
Step 1: Printing a Color Chart
Print a Roland Color System Library color chart.
MEMO The printer name, serial number, media type, ink type, and other information is printed in the color chart.
Procedure
- Load into the printer the media on which the color chart will be printed.
-
Click
 for the queue folder to be used.
The Queue Properties window appears.
for the queue folder to be used.
The Queue Properties window appears. -
Click
 .
.
- Configure the settings in Quality Settings and Color Settings.
IMPORTANT When printing a color chart, the settings from the Queue Properties window are applied to these setting items. You cannot change the settings using the Job Settings window after the job has been added to the job list.
- To close the Queue Properties window, click OK.
-
Click Media in the menu bar, and then click the color chart that you want to print.
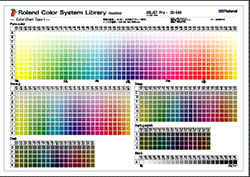
- Color Chart Type-1The colors in the library are categorized by saturation and arranged to vary in hue in the horizontal direction and in brightness in the vertical direction. To print this color chart in its original size, you need A1-size or larger media.
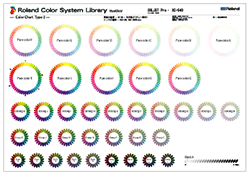
- Color Chart Type-2The colors in the library are categorized by color tone and a color wheel is printed for each tone. (Black colors are arranged linearly by brightness.) To print this color chart in its original size, you need A1-size or larger media.
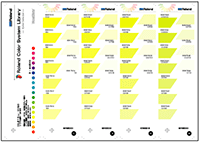
- Color SelectorPrints the ink combination chart. The chart shows the ink combination used for printing each spot color. Although each page is printed in A4 size, you can cut the pieces along the trimming marks and bind them in numeric order (outline numbers) to create a color sample book that can be used to compare the colors.
- Color ChipsPrints 12 color chips per color for 5 colors in A4 size. The colors are categorized by color tone. Click Color Chips and click the tone name to print the color chips for the selected tone.
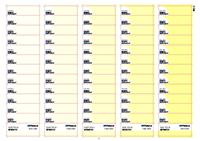 MEMO Color Chips are printed with cutting lines so that the color chips can be trimmed and used individually. If you print the color chips on media with a backing paper using a printer with a cutting function, you can create color chip stickers by setting under Cut Controls to Print & Cut.
The following message appears: The following job will be printed. Do you want to continue?Check whether the media loaded in the printer is large enough for the displayed page size.
- Color Chart Type-1
-
Specify the queue folder with Add Job To and click OK.
The selected type of color chart is added to the job list.
-
Double-click the color chart that was added to the job list.
The Job Settings window appears.
-
Click
 .
.
- Configure the Media Settings and other settings.
- Click OK to close the Job Settings window.
-
Click
 .
The selected color chart is printed.
.
The selected color chart is printed.