
Step 2: Configure the Printing Settings in VersaWorks
Follow the procedure below to set the primer printing method for each job in VersaWorks. Primer can be printed by itself or simultaneously with other colors. The setting made on each job has a higher priority than the printing settings on the entire queue folder.
MEMO Before configuring the printing settings, refer to the instruction manual of the UV printer and complete its setup.
Procedure
-
In the job list, double-click the job whose printing settings you want to configure.
The Job Settings window appears.
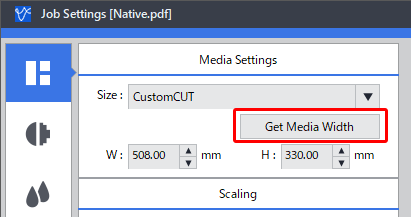
-
Click Get Media Width.
The print area set on the printer is read.
-
Click
 .
.
-
Select the following items in the Quality Settings window.
Printing only primer ink
Setting item Selection Supplementary information Media Type Primer After only the primer ink is printed, spot colors such as white ink and gloss ink are printed. Print Quality High Quality / Standard Select High Quality or Standard. Mode Primer1(v) Select Primer1(v) or Primer2(v).
Normally select Primer1(v). Select Primer2(v)—which is effective on acrylic and glass objects—to print a smooth, even surface on a rough object to be printed on.
Printing primer and CMYK/white ink simultaneously
Setting item Selection Supplementary information Media Type Generic with Primer The primer ink, CMYK ink, and white ink are printed simultaneously. Print Quality High Quality / Standard Select High Quality or Standard. Mode Primer(v)->CMYK(v)
Primer(v)->White(v)
Primer(v)->White(v)HD
Select Primer(v)->CMYK(v), Primer(v)->White(v), or Primer(v)->White(v)HD. Select White(v)HD to print with a white color denser than White(v).
Configure other settings (such as the printing direction and color settings) as necessary.
MEMO Changing Mode displays the locations where primer was specified with shading in green in the layout window.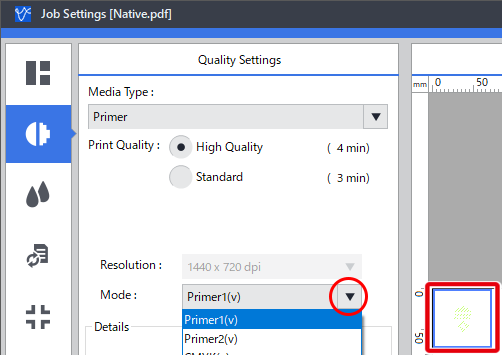
- Click OK.