
3. The height of the object to be printed on is detected automatically.
The height of the object to be printed on is automatically detected, and the print heads are adjusted to the appropriate height for printing.
-
Set up the object to be printed on.
Refer to Steps 1 through 7 of Determining the Print Surface Height and Printing Position to perform Select of Preset and to configure the media reflective intensity setting.
- Tap Change next to Table Height.
-
Open the front cover.
MEMO
Be sure to hold the handle of the front cover and keep holding it until the cover is completely opened or closed.
If you do not open and close the front cover gently, it may break or you may be injured.

-
Move the highest position of the printing surface closer to the head gap sensor.
-
Move the object to be printed on so that it is under the head gap sensor.
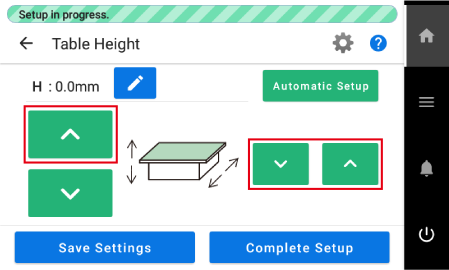
Long tap or tap

 lined up on the right side of the screen to move the table forward or backward.
 -
Move the highest position of the printing surface closer to the head gap sensor.
Long tap or tap lined up vertically on the left side of the screen to bring the highest printing position of the print surface closer to the head gap sensor.

-
Move the object to be printed on so that it is under the head gap sensor.
-
Tap Automatic Setup.
The height of the object to be printed on will be set automatically to a position about 1 mm (39.4 mil) away from the print head's ink emission surface.
MEMOYou can change the distance between the ink emission surface of the print heads and the object to be printed on.
-
Tap Save Settings.
MEMO
Tap Save Settings if the Printing Area or Print Origin settings need to be configured. Tap Complete Setup to finish the setup and return to the home screen, and output will be possible.