
5. Configuring Settings to Match the Media
To ensure the optimal output according to the media size and type, set the minimal amount of items. All items set here can be set individually as well.
- Simple Correction (Auto): Approx. 290 mm (11.42 in.)
- Detailed Correction (Manual): Approx. 375 mm (14.76 in.)
- On the Select Media Output Type screen, select the output type and tap Next.
- Print Only/Print & Cut
Proceed to step 2.
- Cut Only
Switch to the Multi Sensor Adjustment screen. Tap Execute to perform automatic adjustment, then tap OK. This completes the settings for Cut Only.
- Print Only/Print & Cut
- On the Heater Temperature screen, adjust the temperature of the front heater.
- If this is not necessary, tap Next.
- Follow the procedure below to make adjustments.
- Tap
 or
or  to set the Front Heater temperature.
 - Tap Next.
- Tap
- Use the Print Head Height screen to adjust the print head height.
- If this is not necessary, tap Next.
- Follow the procedure below to make adjustments.
- Tap Change
- Open the front cover.
- Move the height-adjustment lever to adjust the head height.
- Close the front cover.
- Tap OK.
- Tap Next.
- Set the Printing Test and Output Start Location on the Nozzle Drop-out Test screen.
- If this is not necessary, tap Next.
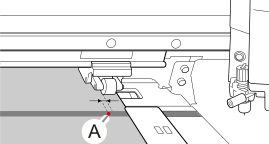
- Follow the procedure below to set Output Start Location.If this setting is not configured, the base point (A) will be set to the following location.
- Feed direction: Blade protector position
- Scan direction: About 2 mm (0.08 in.) from the left edge of the right pinch roller
- Tap .
- Tap
 .
.The cutting carriage moves to the current base point.
- Tap


 and move the cutter center to the position where you want to start cutting.
Tap
or to move the media in the feed direction (forward-back). Tap or to move the cutting carriage in the scan direction (left-right).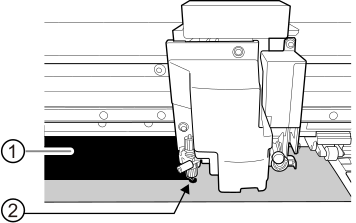
- : Printing area
- : Base point (right edge of the printing area)
- Once the position has been decided, tap Set Base Point Here to confirm it.
The base point position is updated.
- Follow the procedure below to perform Printing Test.
Tap Execute next to Printing Test. For details on what to do after the printing test, refer to Performing Normal Cleaning.
- On the Select Media Adjustment Method screen, select the adjustment method.Here, the media feed correction for reducing horizontal bands and the correction of the landing position of the ink will be adjusted.MEMO
- Simple Correction (Auto) is the recommended adjustment. You can determine the correction values with Detailed Correction (Manual).
- Follow the procedure below to make automatic adjustments.
- Tap .
- Tap Execute on the Batch Automatic Correction screen.
Check the printing area required for the printing test before executing the test.
On successful completion of automatic adjustment, the home screen appears. This completes the settings.
For more information, refer to Automatically Making Required Adjustments.
- Follow the procedure below to make manual adjustments.
- Tap .
- Tap Execute on the Multi Sensor Adjustment screen.
Adjust the reading sensor to the optimal condition. If the adjustment failed, respond to the failure according to the information in Correcting the Reading Sensor.
- Tap Next.
- Tap Execute for Printing Test on the Detailed Feed Correction (Manual) screen. Check the printing area required for the printing test before executing the test.
Set the correction values from the printing test result. For more information, refer to Manual Adjustment: Reducing Horizontal Bands (Feed Correction).
- Tap Save and Proceed.
- Tap Execute for Printing Test on the Detailed Media Gap Adjustment (Manual) screen.
Set the correction values from the printing test result. For more information, refer to Manual Adjustment: Adjusting the Misalignment of the Ink Landing Position (Media Gap Adjustment).
- Tap Save and Exit.
This completes the setup.