After printing, use Sheet Cutting or Perforated Sheet Cutting to separate the media.
You can use Margin After Sheet Cutting to set the margin (A) from the location where sheet cutting is performed to the next printing-start position. You can set the margin between 35 and 75 mm (1.38 and 2.95 in.). The margin is 75 mm (2.95 in.) in the default settings.
IMPORTANT
Reducing the margin may result in the front of the media becoming loose and coming into contact with and possibly damaging the print heads. Be cautious when changing the margin.
It may not be possible to separate some types of media. Some types of media may remain on the platen after separation. If the media remains on the platen, remove it by hand.
If you are using the take-up unit, do not operate the manual switch on the take-up unit leaving the loading lever lowered. Tension is applied to the media by the take-up unit, so avoid operations that pull the media with excessive force.
MEMO
If the distance from the end of the media to the separation location is short, separation may not be performed smoothly.
Procedure
Close the front cover.
If necessary, use the following procedure to set the separation position.
Tap .
Tap Move.
Tap or to set the media to the separation position.
The media is separated at the position in the following figure. Use the media clamp holes as a guideline for this position.
Tap Set Base Point Here.
The separation position is set, and you are returned to the home screen.
MEMO
The Base icon () is added to the home screen to indicate that the base point position has been set.
Tap Sheet Cutting on the operation panel.
Set the margin after media separation as necessary.
Tap Margin After Sheet Cutting.
Tap or to set the margin.
Tap Save.
Tap .
The screen returns to the sheet cutting screen.
Select the sheet cutting method.
Sheet Cutting
This separates the media. Media setup will be canceled.
Perforated Sheet Cutting
The media is perforated without being separated. Media setup will not be canceled.
MEMOIf the media is separated even after you select Perforated Sheet Cutting, use Preferences - Perforated Sheet Cutting to change to the Increase Uncut Locations setting. If the media is heavy or has a large amount that is slack, it can be retained without being separated.
Tap Execute.
The media is separated.
Some RIP software can be set to automatically separate the media after output has finished. For information on how to configure the settings, refer to the manual for the RIP software you are using.
When using a take-up unit, take-up may be interrupted by media separation. Use VersaWorks to set the [Cut Sheet after Output] setting to [Perforated Sheet Cutting], ensuring that media is not separated.

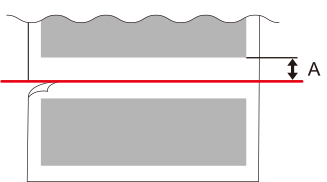
 .
. Move.
Move. or
or  to set the media to the separation position.The media is separated at the position in the following figure. Use the media clamp holes as a guideline for this position.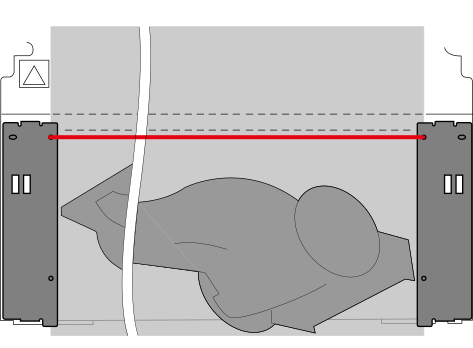
 ) is added to the home screen to indicate that the base point position has been set.
 Sheet Cutting on the operation panel.
 or
or  to set the margin.
 .The screen returns to the sheet cutting screen.