
Changing the Operation Performed when Setting the Printing Test Start Location
- Set up the object to be printed on.
-
Tap
 on the home screen.
-
Tap Change next to Output Start Location.
The Printing Test Start Location screen appears.
-
Tap
 .
.
-
Tap
 or
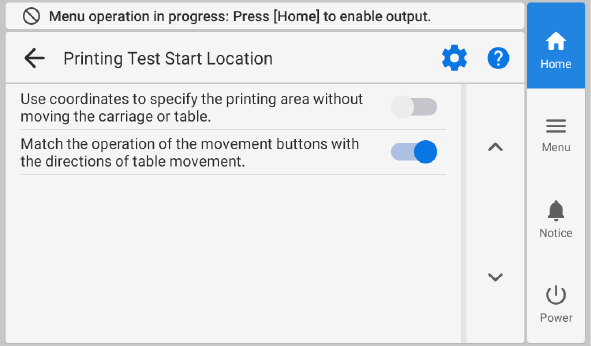
or  to change the settings.
Use coordinates to specify the printing area without moving the carriage or table. Description Configure the Printing Test Start Location settings without moving the print-head carriage or flat table.
Tap
 ,
,  ,
,  , and
, and  on the operation panel to specify the location.
Move the print-head carriage or flat table, and then use the pointer to check the position of the print-head carriage or table as you configure settings.
The print-head carriage and flat table are moved in conjunction with the
, , , and operations on the operation panel.Match the operation of the movement buttons with the directions of table movement. Description Tap
on the operation panel to move the flat table toward the back or to move the flat table toward you.Tap
on the operation panel to move the flat table toward you or to move the flat table toward the back. -
Tap
 .
.
-
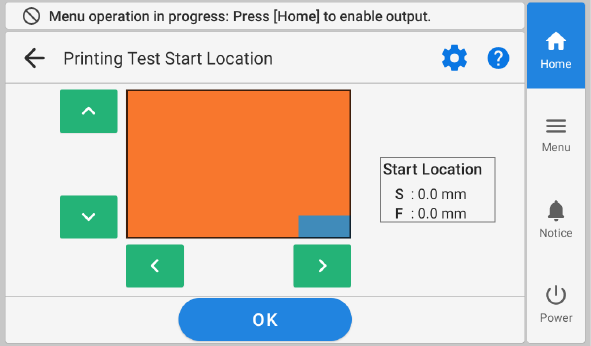
Set the printing test start location.
Tap
, , , and to set the printing test start location.MEMOThe [S] and [F] coordinate values are displayed as the printing area required for the printing test (displayed in blue) is moved up, down, left, and right.
- Tap OK.
-
Tap Execute next to Printing Test.
Printing of the test pattern starts.MEMO
Depending on the color of the object to be printed on, it may be difficult to check the white ink test pattern.
Tap
on the home screen, select in that order, and then tap Execute to make the base of the white ink black, making it easier to check the white ink.Nozzle Drop-out Test (Base: Black) is not displayed if the machine is not equipped with white ink.
-
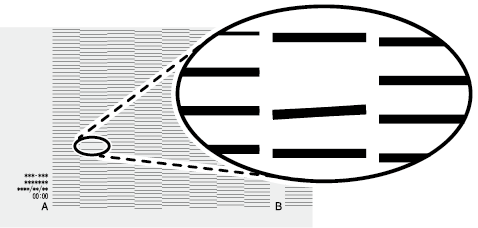
Check whether there is dot drop-out or dot displacement in the test pattern.
Missing blocks indicate dot drop-out. Collapsed or inclined blocks indicate dot displacement.
-
If dot drop-out or dot displacement is present, perform normal cleaning.
If the problem persists, try performing normal cleaning again. If the printer has been used for a long period, dot drop-outs may not be fixed even after you perform normal cleaning two or three times. In that situation, perform Medium Cleaning.
If there is no dot drop-out or dot displacement, proceed to the next step.
-
Tap
 to return to the home screen.
MEMODefault setting:
to return to the home screen.
MEMODefault setting:- Use coordinates to specify the printing area without moving the carriage or table.: Off
- Match the operation of the movement buttons with the directions of table movement.: On