If flat material is used, it must be at least 70 mm (2.76 in.) longer than the vertical size of the cut data. This is the length required for the grit roller to feed out the material to the front or rear.
Refer to the figure below and ensure that there are sufficient margins at the front and rear, the right and left of the material.
50 mm (1.97 in.) or more
15 mm (0.60 in.) or more
25 mm (0.99 in.) or more
IMPORTANT
Materials with any of the following characteristics cannot be used: Uncurl and straighten the shape of the material before loading.
The material is curled upward.
The leading edge of the material is bent or creased.
1. Loading Flat Material
These instructions describe how to set A4 material.
Procedure
Lower the loading lever.
IMPORTANT
Do not use excessive force when moving the loading lever.
Doing so may damage it.
Insert the material from the front of the machine.
Set the material in the position shown in the figure below.
The setting position differs according to the size of the material to be loaded.
Move the pinch rollers to the edges of the material so that each one is within the grit patterns.
Set the material so the left and right margins () from the edges of the material to the pinch rollers are uniform.
MEMO
When using material with a large amount of feed (long material), set the left and right margins to approximately 25 mm (0.98 in.).
MEMO
Sprocket-fed perforated material has perforations along each edge for material feeding. If the pinch rollers are positioned over the perforations, the material cannot be fed correctly. When using this material with the machine, place the pinch rollers away from the perforations.
Align the left edge of the material so that it lies approximately parallel to the guide line ().
Figure 1. View from above the Machine
Raise the loading lever.
The material is secured in place.
MEMO
Use the following link to view a reference video for this procedure.
The cutting carriage moves to the left pinch roller position, and the material moves forward and backward.
When initialization ends, the cuttable width and length are displayed on the display.
After operation stops, check the following items.
Left edge of the material is not inclined towards the guide line
Pinch rollers are not off the material
Figure 2. View from above the MachineMEMO
When the material is inclined or when pinch rollers are off the material, the material cannot be set up correctly. Perform the following procedure, and restart material setup from the beginning.
Unsetup the material, and return the cutting carriage to the stand-by position.
Press the power button for 1 second or longer to turn off the power.
Press [MENU].
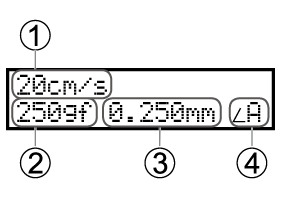
Make sure the values for the items are displayed.
Figure 3. The value of the following figure is a reference example.
Cutting Speed
Cutting force
Blade tip offset
Orientation of cutting coordinates
IMPORTANT
If flat material longer than 1.6 m (5.25 ft.) is loaded, the machine recognizes it as a roll.
If this is the case, feed the material forward and confirm that material can be fed normally.
If you start cutting without confirming the material feeding, the material may slip during cutting, or the cut quality may be degraded with improper feeding.


 MEMO
MEMO


 When initialization ends, the cuttable width and length are displayed on the display.
 When the material is inclined or when pinch rollers are off the material, the material cannot be set up correctly. Perform the following procedure, and restart material setup from the beginning.