
Increasing the Negative Pressure Value of the Print Heads
Adjust the negative pressure to be suitable for your usage environment. Ink dropping occurs when the negative pressure value is too low. If this is the case, set a larger value.
MEMO
Check that the print-head carriage has returned to the maintenance station. If the machine detects an intrusion into the movable range of the print-head carriage while the carriage is not in the maintenance station, the safety protection function is activated to stop the machine.Safety Protection Function
Procedure
- Attach the object to be printed on for the printing test.
- Adjust the print head height automatically.
- Configure printing settings.
- Perform a printing test.
-
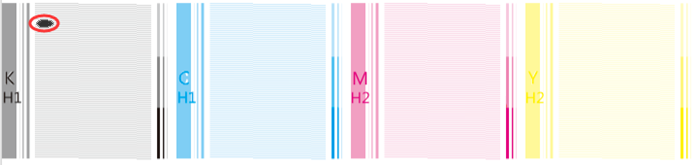
Check the result of the printing test.
Check where dot drop-out or dot displacement occurs.

-
Adjust the negative pressure of the print head for which ink dropping is occurring.
Adjust the negative pressure for the print heads K, C, Y, and M on Negative Pressure (colors) and for the print heads Gl and Wh on Negative Pressure (White).
IMPORTANT- Make a note of the negative pressure values P - 1 and P - 2 before starting adjustment.
- To adjust the negative pressure, adjust the values of both P - 1 and P - 2. Be sure to set a value for P - 2 that is larger than P - 1.
- Change the value by 0.1 at a time during adjustment.

-
Press the [▲] button once.

-
Press the [▲] button once.

-
Perform a printing test.
Perform Steps 1 to 4, and perform a printing test.
-
Check the result of the printing test.
Check whether or not the problem has been resolved. It the problem persists, repeat adjustment until it is resolved.