
Correcting the Milling Position
The accuracy of the milling machine may change if it is used for a long period of time or the surrounding environment changes. Performing automatic correction will correct the ATC magazine and rotary axis positions.
Situations Requiring This Work
- When installing or moving the machine
- When replacing the spindle unit
- When the milling position is misaligned
- When symptoms such as a level difference or a hole in the Z direction occur in the milling results
 |
 |
 |
| Detection pin | Automatic correction jig | Cloth for care |
If automatic correction does not correct the milling position or if you need milling results with higher accuracy, we recommend that you perform manual correction.
If you perform automatic correction after manual correction, the correction value of manual correction will be initialized.
Automatic correction
2. Attach the automatic correction jig.
-
Open the adapter area cover.

-
With its adapter ID facing you, insert the automatic correction jig into the adapter stocker.
Insert the adapter slowly.
IMPORTANTInserting it with too much force will make the adapter strike the inside of the machine, possibly leading to injury and workpiece damage.
 MEMO
MEMOTo check whether the adapter has been attached correctly, gently pull the adapter toward you.
It has been attached correctly if the protrusions on the adapter stocker catch on the grooves on the adapter.

- Close the adapter area cover.
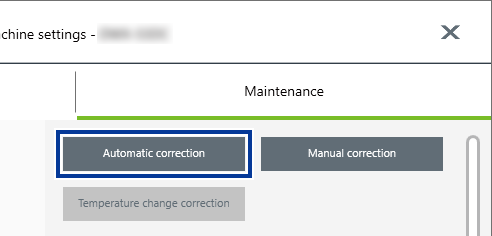
3. Perform automatic correction.
- Show VPanel.
-
Open the Machine settings window.
-
Click
 .
.
The Machine settings window is displayed.
-
Click
-
On the Maintenance tab, click Automatic correction.
-
Follow the on-screen instructions to perform automatic correction.
After performing the work displayed in the window, click OK to proceed to the next window.
- The automatic correction is finished when the operation complete message is displayed.
4. Remove the detection pin and the automatic correction jig.
Do not pull the adapter with excessive force when removing it.
Doing so may result in injury arising from your hand or arm hitting something.
If an adapter remains in the clamp even after correction is finished, hold down the touch sensor on the built-in panel.
The adapter is returned to its adapter stocker.
- Open the tool area cover and the adapter area cover.
-
Remove the detection pin from the tool stocker.

-
Remove the automatic correction jig from the adapter magazine.
Slightly lift up the automatic correction jig, and then pull it out slowly so it does not catch on the stocker.

-
Store the detection pin and the automatic correction jig in the bottom storage.
MEMO
Store the automatic correction jig () with the surface shown in the following figure facing up.
