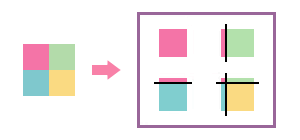
Select one of the following from Type under Overlap.
Top-Left
Creates overlap widths at the top and left of tiles. Set this to decide the positions of the remaining three tiles after the top left (pink) position is decided.
ALL Corners
Creates overlap widths around each tile. Set this when the tile to use as the reference for positioning is not specified.
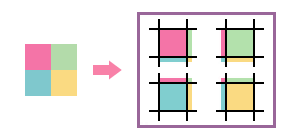
Enter the overlap width in Size.
To print overlap lines, select the Print Overlap Lines checkbox.
MEMOThe line width and color of the overlap lines can be changed.
Enter the value in Thickness under Overlap.
Click Color Settings.
Select RGB or CMYK from ColorSpace, and then adjust the slider bars or enter the values for each color.


 on the left side of the job tool area, and then click
  Job Settings.
 Clip and Tile.
 MEMO The line width and color of the overlap lines can be changed.