
Adding Trim Marks or Margin Marks
| Type | Mark | Details |
|---|---|---|
| Trim Marks |  | Prints trim marks added at the four corners of the image as shown in the diagram. |
| Margin Marks | 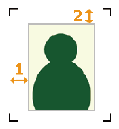 | Leaves margins around the image and prints the margin marks at the four corners of the margin as shown in the diagram. Set the horizontal margin with Horizontal (1) and the vertical margin with Vertical (2) for the image. |
| FOTOBA Cutline Marks | 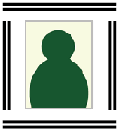 | When a Fotoba cutter is in use, adds specialized cut marks before printing. Set the positions in which to print the marks and the spacing between the image and the marks. |
| KALAXY Cutline Marks | 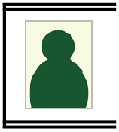 | When a Kala cutter is in use, adds specialized cut marks before printing. There are two types of cut marks. To match the specifications of these marks, specify the horizontal line type and whether to add a stop mark. |
| KALA RoXY Cutline Marks | 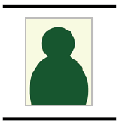 | |
| Neolt Cutline Marks |  | When a Neolt cutter is in use, adds specialized cut marks before printing. |
MEMO You can set Crop Marks (Print&Cut Alignment) regardless of whether margin marks or trim marks are present.
Procedure
- Perform the operation shown below according to what is being set.
- Job
- Double-click the job to set.
- Right-click the job to set, and then click .
- With a job selected, click
 on the left side of the job tool area, and then click
  Job Settings.
The Job Settings window appears.
- Queue folder: Click for the queue folder.
The Queue Properties appears.
- Job
- Click
 Mark.
Mark. - Select the mark to be added from Type under Marks.
- When assigning margin marks, Fotoba marks, or the two types of Kala marks, set the details.
- Margin marks
- Specify the horizontal margin with Horizontal.
- Specify the vertical margin with Vertical.
- Fotoba marks
- Specify the positions in which to print the marks with Print Location.
- Specify the spacing between the vertical/horizontal marks and the image with Image/Mark Spacing.
- KALAXY marks
- Specify Double Line or Single Line with Horizontal Line Type.
- Select the Add stop marks checkbox to print the three lines with spacing of 150 mm [5.91 in.] from the last mark.
- KALA RoXY marks
- Select the Add stop marks checkbox to print the three lines with spacing of 150 mm [5.91 in.] from the last mark.
- Margin marks
- Click OK.
- Any changes made in Job Settings will be applied, and you will be returned to the main window.
- When changes are made in Queue Properties:
- When a message for saving the printing settings appears, click OK.
To apply the changes to a job already in the queue folder, right-click the job and click . The changes are reflected in the layout area of the main window.