
Performing a Nozzle Drop-out Test
When performing printing tests successively, you can select Feed (vertical printing), Scan (horizontal printing), or None (same location printing) as the printing position for the second and later tests in comparison to the first test.
-
Set up the object to be printed on.
Determining the Print Surface Height and Printing Position
For a printing test, set the printing area with W (width) of 110 mm (4.34 in.) or more and L (length) of 110 mm (4.34 in.) or more. An error will occur and printing tests cannot be performed if the area is smaller than this.
-
Tap
 on the home screen.
-
To change the printing test start position, tap Change under Output Start Location.
If you have tapped
 on the Printing Test Start Location screen and enabled Use coordinates to specify the printing area without
moving the carriage or table., specify the values for [S] and [F].
on the Printing Test Start Location screen and enabled Use coordinates to specify the printing area without
moving the carriage or table., specify the values for [S] and [F].For more information on settings, refer to Changing the Operation Performed when Setting the Printing Test Start Location.
-
Tap
 ,
,  ,
,  , or
, or  once.
The flat table and print-head carriage will move, and the pointer will point to the previously-set print origin.
once.
The flat table and print-head carriage will move, and the pointer will point to the previously-set print origin.Subsequently, when you have finished setting the print start position, the print-head carriage will automatically return to the standby position to protect the print heads from drying out if they have not been moved by the user for approximately three minutes. Perform the procedure again.
MEMOIf Use coordinates to specify the printing area without moving the carriage or table. is enabled, the print-head carriage will not move, so the print-head drying protection function will not work.
-
Set the Printing Test Start Location.
Long tap or tap
, , , and to set the printing test start position.MEMO- If Use coordinates to specify the printing area without moving the carriage or table. is enabled, specify the values for [S] and [F].
- The printing test start position you have set will remain in effect until you change to a different media.
-
Tap
-
Tap Execute next to Printing Test.
Printing of the test pattern starts.MEMO
Depending on the color of the object to be printed on, it may be difficult to check the white ink test pattern.
Tap
on the home screen, select in that order, and then tap Execute to make the base of the white ink black, making it easier to check the white ink.Nozzle Drop-out Test (Base: Black) is not displayed if the machine is not equipped with white ink.
-
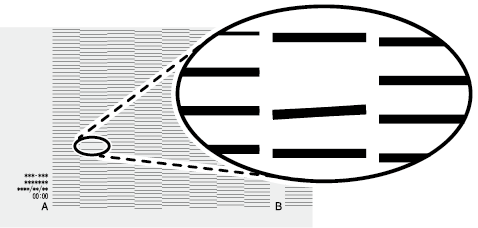
Check whether there is dot drop-out or dot displacement in the test pattern.
Missing blocks indicate dot drop-out. Collapsed or inclined blocks indicate dot displacement.
-
If dot drop-out or dot displacement is present, perform normal cleaning.
If there is no dot drop-out or dot displacement, proceed to the next step.
-
Tap
 to return to the home screen.