
Registering and Setting Up the Nozzle Drop-out Test Paper
We recommend registering the media to be used for the nozzle drop-out test in order to operate the machine efficiently.
If you register a landscape A5 size (210 mm × 148 mm [8.27 in. × 5.83 in.]) paper as the media, you can perform nozzle drop-out tests in up to four locations on a single sheet of media by changing the Print Origin.
Procedure
- Press the sub power button.
-
Open the front cover.

-
Pull out the white ink cartridge and mix it.
Shake it about 50 times (for approximately 20 seconds), and then reinsert it.
-
Load the nozzle drop-out test paper.
The area inside the white line (A) is the approximate maximum printing area. Place and secure the media in alignment with the white frame. Secure it here with tape.

- Close the front cover.
-
On the Utility home screen, click
 Setup.
-
Click
 .
MEMO In Utility, "media" is used on the window used to register/manage objects.
.
MEMO In Utility, "media" is used on the window used to register/manage objects.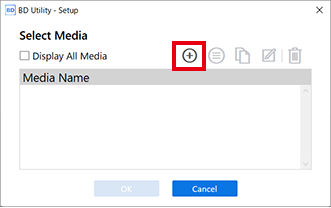
-
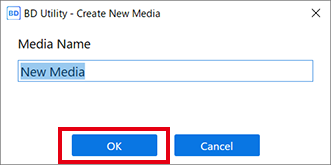
Enter a name that you will recognize as being for the nozzle drop-out test, and then click OK.
Previously registered media names cannot be used.
- Select Opaque on the Object Type window, and then click OK.
-
Click Change next to Flat Table Height, and then set the height of the nozzle drop-out test paper.
-
Click
 or
or  on the right side of the window to align the nozzle drop-out test paper on the flat table with the forward-back position of the head gap sensor.
MEMO You can select 0.1 mm (0.004 in.), 1 mm (0.04 in.), 10 mm (0.39 in.), or 50 mm (1.97 in.) as the single-click moving distance.
on the right side of the window to align the nozzle drop-out test paper on the flat table with the forward-back position of the head gap sensor.
MEMO You can select 0.1 mm (0.004 in.), 1 mm (0.04 in.), 10 mm (0.39 in.), or 50 mm (1.97 in.) as the single-click moving distance. -
Click on the left side of the window to move the nozzle drop-out test paper on the flat table closer to the head gap sensor.
Move the highest printing position of the object up to a position (a) a few mm away from the head gap sensor without coming into contact with the head gap sensor.

-
Click
-
Click Change next to Print Origin and Printing Area, and set range of the nozzle drop-out test.
The printing size for the nozzle drop-out test is approximately 90 mm × 51 mm (3.54 in. × 2.01 in.) (landscape).MEMO When the Printing Area setting is finished, the print-head carriage returns to its original position after it has been left in the same position for approximately 3 minutes to prevent the print heads from drying out. Perform the procedure again.
-
Click , ,
 , or
, or  , and then move the pointer to specify the print origin (lower right of the printing area).
The print-head carriage moves in the left-right direction and the flat table moves in the forward-backward direction. The position that the pointer illuminates serves as the print origin.
, and then move the pointer to specify the print origin (lower right of the printing area).
The print-head carriage moves in the left-right direction and the flat table moves in the forward-backward direction. The position that the pointer illuminates serves as the print origin.
MEMO About Printing AreaSince the Print Origin is unchanged and the Origin Relative is specified here, the upper left of the printing area is automatically set to the maximum position (S: 210 mm [8.26 in.], F: 148 mm [5.82 in.]).
-
Click
-
Click OK.
Setup in progress. is displayed. When setup is completed, you are returned to the home screen, and the registered object name, and the set Flat Table Height, Print Origin, and Printing Area are displayed.
MEMO If you are printing continuously on the same media, such as when performing a nozzle drop-out test followed by cleaning and then another nozzle drop-out test, click  , and then change the print origin registered in List of Media Settings.
, and then change the print origin registered in List of Media Settings.