
Adding Trim Marks or Margin Marks
| Type | Mark | Details |
|---|---|---|
| Trim Marks | 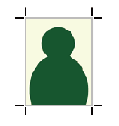 | Prints trim marks added at the four corners of the image as shown in the diagram. |
| Margin Marks | 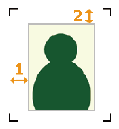 | Leaves margins around the image and prints the margin marks at the four corners of the margin as shown in the diagram. Set the horizontal margin with Horizontal (1) and the vertical margin with Vertical (2) for the image. |
| FOTOBA Cutline Marks |  | When a Fotoba cutter is in use, adds specialized cut marks before printing. Set the positions in which to print the marks and the spacing between the image and the marks. |
| KALAXY Cutline Marks |  | When a Kala cutter is in use, adds specialized cut marks before printing. There are two types of cut marks. To match the specifications of these marks, specify the horizontal line type and whether to add a stop mark. |
| KALA RoXY Cutline Marks |  | |
| Neolt Cutline Marks |  | When a Neolt cutter is in use, adds specialized cut marks before printing. |
| Graphtec Registration Marks |  | When a Graphtec cutter is in use, adds specialized cut marks before printing. |
| OPOS Marks | 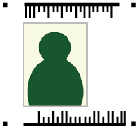 | When a Summa cutter is in use, adds specialized cut marks before printing. |
- You can set Crop Marks (Print&Cut Alignment) regardless of whether margin marks or trim marks are present.
- When you add Graphtec registration marks or OPOS marks, you cannot print color bars.
- Perform the operation shown below according to what is being set.
- Job
- Double-click the job to set.
- Right-click the job to set, and then click .
- With a job selected, click
 on the left side of the job tool area, and then click
  Settings.
The Settings window appears.
- Queue folder: Click for the queue folder.
The Queue Properties appears.
- Job
- Click
 Mark.
Mark. - Select the mark to be added from Type under Marks.
- Set the details.IMPORTANT There are no settings for trim marks or for Neolt.
- Margin marks
- Specify the horizontal margin with Horizontal.
- Specify the vertical margin with Vertical.
- Fotoba marks
- Specify the positions in which to print the marks with Print Location.
- Specify the spacing between the vertical/horizontal marks and the image with Image/Mark Spacing.
- KALAXY marks
- Specify Double Line or Single Line with Horizontal Line Type.
- Select the Add stop marks checkbox to print the three lines with spacing of 150 mm [5.91 in.] from the last mark.
- KALA RoXY marks
- Select the Add stop marks checkbox to print the three lines with spacing of 150 mm [5.91 in.] from the last mark.
- Graphtec registration marks
- PatternSpecify the registration mark type.
- 4 Points Type 1
- 4 Points Type 2
- Segment Area Type 1
- Segment Area Type 2
- Barcode TypeMEMO
With Continuous Operation (Front Edge Only), the barcode is printed after the other printing finishes. With Continuous Operation (Rear Edge Only), the barcode is printed before the other printing starts.
Use Continuous Operation (Rear Edge Only) when you are performing continuous printing on roll media, taking the media up, and then loading the media in a Graphtec cutter.
With Standard, the entire process is completed each time. With Continuous Operation (Both Edges), Continuous Operation (Front Edge Only), and Continuous Operation (Rear Edge Only), the following process is repeated: the barcode is read, cutting is performed, the barcode is searched for and read, and cutting is performed.
- None
- Standard
- Continuous Operation (Both Edges)
- Continuous Operation (Front Edge Only)
- Continuous Operation (Rear Edge Only)
- Margin
Specify the length from the image to the registration mark. This can be set when Barcode Type is set to None or Standard.
- Min Segment Length
When Pattern is set to Segment Area Type 1 or Segment Area Type 2, specify the minimum length of the intermediate registration mark.
- White around marks
To make it easier to read registration marks and barcodes on transparent or milky white media, print the Wh plate around the registration marks/barcodes. When a mode that includes Wh such as Wh -> CMYK or CMYK -> Wh is selected with , you can turn this setting on.
- Pattern
- OPOS marks
- Barcode TypeMEMO With OPOS (Bottom only), the barcode is printed after the other printing finishes. Use this setting when you are performing continuous printing on roll media, taking the media up, and then loading the media in a Summa cutter.
- None
- OPOS (Both)
- OPOS (Bottom only)
- Margin
Specify the length from the image to the mark.
- Barcode Type
- Margin marks
- Click OK.
- Any changes made in Settings will be applied, and you will be returned to the main window.
- When changes are made in Queue Properties:
- When a message for saving the printing settings appears, click OK.
To apply the changes to a job already in the queue folder, right-click the job and click . The changes are reflected in the layout area of the main window.
MEMO If you have set Graphtec registration marks or OPOS marks, the ID for Graphtec Studio2 or for Summa GoSign will be acquired at this point in time. - Perform printing.
- Graphtec Registration Marks
If Configure Advanced Print Settings under on the menu bar is on, you can specify whether to link with Graphtec Studio2 in the same window. Even if this setting is off, you can right-click the corresponding job and click to link with this software.
- OPOS Marks
If Configure Advanced Print Settings under on the menu bar is on, you can specify whether to save data in the Summa GoSign hot folder in the same window. Even if this setting is off, you can right-click the corresponding job and click to save data in the hot folder.
IMPORTANT Refer to Configuring Hot Folder Settings for Summa GoSign and create a hot folder in advance. If this setting has not been configured, you cannot save data.
- Graphtec Registration Marks