
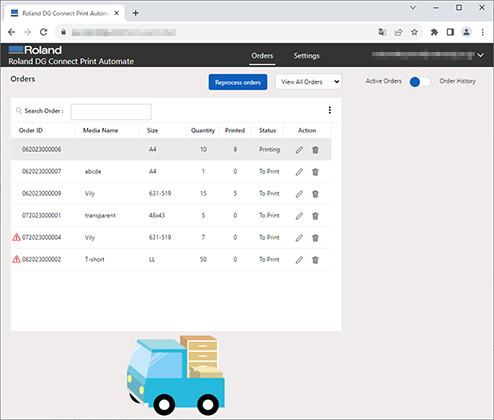
Orders tab
The items that can be set on the Orders tab screen vary depending on the account Role setting.
An order where a caution mark ( ) is displayed indicates that a jig has not been set.
Orders tab screen when the account Role is Admin
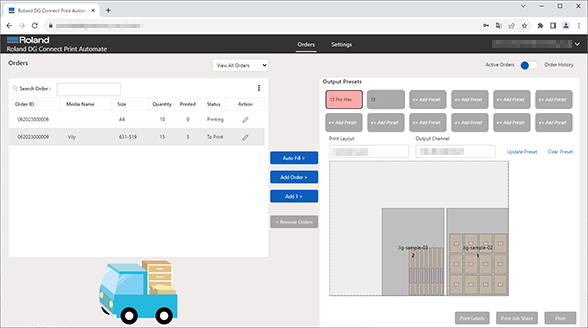
Orders tab screen when the account Role is Power User or Operator
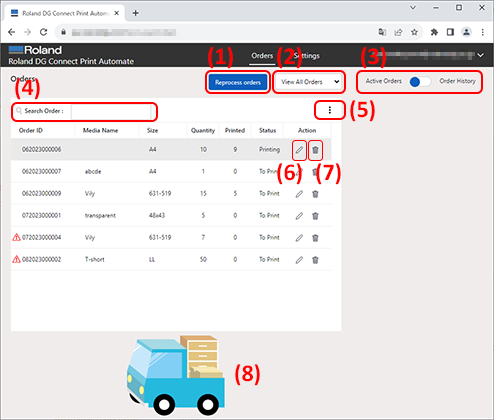
Orders tab - for Admin
| No. | Item | Description |
|---|---|---|
| 1 | Reprocess orders | Reprints a processed order. |
| 2 | View All Orders / Unassigned Orders | Select the conditions for the orders displayed in the list. |
| 3 | Active Orders / Order History | Changes between unprocessed orders and the order history. |
| 4 | Search Order | Displays only orders which contain the entered characters. |
| 5 | Show/Hide Columns | Switches between showing and hiding the order information. |
| 6 |  |
Change the quantity, associate with a jig, and assign workers. Click to display Edit order display. |
| 7 |  |
Deletes the order. This work can only be performed by an account where this operation is permitted. |
| 8 | Preview | Displays a preview of print image for the selected order. |
Edit order display
![PAM-Web_display_[edit_order].png](pdu1698395073822.png)
| No. | Item | Description |
|---|---|---|
| 1 | Order ID | Displays the order number. The number is assigned automatically and cannot be changed. |
| 2 | Dealer Order ID | If the order data sent from e-commerce or other order receiving system contains the Dealer ID information, it is displayed here. |
| 3 | Frame | Displays the file name. |
| 4 | Size | If the order data sent from e-commerce or other order receiving system contains the Size information, it is displayed here. |
| 5 | Total Quantity | This is the number of orders received from the customers. |
| 6 | Print Quantity | This is the remaining number of orders that have not yet been printed. It is possible to assign jigs only in a quantity equal to the number of unprinted orders. |
| 7 | Jig | Select the jig to use when printing this order. |
| 8 | Assigned To | Assign the person responsible for the work of this order. This can be set only by a user who has "Change Order Assignee" privilege (Admin only in the presets). A Power User or Operator user who has this privilege can only change the assignment of an order which was assigned to that user. |
| 9 | Preview | Displays a preview of the print image for the order. |
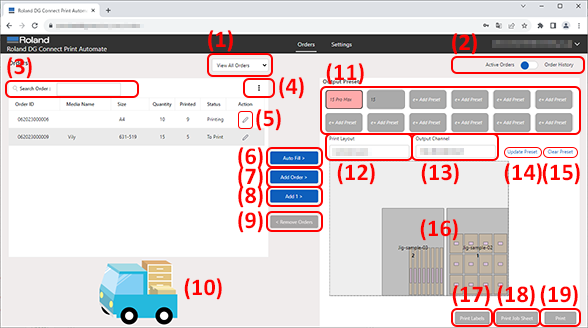
Orders tab - for Power User or Operator
| No. | Item | Description |
|---|---|---|
| 1 | View All Orders / Active Output Preset/ All Output Preset / No Output Preset | Select the conditions for the orders to display in the order list. |
| 2 | Active Orders / Order History | Changes between displaying unprocessed orders and displaying the order history. |
| 3 | Search Order | Displays only orders which contain the entered characters. |
| 4 | Show/Hide Columns | Switches between showing and hiding the order information. |
| 5 | |
Change the quantity and associate with a jig. Click to display Edit order display. |
| 6 | Auto Fill | This pastes all print data without remainder into the print layouts which include the jigs associated with the order. It finds the corresponding print layouts among all Output Presets, and processes them automatically. |
| 7 | Add Order > | This pastes all print data without remainder into the print layout of the selected Output Preset. This is enabled only when the print layout of the selected Output Preset is a print layout that contains a jig associated with an order. |
| 8 | Add 1 > | This pastes one print data to a jig where print data has not yet been pasted. |
| 9 | < Remove Orders | Cancels the pasting of print data to the jig. |
| 10 | Preview (Order) | Displays a preview of the image to be printed. |
| 11 | Output Presets | This is a list of Output Presets. To set or change an Output Preset, click Update Preset. When the print layout or Output Channel is set, the button becomes pink. The button will be orange for the Output Preset for which print data has been assigned. |
| 12 | Print Layout | Displays the print layout that is set for the Output Preset. It is not displayed if it is not set. |
| 13 | Output Channel | Displays the Output Channel (output device and input port or input folder) that is set for the Output Preset. It is not displayed if it is not set. |
| 14 | Update Preset | Set or change the Output Preset. Click to display the Output Presets display. |
| 15 | Clear Preset | Clears the Output Preset settings. |
| 16 | Preview (Print Layout) | Displays the print layout that is registered for the Output Preset. |
| 17 | Print Labels |
Exports a label including the order number, order information, and print data (preview) as a PDF file. The label is applied to the printed product, and is used to indicate the contents. |
| 18 | Print Job Sheet | Exports the information of the print data that was pasted to the print layout and jig as a PDF file. |
| 19 | Outputs the print data to the output destination (Output Channel) that was registered in the Output Preset. |
Edit order display
| No. | Item | Description |
|---|---|---|
| 1 | Order ID | Displays the order number. The number is assigned automatically and cannot be changed. |
| 2 | Dealer Order ID | If the order data sent from e-commerce or other order receiving system contains the Dealer ID information, it is displayed here. |
| 3 | Frame | Displays the file name. |
| 4 | Size | If the order data sent from e-commerce or other order receiving system contains the Size information, it is displayed here. |
| 5 | Total Quantity | This is the number of orders received from the customers. |
| 6 | Print Quantity | This is the remaining number of orders that have not yet been printed. It is possible to assign jigs only in a quantity equal to the number of unprinted orders. |
| 7 | Jig | Select the jig to use when printing this order. |
| 8 | Assigned To | Assign the person responsible for the work of this order. This can be set only by a user who has "Change Order Assignee" privilege (Admin only in the presets). A Power User or Operator user who has this privilege can only change the assignment of an order which was assigned to that user. |
| 9 | Preview | Displays a preview of the print image for the order. |
Output Presets display
![PAM_Web_display_[output_presets].png](ecs1701663958930.png)
Register the print data output channel and printing settings in advance.
| No. | Item | Description |
|---|---|---|
| 1 | Print Layout | Select the print layout to use for printing. This can be selected only when the Location in the user account which is attempting to set Output Presets is the same as the Location of the jig assigned to the print layout. |
| 2 | Master Data Filter | Select the printing settings to deliver to the RIP. When the printing settings were already configured with Automation Rules, the settings here for the same setting items will take priority. If options are not displayed, or if the option you want to select has not been registered, click Add. |
| 3 | Output Channel | Select the print data output destination (input port of a printer registered in VersaWorks or save folder). When an output destination is selected, "Edit Output Channels" becomes enabled. |
| 4 | Define Job Type | To output the print data added to an order as is, select "Normal Print Job." To add an additional job such as a white plate to the print data, select "MultiJob Grouping." Note: This item is not displayed when Hot Folder is set for the Output Channel. |
| 5 | Printer Setting File | Select whether to use the printing settings that are set in the order, or to use the VersaWorks printing settings. Note: This item is not displayed when Hot Folder is set for the Output Channel. |
| 6 | Queue preset parameters | When "Use VersaWorks Printing Settings" was selected for Printer Setting File, the settings are displayed here. Note: This item is not displayed when Hot Folder is set for the Output Channel. |
| 7 | Define Operation Commands - Return To Origin | When turned on, the printer head returns to the printer origin (printing start point) after printing is completed. Note: This item is not displayed when Hot Folder is set for the Output Channel. |
| 8 | Define Operation Commands - Action | Select the process to execute with VersaWorks. Note: This item is not displayed when Hot Folder is set for the Output Channel. |
| 9 | Name The Output Preset | Enter the name of the Output Preset. |