
Settings tab
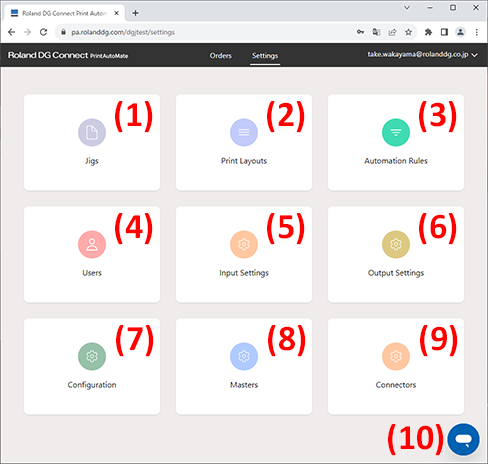
The items that can be set vary depending on the account access rights.
Settings which the account does not have access rights for are not displayed or are disabled.
| No. | Item | Description |
|---|---|---|
| 1 | Jigs | Set the fixing jigs of the object and the positioning (arrangement). |
| 2 | Print Layouts | Set the installation position of the jig on the output device. |
| 3 | Automation Rules |
Set the conditions for sorting, and configure the printing or add information to the sorted orders. Click to display the Automation Rules - Create your Rule Set display. |
| 4 | Users | Register a new user, delete a user, change the access rights, and make other settings. Adding or changing an account can only be performed by a user who has Admin privileges. |
| 5 | Input Settings |
Set these to load order information such as quantity and clothing size into PAM. Click to display the Input Settings - Input Settings display. |
| 6 | Output Settings |
Set the Output Channels. If you have Admin privileges, you can set the Output Channels for all registered users. Click to display the Output Settings - My Output Channels display. |
| 7 | Configuration | Configure the PAM environment. |
| 8 | Masters |
Adds or changes the options for Users, and the options for the Filter setting of the Automation Rules. Click to display the Masters - Masters display. |
| 9 | Connectors | The Input Manager and Output Manager installer is available for download. |
| 10 | ChatBot | Enter a question to receive an automated answer within the bot's range of understanding. |
Jigs
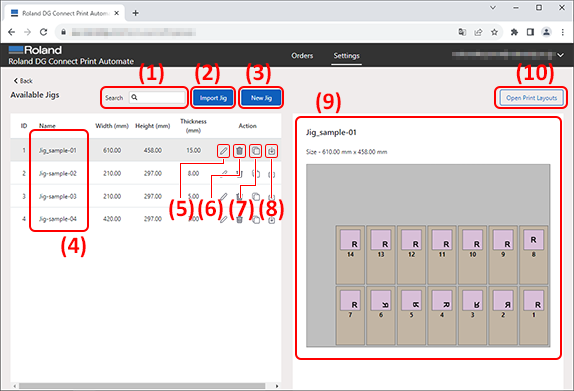
Create fixing jigs for the object and set the positioning (arrangement).
| No. | Item | Description |
|---|---|---|
| 1 | Search | Search for the jig "Name" to display the jigs starting with the entered characters. |
| 2 | Import Jig | Import the jig data that was saved in a file. This allows a jig from a different PAM license to be transferred. Saving a jig that is no longer used will also allow it to be used again when needed. |
| 3 | New Jig |
Creates a new jig. Click to display the Add New Jig display. |
| 4 | Name | Displays a list of the registered jig names. |
| 5 |  |
Change the jig settings. Click to display the Edit Jig display. |
| 6 |  |
Deletes the jig. |
| 7 |  |
Copies a jig and adds a new jig. |
| 8 |  |
Saves the jig to a file. |
| 9 | Preview | Displays a preview of the selected jig. |
| 10 | Open Print Layouts | Switches from the jig settings screen to the Print Layouts. |
Add New Jig display
![PAM-Web_display_[add_new_jig].png](qnd1698398443786.png)
Items marked by * are items where input is required.
"Object box" indicates the exterior frame of the object. "Image box" indicates the frame where print data is inserted (print frame).
| No. | Item | Description |
|---|---|---|
| 1 | Name | Change the jig name. |
| 2 | Width, Height | Enter the jig width and length (depth). |
| 3 | Thickness | Enter the jig thickness. |
| 4 | Reference | Remarks, notes |
| 5 | Default Spacing |
Enter the distance (X direction) from the neighboring object. When adding an object, position at this distance in the X direction. |
| 6 |
Object box X, Y |
Enter the amount of offset from the lower right point of the jig to the lower right point of the Object box. |
| 7 |
Object box Width, Height |
Enter the size of the exterior frame on the object. |
| 8 |
Image box X, Y |
Enter the amount of offset from the lower right point of the Object box to the lower right point of the print frame. |
| 9 |
Image box Width, Height |
Enter the print frame size. |
| 10 |
Image box Rot. |
Select the rotation angle for the image to be inserted in the print frame. |
| 11 |
Image box Mirror |
Reverses the image to be inserted in the print frame left/right or top/bottom. |
| 12 |
Image box Scale |
Select the scale for the image to be inserted in the print frame.
|
| 13 |
Image box Ref. |
Select the position for the image to be inserted in the print frame. |
| 14 | |
Deletes the Object box. |
| 15 | |
Adds one more of the same Object box. |
| 16 |  , ,  |
Change the order of the Object boxes. |
| 17 | Delete All | Deletes all Object boxes. |
| 18 | Add Multiple |
Copies an Object box and positions each copy on each jig. Click to display the Object box details display. |
| 19 | + Add Object Box | Adds one Object box. |
| 20 | Location | Select the jig placement location. Click to display Select Locations. To add an option, click Add Value. |
| 21 | Printer Type | Select the printer type where the jig can be installed. Click to display the Select Printer Types display. To add an option, click Add Value. |
| 22 | Preview | Displays a preview of the jig settings.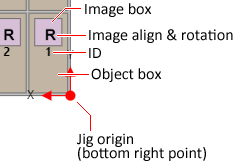
|
Edit Jig display
![PAM-Web_display_[edit_jig].png](hju1698398746578.png)
Items marked by * are items where input is required.
"Object box" indicates the exterior frame of the object. "Image box" indicates the frame where print data is inserted (print frame).
| No. | Item | Description |
|---|---|---|
| 1 | Name | Change the jig name. |
| 2 | Width, Height | Enter the jig width and length (depth). |
| 3 | Thickness |
Enter the jig thickness. This is the thickness to the height of the printing surface when the object is installed on the fixing jig. Be aware that it is not the thickness of only the fixing jig. |
| 4 | Reference Text | Enter a remark or note. |
| 5 | Default Spacing |
Enter the distance (X direction) from the neighboring object. When adding an object, position at this distance in the X direction. |
| 6 |
Object box X, Y |
Enter the amount of offset from the lower right point of the jig to the lower right point of the Object box. |
| 7 |
Object box Width, Height |
Enter the size of the exterior frame on the object. |
| 8 |
Image box X, Y |
Enter the amount of offset from the lower right point of the Object box to the lower right point of the print frame. |
| 9 |
Image box Width, Height |
Enter the print frame size. |
| 10 |
Image box Rot. |
Select the rotation angle for the image to be inserted in the print frame. |
| 11 |
Image box Mirror |
Reverses the image to be inserted in the print frame left/right or top/bottom. |
| 12 |
Image box Scale |
Select the scale for the image to be inserted in the print frame.
|
| 13 |
Image box Ref. |
Select the position for the image to be inserted in the print frame. |
| 14 | |
Deletes the Object box. |
| 15 | |
Adds one more of the same Object box. |
| 16 | , |
Change the order of the Object boxes. |
| 17 | Delete All | Deletes all Object boxes. |
| 18 | Add Multiple |
Copies an Object box and positions each copy on each jig. Click to display the Object box details display. |
| 19 | + Add Object Box | Adds one Object box. |
| 20 | Save As | Copies this jig and adds a new jig. |
| 21 | Location | Select the jig placement location. Click to display Select Locations. To add an option, click Add Value. |
| 22 | Printer Type | Select the printer type where the jig can be installed. Click to display the Select Printer Types display. To add an option, click Add Value. |
| 23 | Preview | Displays a preview of the jig settings. |
Object box details display
![PAM-Web_display_[object_box_details].png](vwh1698398898371.png)
Items marked by * are items where input is required.
Decide the object and image size for one case, and then copy it and use it to fill the jigs.
"Object box" indicates the exterior frame of the object. "Image box" indicates the frame where print data is inserted (print frame).
| No. | Item | Description |
|---|---|---|
| 1 | Width, Height | Enter the size of the exterior frame on the object. |
| 2 |
Horizontal Margin, Vertical Margin |
Enter the distance from the neighboring object. When adding an object, position at this interval. |
| 3 |
Image box X, Y |
Enter the amount of offset from the lower right point of the Object box, and decide the Image box position. Use Image box Placement to select the input amount of offset to the point where the Image box will be placed. |
| 4 |
Image box Width, Height |
Enter the print frame size. |
| 5 |
Image box Placement |
Select the Image box positioning point. |
| 6 | Rotation | Select the rotation angle for the image to be inserted in the print frame. |
| 7 | Mirror | Reverses the image to be inserted in the print frame left/right or top/bottom. |
| 8 | Scale | Select the scale for the image to be inserted in the print frame.
|
| 9 | Reference Point | Select the position for the image to be inserted in the print frame. |
| 10 | Preview | Displays a preview of the Object box and Image box settings. |
Print Layouts
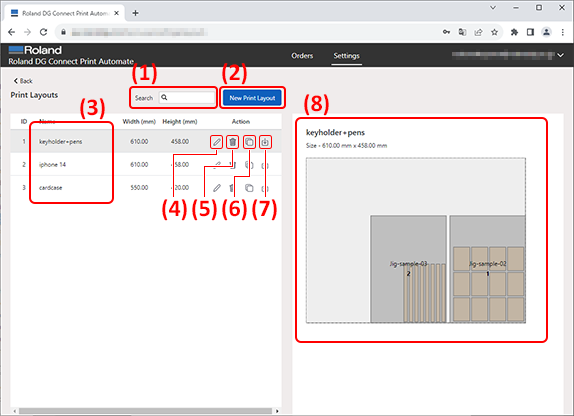
Set the installation position of the jig on the output device.
| No. | Item | Description |
|---|---|---|
| 1 | Search | Search for "Name" to display only the hit print layouts. |
| 2 | New Print Layout |
Adds a new print layout. Click to display the Add New Print Layout display. |
| 3 | Name | Displays a list of the registered print layouts. |
| 4 | |
Change the print layout settings. Click to display the Edit Print Layout display. |
| 5 | |
Deletes the print layout. |
| 6 | |
Copies a print layout and adds a new print layout. |
| 7 | |
Saves the print layout to a file. The exported PDF file can be used as a drawing for jig production. |
| 8 | Preview | Displays a preview of the selected print layout. |
Add New Print Layout display
![PAM-Web_display_[add_new_print_layout].png](mbn1698629135775.png)
Items marked by * are items where input is required.
While it is possible to position multiple jigs in a single print layout, it is not possible to position multiple jigs with different Location or Printer Type in the same print layout. It is also not possible to combine jigs with different thicknesses.
| No. | Item | Description |
|---|---|---|
| 1 | Name | Change the print layout name. |
| 2 | Physical Size | Enter the printer table size. |
| 3 |
Printable Area - X Offset, Y Offset |
Enter the amount of offset from the table mechanical origin to the lower right point of the printing area. Align the position with the print origin that is set at the printer. |
| 4 |
Printable Area - Width, Height |
Enter the printing area size. |
| 5 | Reference Text | Enter a note or remark. |
| 6 | Default Spacing |
Enter the distance (X direction) from the neighboring jig. When adding a jig, position at this distance in the X direction. |
| 7 | Jigs - Name | Select the jig to place in the print layout from the jigs that have been registered. |
| 8 | Jigs - X, Y |
Specify the position of the jig lower right point. Enter the distance from the lower right point of the table (Physical Size). |
| 9 | Jigs - |
Cancels the jig assignment. |
| 10 | Jigs - |
Adds one more of the same jig. |
| 11 | + Add Jig | Adds a jig to the print layout. While it is possible to position multiple jigs in a single print layout, it is not possible to add a jig with a Location or Printer Type that is different from the ID 1 jig. It is also not possible to combine jigs with different thicknesses. |
| 12 | Preview | Displays a preview of the print layout settings.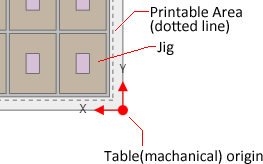
|
Edit Print Layout display
![PAM-Web_display_[edit_print_layout].png](tuj1698629591396.png)
Items marked by * are items where input is required.
While it is possible to position multiple jigs in a single print layout, it is not possible to position multiple jigs with different Location or Printer Type in the same print layout. It is also not possible to combine jigs with different thicknesses.
| No. | Item | Description |
|---|---|---|
| 1 | Name | Change the print layout name. |
| 2 | Physical Size | Enter the printer table size. |
| 3 |
Printable Area - X Offset, Y Offset |
Enter the amount of offset from the table mechanical origin to the lower right point of the printing area. Align the position with the print origin that is set at the printer. |
| 4 |
Printable Area - Width, Height |
Enter the printing area size. |
| 5 | Reference Text | Enter a note or remark. |
| 6 | Default Spacing |
Enter the distance (X direction) from the neighboring jig. When adding a jig, position at this distance in the X direction. |
| 7 | Jigs - Name | Select the jig to place in the print layout from the jigs that have been registered. |
| 8 | Jigs - X, Y |
Specify the position of the jig lower right point. Enter the distance from the lower right point of the table (Physical Size). |
| 9 | Jigs - |
Cancels the jig assignment. |
| 10 | Jigs - |
Adds one more of the same jig. |
| 11 | + Add Jig | Adds a jig to the print layout. While it is possible to position multiple jigs in a single print layout, it is not possible to add a jig with a Location or Printer Type that is different from the ID 1 jig. It is also not possible to combine jigs with different thicknesses. |
| 12 | Save As | Copies this print layout and adds a new print layout. |
| 13 | Preview | Displays a preview of the print layout settings. |
Automation Rules - Create your Rule Set display
![PAM-Web_display_[create_your_rule_set].png](qnu1698629752113.png)
Filter refers to the sorting conditions. Here, we decide the conditions used to sort the orders and the processing of the sorted orders.
From the order information (type, size, color, etc. of object) received from e-commerce or other order-receiving system, orders which match the condition are sorted and the necessary settings for creating that ordered product can be added.
For example, it is possible to set the jig for fixing the object, or specify the print quality.
| No. | Item | Description |
|---|---|---|
| 1 | Add Filter | Select the category to add to Filter. |
| 2 | Add | Adds the selected category to Filter. If the category has already been added, this button is disabled. |
| 3 | (Category) |
Removes that selected category from Filter. |
| 4 |  |
Associates multiple keywords. When set, orders which meet any of the conditions (OR relationship) are sorted. Click to display the Link Filters display. |
| 5 | , |
Change the order of the keywords. |
| 6 |  |
Set the keyword match conditions and processing. Click to display the Extend Filter display. |
| 7 | |
Change the keyword. |
| 8 | (Value) |
Deletes the keyword. |
| 9 | + Add Value | Adds a keyword. |
Link Filters display
![PAM-Web_display_[link_filters].png](duj1698629910818.png)
| Item | Description |
|---|---|
| Link your filter Hot "@@@" with | Select the link (add) destination keyword. |
Extend Filter display
![PAM-Web_display_[extend_filter].png](mza1698630079989.png)
Select the keyword search rules, add keywords, and configure the printing settings for creating the ordered product.
| No. | Item | Description |
|---|---|---|
| 1 | Matching Rule | Select the condition matching rules. |
| 2 | Add values for your filter | Displays a list of the set keywords. |
| 3 | + Add Value | Adds a keyword for sorting. Multiple keywords serve as AND conditions. |
| 4 | Select the actions for your filter | Configure the printing settings for creating the ordered product. When a jig is selected, only the Location and Print Type which are set for that jig can be selected. |
| 5 | Clear | Clears the settings and returns to "Not Assigned." |
| 6 | + Add Jig / + Add Value |
Adds a new option. Click [+ Add Jig] to display the Add New Jig display. Click [+ Add Value] to display the Masters - Masters display. The items added here are added to each of the Masters categories. |
Users
This setting can only be operated by users who have Admin privileges.
| No. | Item | Description |
|---|---|---|
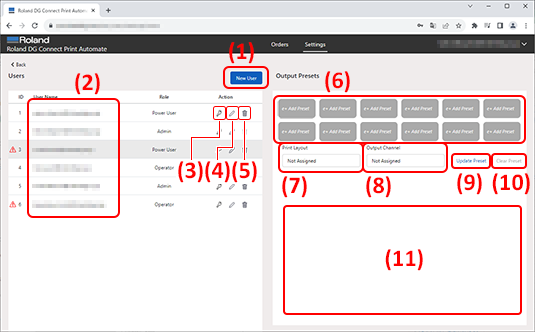
| 1 | New User |
Adds a new user account. Click to display the Create New User display. |
| 2 | User Name |
Displays a list of registered user accounts. The caution mark ( |
| 3 |  |
Change the login password. Click to display the Edit User Password display. |
| 4 | |
Change the access privileges for the user account. Click to display the Edit User display. |
| 5 | |
Deletes the user account. |
| 6 | Output Presets | This is a list of Output Presets. This is displayed when a user account with Role of Operator or Power User is selected. To set an Output Preset, click the subject Output Preset button to select it, and then select Output Presets. A gray Output Preset where "e+ Add Preset" is displayed indicates that the Output Preset has not been set. If "No Output Connector Installed" is displayed, log into Output Manager as the target user. Output Manager imports registered printers from VersaWorks on the same PC into the PAM, so this message appears if this task has not been completed for the user. |
| 7 | Print Layout | Displays the print layout that is set for the Output Preset. It is not displayed if it is not set. This is displayed when a user account with Role of Operator or Power User is selected. |
| 8 | Output Channel | Displays the Output Channel (output device and input port or input folder) that is set for the Output Preset. It is not displayed if it is not set. This is displayed when a user account with Role of Operator or Power User is selected. |
| 9 | Update Preset | Set or change the Output Preset. Click to display Output Presets display. This is displayed when a user account with Role of Operator or Power User is selected. |
| 10 | Clear Preset | Clears the Output Preset settings. This is displayed when a user account with Role of Operator or Power User is selected. |
| 11 | Preview (Print Layout) | Displays the print layout that is registered for the Output Preset. It is not displayed if it is not set. |
 ) indicates that no Output Presets have been set. Although they can be set at this stage, they can also be set by the person performing the actual printing work.
Create New User display
![PAM-Web_display_[create_new_user].png](uab1698630482218.png)
Adds a new user account.
| No. | Item | Description |
|---|---|---|
| 1 | User Name | Displays the user account name. |
| 2 | Role |
Select the user account Role. There are three options: Admin, Power User, and Operator. See User Accounts and Access Privileges for details. |
| 3 | Password |
Enter the login password. The password security level is indicated in five stages under the password input field. It is recommended that you enter a password with displayed security level "strong."
|
| 4 | Confirm Password |
Enter the password again. If the password is different from that entered for "Password," an error message is displayed. |
| 5 | Location | Select the user account location. The options are the items registered in the Masters Location category. |
| 6 | + Add Location | Adds a location. When added, it is registered in Location in Masters. |
| 7 | Clear | Cancels the Location setting. This is the same as when "Not Assigned" was selected. |
| 8 | Set the accessibility | Set the access privileges for the user account. |
Edit User Password display
![PAM-Web_display_[edit_user_password].png](sza1698630860295.png)
Change the password for an existing user account.
| No. | Item | Description |
|---|---|---|
| 1 | User Name | Displays the name of the user account for password change. |
| 2 | New Password |
Enter the new password. The password security level is indicated in five stages under the password input field. It is recommended that you enter a password with displayed security level "strong."
|
| 3 | Confirm Password |
Enter the new password again. If the password is different from that entered for "New Password," an error message is displayed. |
Edit User display
![PAM-Web_display_[edit_user].png](bde1698631014721.png)
Change the settings for an existing user account.
| No. | Item | Description |
|---|---|---|
| 1 | User Name | Displays the user account name. |
| 2 | Role |
Select the user account Role. There are three options: Admin, Power User, and Operator. See User Accounts and Access Privileges for details. |
| 3 | Location | Select the user account location. The options are the items registered in the Masters Location category. |
| 4 | + Add Location | Adds a location. When added, it is registered in Location in Masters. |
| 5 | Clear | Cancels the Location setting. This is the same as when "Not Assigned" was selected. |
| 6 | Set the accessibility | Set the access privileges for the user account. |
Output Presets display
![PAM_Web_display_[output_presets].png](ecs1701663958930.png)
Register the print data output channel and printing settings in advance.
| No. | Item | Description |
|---|---|---|
| 1 | Print Layout | Select the print layout to use for printing. This can be selected only when the Location in the user account which is attempting to set Output Presets is the same as the Location of the jig assigned to the print layout. |
| 2 | Master Data Filter | Select the printing settings to deliver to the RIP. When the printing settings were already configured with Automation Rules, the settings here for the same setting items will take priority. If options are not displayed, or if the option you want to select has not been registered, click Add. |
| 3 | Output Channel | Select the print data output destination (input port of a printer registered in VersaWorks or save folder). When an output destination is selected, "Edit Output Channels" becomes enabled. |
| 4 | Define Job Type | To output the print data added to an order as is, select "Normal Print Job." To add an additional job such as a white plate to the print data, select "MultiJob Grouping." Note: This item is not displayed when Hot Folder is set for the Output Channel. |
| 5 | Printer Setting File | Select whether to use the printing settings that are set in the order, or to use the VersaWorks printing settings. Note: This item is not displayed when Hot Folder is set for the Output Channel. |
| 6 | Queue preset parameters | When "Use VersaWorks Printing Settings" was selected for Printer Setting File, the settings are displayed here. Note: This item is not displayed when Hot Folder is set for the Output Channel. |
| 7 | Define Operation Commands - Return To Origin | When turned on, the printer head returns to the printer origin (printing start point) after printing is completed. Note: This item is not displayed when Hot Folder is set for the Output Channel. |
| 8 | Define Operation Commands - Action | Select the process to execute with VersaWorks. Note: This item is not displayed when Hot Folder is set for the Output Channel. |
| 9 | Name The Output Preset | Enter the name of the Output Preset. |
Input Settings - Input Settings display
When "PersBiz" is selected for "Input Connectors"
![PAM-Web_display_[input_settings]_persbiz.png](gfz1698631557382.png)
| No. | Item | Description |
|---|---|---|
| 1 | Media | Add the key character string that is detected from the json file where the order information is recorded. Enter the detected key value into the PAM Media attributes. |
| 2 | Color | Add the key character string that is detected from the json file where the order information is recorded. Enter the detected key value into the PAM Color attributes. |
| 3 | Size | Add the key character string that is detected from the json file where the order information is recorded. Enter the detected key value into the PAM Size attributes. |
| 4 | Quantity | Add the key character string that is detected from the json file where the order information is recorded. Enter the detected key value into the PAM Quantity attributes. |
| 5 | Custom Parameters | Add, delete, or change parameters. Except for the preset parameters, only parameters that were added later can be edited. |
| 6 | Learning Mode | This is only applicable for PersBiz. When switch on, the system will read the job definition file from PersBiz and will capture the parameters from the job definition file. These parameters can then be mapped or linked with PAM Parameters. |
When "Hot Folder 1-8" is selected for "Input Connectors"
![PAM-Web_display_[input_settings]_hot-folder.png](mor1698631702501.png)
If a json file is placed in the Hot Folder, the order information written within and the print file (for the specified save location) are imported. If a print file is placed within the folder, the order information is obtained according to the set file name rules.
| No. | Item | Description |
|---|---|---|
| 1 | Separator | Specify the character to use for the parameter separator. Select characters and symbols that can be specified in the file name and characters that are not included in the order information. For example, hyphen "-" or underscore "_". "Job Filename Example": Examples of file names are displayed based on the character specified for Separator and the parameter order. |
| 2 | All Parameters | Displays a list of all registered parameters. To register a new parameter, click Custom Parameters. |
| 3 |  , ,  |
|
| 4 | Job Filename Variable |
Set the file name order information items and their display order.
|
| 5 | , |
|
| 6 | Fix Hot Folder Values |
When the order contents do not vary (are not a variable), set the fixed value. When there is a parameter that does not change with each order, for example when the base shirt color is white only, white is always input for the color order contents. |
| 7 | Custom Parameters | Add, delete, or change parameters. Except for the preset parameters, only parameters that were added later can be edited. |
Output Settings - My Output Channels display
When "Printer" is selected in "Output Channel"
![PAM-Web_display_[my_output_channels]_printer.png](gwq1698631857176.png)
| No. | Item | Description |
|---|---|---|
| 1 | Users |
Select the subject user to set the Output Channels for. If the account has Admin privileges, it is possible to select all registered users. If the account has Power User privileges or Operator privileges, only your own account can be selected. |
| 2 | Output Channels - VersaWorks | Configure the output setting when sending print data directly to VersaWorks. |
| 3 | Printer Model | Select the printer where the printing data will be sent. The options are the printers which are registered in the output destination on the RIP. |
| 4 | Device Settings | These are settings that are unique to the output destination printer, such as the print data rotation and printing start point. |
When "Hot Folder" is selected in "Output Channel"
![PAM-Web_display_[my_output_channels]_hot-folder.png](kww1698631980248.png)
| No. | Item | Description |
|---|---|---|
| 1 | Users |
Select the subject user to set the Output Channels for. If the account has Admin privileges, it is possible to select all registered users. If the account has Power User privileges or Operator privileges, only your own account can be selected. |
| 2 | Output Channels - Hot Folder | Configure the output setting when sending printing data to the RIP input folder via a file. |
| 3 | Folder Location |
Select the output destination folder. Although a folder that is set to Hot Folder in Output Manager can be selected, it is not possible to select a folder that was set by a different non-administrator account. |
| 4 | Device Settings | These are settings that are unique to the output destination printer, such as the print data rotation and printing start point. |
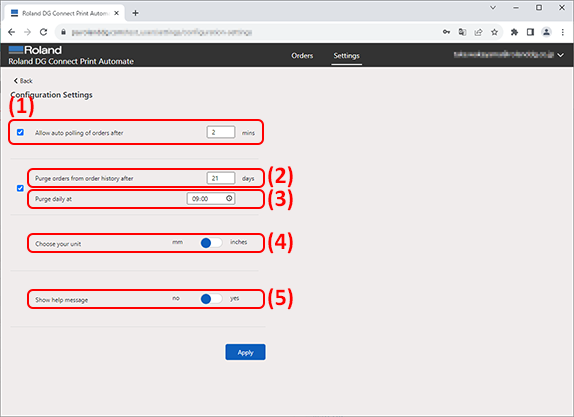
Configuration
| No. | Item | Description |
|---|---|---|
| 1 | Allow auto polling of orders after *** mins | Checks whether or not there is an order at the set time interval. |
| 2 | Purge orders from order history after *** days | Deletes orders from the order history when the set number of days have passed. |
| 3 | Purge daily at *** | Specify the time to delete orders from the order history when the set number of days have passed. |
| 4 | Choose your unit | Select the length unit. |
| 5 | Show help message | Switches between showing and hiding the message at the top of the Settings tab screen. |
Masters - Masters display
![PAM-Web_display_[masters].png](obo1698631331863.png)
Add or change the options for the Location setting when registering a user, the options for the Filter setting used when assigning a worker to an order, and the options for the Automation Rules Filter setting.
| No. | Item | Description |
|---|---|---|
| 1 | Add Master | Select the subject category of the option to add. |
| 2 | Name | Displays a list of options registered in the category. |
| 3 | |
Change the option name. |
| 4 | |
Deletes the option. |
| 5 | + Add Value | Adds an option. |
Connectors
![PAM-Web_display_[connectors].png](tce1699952136585.png)
| No. | Item | Description |
|---|---|---|
| 1 | Click to download Input Connector | Download Input Manager. Click to open the screen for selecting the installer save folder. |
| 2 | Click to download Output Connector | Download Output Manager. Click to open the screen for selecting the installer save folder. |