
Correcting the Sensor for Reading Crop Marks
Depending on the characteristics of the media, such as reflectivity and colors, the machine may not be able to read the crop marks. In such cases, correct the sensor for reading crop marks.
1. Correct the sensor for reading crop marks.
-
Press [▲] to display the screen shown below.

-
Press [▶] once, and then press [▼] twice to display the screen shown below.
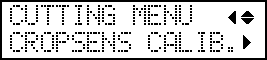
-
Press [▶] to display the screen shown below.
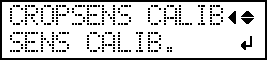
-
Press [ENTER] to display the screen shown below.

-
Press [◀], [▶], [▲] or [▼] to move the center of the blade over the crop marks.
The center of the blade should only be over the crop marks, and does not need to be aligned with the center of the crop marks.

-
Press [ENTER].
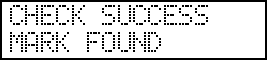
If correction succeeds, the following message appears. Proceed to the next step.
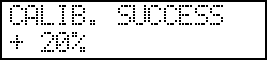
If correction fails, the following message appears. Take countermeasures and redo the correction.
Message Cause Countermeasures 
-
The lighting in the room where the printer is installed or vicinity of the printer is too bright.
-
The reflected light from the media is too strong.
-
Adjust the brightness of the lighting.
-
Change the media type.

- The reflection from the media is too weak.
- Change the media type.

- Correction failed for some reason.
- Redo the correction.
If the same message appears even after you redo correction several times, contact your authorized Roland DG Corporation dealer.
-
-
Press any one of the keys on the operation panel to display the screen shown below.
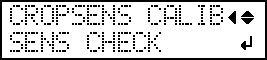
2. Check whether crop marks can be read.
-
Press [▲] to display the screen shown below.
-
Press [ENTER] to display the screen shown below.
-
Press [◀], [▶], [▲] or [▼] to move the center of the blade over the crop marks.
The center of the blade should only be over the crop marks, and does not need to be aligned with the center of the crop marks.
-
Press [ENTER].
Check whether crop marks can be read.If reading succeeds, the following message appears. Proceed to the next step.
If reading fails, the following message appears.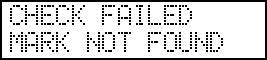
It is possible that crop marks cannot be detected because they are not the crop marks output from the software RIP that is compatible with this machine. Crop marks drawn using drawing software also cannot be detected.
Use the software RIP that is compatible with this machine to output the crop marks and redo the correction from the start.
If detection failed even with crop marks output by the compatible software RIP, redo the correction from the sensor correction stage.
-
Press any one of the keys on the operation panel to display the screen shown below.