For a printing test, set the printing area with W (width) of 110 mm (4.34 in.) or more and L (length) of 110 mm (4.34 in.) or more. An error will occur and printing tests cannot be performed if the area is smaller than this.
Tap on the home screen.
Tap Execute next to Printing Test.
Printing of the test pattern starts.
MEMO
Depending on the color of the object to be printed on, it may be difficult to check the white ink test pattern.
Tap on the home screen, select Cleaning - Printing Test - Nozzle Drop-out Test (Base: Black) in that order, and then tap Execute to make the base of the white ink black, making it easier to check the white ink.
Nozzle Drop-out Test (Base: Black) is not displayed if the machine is not equipped with white ink.
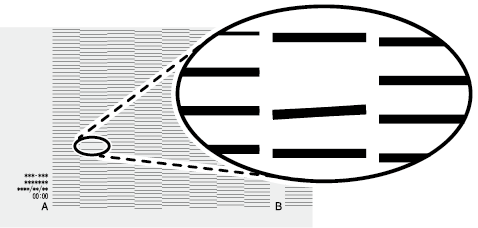
Check whether there is dot drop-out or dot displacement in the test pattern.
Missing blocks indicate dot drop-out. Collapsed or inclined blocks indicate dot displacement.If no dot drop-out or dot displacement occurs, this operation is finished. Tap to return to the home screen.
If dot drop-out or dot displacement is present, perform cleaning such as normal cleaning.

 on the home screen.
 to return to the home screen.