
1. Cleaning the Print Head Caps
Procedure
- Remove the object to be printed on.
-
Tap
 on the home screen.
- Tap Manual Cleaning.
-
Tap Execute.
Tap Execute to display a message reminding the user to wear protective gear.
-
Tap OK.
Tap OK to move the print-head carriage and flat table.
-
Follow the instructions on the operation panel to clean the print head caps.
- Tap
 or
or  to check the procedure.
 - If you complete the work without viewing the instructions, tap Finish All.
IMPORTANT- Be sure to use one of the included cleaning sticks.
- Do not use a previously used cleaning stick.
- Do not put a previously used cleaning stick into the cleaning liquid.

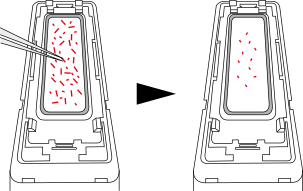
IMPORTANTUse a pair of tweezers to remove the pieces of hardened ink that are 3 mm (0.12 in.) or more in length.
Do not use excessive force when pulling on pieces of hardened ink that are difficult to remove. Doing so may damage the print head caps.
。
When you have finished cleaning, close the right cover.
- Tap