
1. Create the cutting data and configure the perforated cut settings (CutStudio)
Procedure
- Start CutStudio.
-
Click .
The Cutting Setup window appears.
-
Click Change.
The printer driver properties window appears.
- Click the Paper tab.
-
Click Get from Machine.
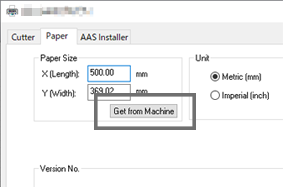
The size (cutting area) of the material loaded in the cutting machine will be imported into Paper Size.
- Click OK in the printer driver properties window.
-
In the Cutting Setup window, click OK.
The cutting area (working area) obtained from the machine is displayed in CutStudio.
-
Draw the cutting data so that it fits within the cutting area.
Cutting will not be performed for data outside the cutting area.
Import data from Adobe Illustrator or CorelDRAW for use as necessary.
- Select the object that you want to apply perforated lines to.
-
Click
 .
.
-
Click
 .
.
The Save As window appears.
Select the folder in which to save the file, enter a file name, and then save the file.