
What Is Variable Printing?
Variable printing is printing which replaces a portion of the printing area such as characters and images, for each printing. Applications include the printing of employee ID cards where the name, department, and photograph differ; tickets with consecutive numbers, and postcard addressee information.
- Background data
- Data file for specifying the text or images to print
- Image files if you want to print images.
1. Creating a Template in VersaWorks

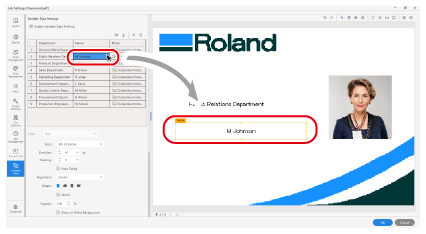
| A | Background image: Image data of company logo, design, etc. Data should be created in advance. (Supported file types: .png, .jpeg, .tiff, .eps, .pdf, .ps) |
| B | Variable field: Specify the position of the headshot. Type: Image, Area name: Photo |
| C | Variable field: Specify the position of the department name. Type: Text, Area name: Department |
| D | Variable field: Specify the position of the name. Type: Text, Area name: Name |
| E | Variable field: Specify the position of the QR code of the employee number. Type: Barcode, Area name: QR code |
- From the menu bar, click .
- Click > to the right of Variable Data Field Template.The Variable Data Field Template Management window appears.
- Click
 .
. - Enter the template name and click OK.The Variable Data Field Template Settings [*] window appears.
- Set the background image.
- Set the variable field.
- Click
 .The Create New Data window appears.
- Click
- Click < Back.You are returned to the Variable Data Template Management window.
2. Adding the Template to the Job List
- Click > on the right side of Export Template in the Variable Data Template Management window.
- Select the area template to output from those where Variable Data Field Template is Attributes.
- Specify the Printer Nickname and Target Queue.
- Click OK.The Variable Data Field Template will be added to the specified Queue.
- Click Cancel.You are returned to the Variable Data Template Management window.
- Close the Variable Data Template Management window.
3. Creating a Data File and Importing to VersaWorks
Prepare an image file for printing to a variable field. Export the variable field data created with the variable field template as a data file, edit the data using spreadsheet software, and then import it. You can also edit the data file in VersaWorks without exporting/importing.Creating, Editing, and Exporting a Data File
- Open the Settings window for the job added in 2. Adding the Template to the Job List.
- Double-click the job to set.
- Right-click the job to set, and then click .
- With a job selected, click
 on the left side of the job tool area, and then click
  .
.
- Click
 Variable Data.
 - Click
 .The Save As window appears.
 - Enter the desired name.The saved file formats are the following: CSV file (comma-delimited) (.csv), Text file (tab-delimited) (.txt), Text file (space-delimited) (.prn), or XML file (.xml). The method of selecting the file format varies depending on the OS.
- Windows: Select a saved file format from the File Type list.
- Mac: The selected file format is included in the file name.
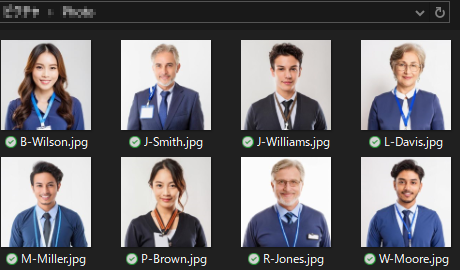
- Save the employee name image files to the desired folder.Save image files in file formats that can be directly opened in VersaWorks (TIFF (LZW-compressed or uncompressed), EPS, JPEG, PDF, PostScript, or PNG).
- Open and edit the saved data file.
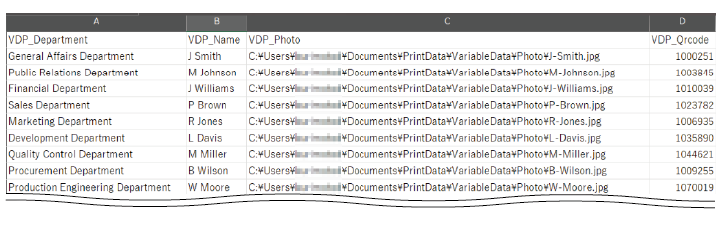
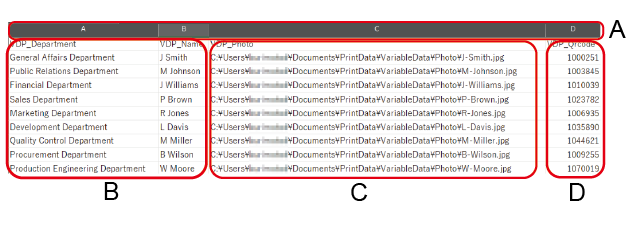
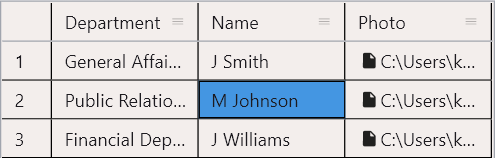
This is an example of editing a CSV file.
The variable field names are already entered in the first row. Enter the characters listed (B), the absolute path (C) of the image files that were saved in Step 5, and the employee number (D) in each variable field, and save.
- Click
 in the window shown in Step 3.The window for selecting the file appears.
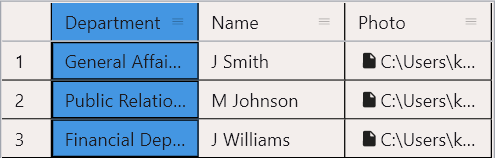
 - Select the edited/saved data file and click Open.The edited content is reflected in VersaWorks.
- Click on the blank row "1" and click
 .Blank rows are deleted.
4. Configuring the Variable Printing Settings
- Select the field to be configured.
- When applying the same settings to all dataSelect the first row (the field name) in the list. The settings will be applied to all the data.
- When applying the settings only to specific dataSelect the cell to configure.
MEMOThe selected column or cell is displayed in the layout area with a border line and field name.
- When applying the same settings to all data
- Set the details of Text.
- Font
Selects the font type.
- FontSize
Sets the font size.
- Tracking
Sets the spacing between two characters. Set this to 100 to make the spacing one-character wide.
- Auto Sizing
Select this checkbox to automatically adjust the font size to fit the text in the variable field when the text is larger than the variable field.
- Alignment
Sets the alignment of the text in the variable field.
- Rotate
Rotates the text in the variable field in units of 90 degrees.
- Mirror
Horizontally mirrors the text in the variable field.
- Opacity
Sets the opacity of the entire variable field. Set this to 0% to make the target transparent.
- Draw on White Background
Select this checkbox to print the background object on top when the background object and the variable field overlap.
- Effect
 : Italic,
  : Bold,
  : Underline,
  : Shadow,
  : Outline can be set.
 - Offset
When
(shadow) is selected in Effect: Sets the shadow offset widths as percentages.MEMOFigure 3. Example: Offset: 10% (blue shadow) 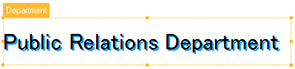
- Stroke
When
(outline) is selected in Effect: Sets the stroke widths of outlines in points.MEMOFigure 4. Example: Stroke width: 1 pt (red outline) 
- ColorSet the text (1), shadow (2), outline (3) and variable field color (4).
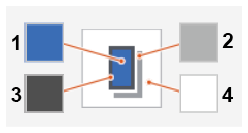
Click the square to display the Color Settings window.
Select RGB, CMYK, or Transparent for ColorSpace. White can be specified for character and variable field colors. When RGB or CMYK is selected, use the slider bar or enter the value to set each color value.
- Field Special Color Plate Generation
To generate spot color plates for an area, select Print Area (Color-Based) or Entire Field for Generated Pattern and set Density.
- Font
- Set the details of Image.
- FitSets whether to fit the image in the variable field. Set one of the following for the original image (1).
- None (2): Places the original image without resizing.
- Fit to Fields (3): Changes the size of the image to fit in the variable field. The horizontal to vertical ratio is not maintained.
- Fit proportionally (4): Changes the size of the image proportionally to fit either in the height or width of the variable field.
- Alignment
Selects the alignment of the image in the variable field.
- Rotate
Rotates the image in the variable field in units of 90 degrees.
- Mirror
Horizontally mirrors the image in the variable field.
- Opacity
Sets the opacity of the image. Set this to 0% to make the target transparent.
- Draw on White Background
Select this checkbox to print the background object on top when the background object and the variable field overlap.
- Color
Sets the background color inside the variable field.
Select RGB, CMYK, Transparent, or White for ColorSpace. When RGB or CMYK is selected, use the slider bar or enter the value to set each color value.
- Field Special Color Plate Generation
To generate spot color plates for an area, select Print Area (Color-Based) or Entire Field for Generated Pattern and set Density.
- Fit
- Set the details of Barcode.
- Code Type
Select the barcode type from EAN-13, UPC-A, or QR Code.
- Rotate
Rotates the barcode in the variable field in units of 90 degrees.
- Mirror
Horizontally mirrors the barcode in the variable field.
- Error Correction Level
Select the correction level to ensure the QR code can be read correctly even if part of the code is dirty or missing. The percentage of missing data that can be recovered increases in the order of L, M, Q, and H, but the data size also increases.
- Field Special Color Plate Generation
To generate spot color plates for an area, select Print Area (Color-Based) or Entire Field for Generated Pattern and set Density.
- Code Type
- As necessary, adjust the size and position of the variable field.
- Change the field.
- Changing with Field Settings
Use X and Y to change the field position. Specifically, set the distance between the top left corner of the job and the top left corner of the variable field.
Use W and H to set the variable field size.
- Changing in the layout area
Move the pointer to the selected area, then drag to move it. Move the pointer to the square on the frame of the selected area, and drag the square to adjust the size of the variable field.
MEMO- To undo or redo operations, use
 or
or  (respectively).
 - Click Reset with a variable field selected to revert any changes made to the field (to its size or position) to the original settings.
- When Show All Variable Data Fields is selected, the border lines and variable names for all set variable fields are displayed in the layout area.
- The data's cell color changes if the attribute setting differs from that of the other data.
- Changing with Field Settings
- Change the field.
- Configure other Settings as necessary.Example
5. Setting the Layout for Variable Printing

- Click
 Layout.
 - Set the layout for the employee ID cards.
- Position: X and Y
The job is moved by the specified offset in relation to the job list layout area window's upper left corner (lower right of set up media).
- Print Properties: Tile Spacing
Specify the spacing between cards. Select Equal X and Y Spacing, Separate X and Y Spacing, or Grid Spacing, and then specify the Spacing, Y, and X. When using a jig, specify the spacing according to the jig.
- Position: X and Y
- Click OK.The configured layout is reflected in the preview area of the main window.
6. Performing Printing
- Select the job from the job list.
-
Perform printing.
Processing by the RIP and printing are performed.