
Creating, Editing, and Exporting a Data File
When a template is added to the job list, the data can be edited in VersaWorks without the use of spreadsheet software. When the amount of editing is large, it is possible to export the data file and edit it with editing software, then import it. If a data file that was created with spreadsheet software cannot be successfully loaded into VersaWorks, then creating the data file with VersaWorks, and exporting and editing it before loading it, will facilitate loading.
Procedure
Creating and editing a data file
-
Add a template file to the job list.
Check that
 is displayed for in the job overview area.
 -
Use one of the methods below to open the Job Settings window.
- Double-click the job to set.
- Right-click on the job to set, then click .
- With a job selected, click
 on the left side of the job tool area, and then click
  .
.
-
Click
 VariableData.
-
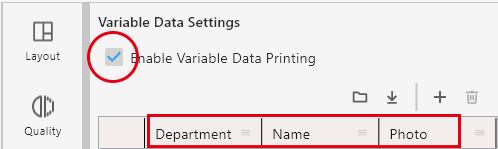
Select the Enable Variable Data Printing checkbox.
A preview of the template is displayed in the layout area. The variable field name ("VDP_" deleted from the spot color name) specified in Step 1: Create a Template is also displayed in the first line of the Variable Data Settings list.
-
Click
 .
A row is added to the table. Clicking multiple times will add a number of rows equal to the number of clicks.
.
A row is added to the table. Clicking multiple times will add a number of rows equal to the number of clicks. - Edit the table and create the data file.
-
Click OK.
The edited contents are saved.
Exporting and editing a data file
-
When the amount of editing is large, click
 .
The Save As window appears.
.
The Save As window appears. -
Enter the desired name.
The saved file formats are the following: CSV file (comma-delimited) (.csv), Text file (tab-delimited) (.txt), Text file (space-delimited) (.prn), or XML file (.xml). The method of selecting the file format varies depending on the OS.
- Windows: Select a saved file format from the File Type list.
- Mac: The selected file format is included in the file name.
-
Open and edit the saved data file.
Use software suitable for file editing, and edit and save the file.
Importing a data file
-
Click
 in the window shown in Step 4.
The window for selecting the file appears.
in the window shown in Step 4.
The window for selecting the file appears. -
Select the data file that was saved in Step 7 and click Open.
The contents of the edited data file are displayed in the table.