
Printing Multiple Jobs Layered on Top of Each Other
A layered job is one in which multiple jobs are layered on top of each other. With a layered job, multiple jobs can be layered and printed with a single printing operation.
Two methods are available with layered jobs: "pull-back printing," in which the media is pulled back and printed on, and "one pass multilayer printing," which prints on all layers together. One pass multilayer printing may result in less printing misalignment than pullback printing.
Two types of one pass multilayer printing are available. In one type, the three-layer mode is selected with for printing (2. B: Performing One Pass Multilayer Printing (Three-layer Mode)). In the other type, the advanced settings are configured with Custom Layer Mode for printing (2. C: Performing One Pass Multilayer Printing (Two- to Five-layer Custom Mode)).
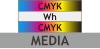 | When you want to, for example, print on transparent film and express vibrant images using CMYK from the print surface and from the surface opposite the printed surface. The printing on the back may show through, so it is a good idea to use the same image. |
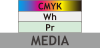 | When you want to, for example, improve the adhesion of ink to media that peels off easily and express vibrant images using CMYK on a base of white ink |
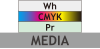 | When you want to, for example, improve the adhesion of ink to media that peels off easily, express vibrant images using CMYK on a base of white ink, and display the images from the surface opposite the printed surface (the transparent surface) |
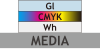 | When you want to, for example, print images on a base of white ink, eliminate the effect of the media's color, and add textures |
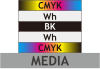 | When you want to, for example, print on transparent film and express vibrant images using CMYK from the print surface and from the surface opposite the printed surface. The printing on the back will not show through, so use this method with images having directionality such as completely different images or text. |
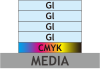 | When you want to, for example, express more three-dimensional textures |
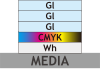 | When you want to, for example, print images on a base of white ink, eliminate the effect of the media's color, and add more three-dimensional textures |
However, one pass multilayer printing may not be possible depending on the model you are using or the job.
1. Overlapping Multiple Jobs to Create a Single Job
- The only cutting lines that are enabled are those on the top layer.
- When creating cutting lines in VersaWorks, add them to the top layer.
- When a layer job is generated, is set to Print Only.
- Select multiple jobs from the job list.The method for selecting multiple jobs depends on the OS.MEMO In a layered job, the layers are overlaid in the order they are selected. To specify the layer position, select the jobs in order from the bottom layer.
- A layered job can be generated by either of the following methods.
- Right-click and click .
- Click
 on the right side of the job tool area, and then click Generate Layered Job.
- When performing pullback printing, proceed to 2. A: Performing Pullback Printing.
- When performing one pass multilayer printing, proceed to 2. B: Performing One Pass Multilayer Printing (Three-layer Mode) or 2. C: Performing One Pass Multilayer Printing (Two- to Five-layer Custom Mode).
2. A: Performing Pullback Printing
Pullback and printing are performed for each job in the job number sequence.
- Select the layered job.
-
Perform printing.
Processing by the RIP and printing are performed.
2. B: Performing One Pass Multilayer Printing (Three-layer Mode)
With some models, one pass multilayer printing is possible in a mode with three layers selected. If Unsupported Model is not displayed on the Layer tab under Job Settings [Layered Job], you can use this function.
- CMYK -> Wh -> CMYK
- Pr -> Wh -> CMYK
- Pr -> CMYK -> Wh
- Wh -> CMYK -> Gl
- Marks are only added when the job on each layer has the same size, position, and orientation.
- Crop marks are added to the Entire Area.
- Use one of the methods below to display Job Settings [Layered Job].
- Double-click the layered job.
- Right-click a layer job, and then click .
- Click on the left side of the job tool area, and then click
 Settings.
If there is a layer that you want to hide in the Layers, clear the Layers checkbox.
- Select the One Pass Multilayer Printing checkbox.The checkbox will be selected if the data can be used for one pass multilayer printing. Current Layer Count and Number of Layers Possible for One Pass Multilayer Printing are displayed if the data cannot be used for one pass multilayer printing.
- The message The layered job will be reconfigured to change the printing method. Do you want to continue? appears. Click Yes.The Settings window closes. After the job is reconfigured, the Settings window appears again.
- Select items such as Media Name, Print Quality, and Mode from .
- Click OK.You are returned to the main window.
- Perform printing.Processing by the RIP and printing are performed.
2. C: Performing One Pass Multilayer Printing (Two- to Five-layer Custom Mode)
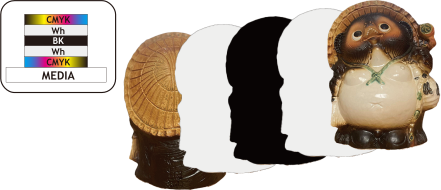
- Use one of the methods below to display Job Settings [Layered Job].
- Double-click the layered job.
- Right-click a layer job, and then click .
- Click on the left side of the job tool area, and then click Settings.
To check the image in the preview window, clear the checkboxes on the upper layers. - Select the One Pass Multilayer Printing checkbox.
- The message The layered job will be reconfigured to change the printing method. Do you want to continue? appears. Click Yes.The Job Settings [Layered Job] window closes. After the job is reconfigured, the Job Settings [Layered Job] window appears again.
- Under , click Edit.
- Set the order of the layers.Select the layer to change, and then click
 or
or  .MEMO You can also set the mode of each layer, and then switch the image of each layer at a later time. In this situation, the mode of each layer is fixed, and only the images are switched.
 - Select the mode to print for each layer.Select CMYK, Wh, Gl, or something similar with Mode.
- Click OK.You are returned to the Job Settings [Layered Job] screen.
- Configure other settings if necessary.
- Click OK.
- Perform printing.Processing by the RIP and printing are performed.
Clipping the Image with a Layered Job and Setting the Number of Copies and the Spacing
When you are using multiple images as a single piece of print data to print a product, you may want to increase the production of a single specific image. Clip the required image with a layered job and set the number of copies and the spacing. You can then perform additional printing of the clipped part to increase the production of the product.
| Print data (layered job) | Product |
|---|---|
 |  |
- Use one of the methods below to display Job Settings [Layered Job].
- Double-click the layered job.
- Right-click a layer job, and then click .
- Click on the left side of the job tool area, and then click Settings.
- Click
 Clip and Tile.
 - Select the Clip Image checkbox under Clipping.
- Set the part to be printed (the clip area).
- In the layout area, click
 .If the icon is blue, it is already selected.
 - Drag the clip point to set the clip area.To fine-tune the clip area, use
 and
and  to enlarge the preview image, and then drag the clip point again.
- In the layout area, click
- Click
 Layout.
 - Specify Copy and Tile Spacing in Print Properties.
- Click OK.You are returned to the main window.