
Sustituir las formas de datos de impresión con líneas de corte
Se pueden sustituir algunas de las formas dentro de los datos de impresión con una línea de corte.
-
Select the job to which to add a cutting line from the job list.
IMPORTANTE Cutting lines can only be added to PDF-format jobs.
-
Right-click the selected job, and then click Job Assistant.
The Job Assistant window appears.
-
Click
 .
.
- Haga clic en la forma para sustituirla por una línea de corte.Puede seleccionar múltiples formas manteniendo pulsada la tecla Mayús mientras hace clic.
- Seleccione el método de edición
 Reemplazar con línea de corte.
 -
Select the type of cut from those shown below.
Type of Cut 
CortarCuts solid lines over the cutting lines that were created. 
Corte perforadoCuts perforated (broken) lines over the cutting lines that were created. -
Select the following conditions.
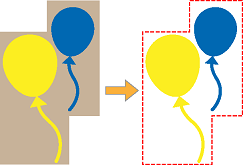
Create Cutting Line / Replace with Cutting Line Tipo de contorno  Contorno: Creates a cutting line based on the selected image outline. This will ignore any clipping mask.
 Contorno recortado: Creates a cutting line based on the outline of the unmasked portion if the selected image had a clipping mask. If the selected image does not have a clipping mask, it creates a cutting line in the same manner as Contorno.
 Cuadro delimitador: Creates a rectangular cutting line around the selected image.
Corte interior  Corte interior: If there are outlines on the inside of the selected image (as in the figure to the lower left), or you have selected multiple images and outlines can be made on the inside of adjacent images (as in the figure to lower right), a cutting line will be created on the inside.
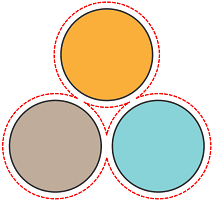
 No cortar el interior: Even if there are outlines on the inside of the selected image (as in the figure to the lower left), or you have selected multiple images and outlines can be made on the inside of adjacent images (as in the figure to lower right), a cutting line will not be created on the inside.

Forma de la esquina  Ángulo: Creates a cutting line that maintains the corner shape. Note however that if Límite del ángulo is on, the cutting line will be chamfered depending on the angle.
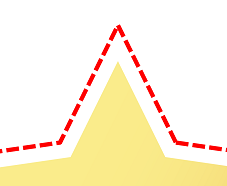
 Redondeada: Creates a cutting line that rounds the corners.
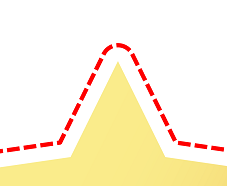
 Biselada: Creates a cutting line that chamfers the corners.
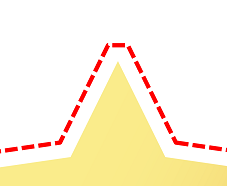
Límite del ángulo * This setting is only enabled when Ángulo is selected in Forma de la esquina.
OFF: Creates a cutting line that maintains the corner regardless of the angle.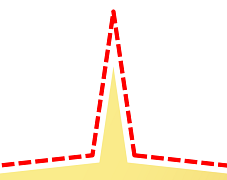 ON: Chamfers the corners according to the Ángulo settings.
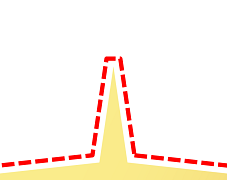
Ángulo * This setting is only enabled when Límite del ángulo is on.
Use the slider to set the Ángulo to be chamfered. For example, the more you set the angle to the Grande direction, the wider will be the angle at which chamfering is performed.
Desplazamiento Sets the distance from the outline of the selected shape at which to create the cutting line. - Haga clic en Reemplazar.
- Haga clic en Aceptar.
-
In the confirmation window, click Sí.
The Job Assistant window closes. It will be added to the job list as a new job.