
Performing Just Cutting
Even with print data where there is no cutting line around the border, it is possible to set cutting at image boundaries and perform cutting output.
However, when the print data is an EPS file and a cutting line has been drawn around the border, it is possible that the saved print data has a cutting line that is outside the printing area. In this case, it is not possible to cut all of the outside. Either correct the print data so it has margins, or else configure the settings listed in the note on IMPORTANT in Step 6.
-
Perform the operation shown below according to what is being set.
- Job: Double-click the job to open the Job Settings window.
- Queue folder: Click
 for the queue folder to open the Queue Properties window.
-
Click
 .
.
- From the Operation Mode list, select Cut Only.
-
Select the following check boxes as necessary.
-
Cut Image Boundaries
Cuts the border of the job regardless of whether a cutting line is present. The generated border cutting line can be checked with the preview in the job settings window.
-
Return to Origin After Cut
Returns the media to the origin (the position before cutting) after cutting. Set when performing printing after cutting.
-
Cut Passes
Use this option to specify the number of cut passes when cutting thick media or hard media. Depending on the media, cutting multiple times with lower blade force may give more aesthetically pleasing results than cutting once with higher blade force.
-
Cutting Conditions Settings
Enables the setting of printer cutting conditions such as Cutting Speed.Configuring the Cutting Conditions
-
Execute PREFEED Operation
Feeds out media according to the size of the data sent from the computer, pulls the media back to the output-start location, and then performs output. The cutting quality is stable because cutting is not performed while roll media is pulled tight.
-
- Configure other settings such as the media settings if necessary.
-
Click OK.
- When changes are made in Queue Properties:
- A message that printing settings will be overwritten appears. Click Yes.
-
To apply the changes to a job already in the queue folder, select the job and click
 .
.
IMPORTANT- The print data is an EPS file.
- A cutting line has been drawn around the border.
If both of the above conditions are met, additional settings are required. If you do not configure these additional settings, it may not be possible to cut a part of the border. Configure the settings shown below.
- Double-click the job.
- In the Queue Properties window, click
 .
. - Enter a value in Margin under EPS.
- If you scale the image in the or window, the size of the margin will also be scaled.
- When you add a job to the job list, the margin set with Margin is automatically added within the range specified by the border.
- When changes are made in Queue Properties:
-
Add the job containing cutting lines to the job list, and then click
 .
Cutting starts along the cutting lines of the selected job.MEMO
.
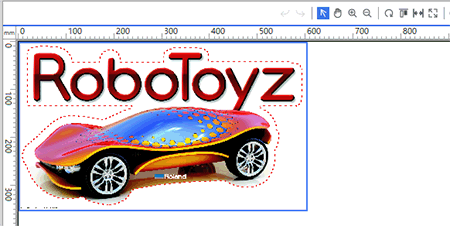
Cutting starts along the cutting lines of the selected job.MEMO- Recognized cutting lines are displayed as red dotted lines in the preview area in the Job Settings window.
-
You can also change these settings in the Job Settings window after adding a job to the job list. However, you cannot change the Cut All Paths setting or the Margin setting under EPS.
- Recognized cutting lines are displayed as red dotted lines in the preview area in the Job Settings window.