
Performing a Nozzle Drop-out Test
Procedure
-
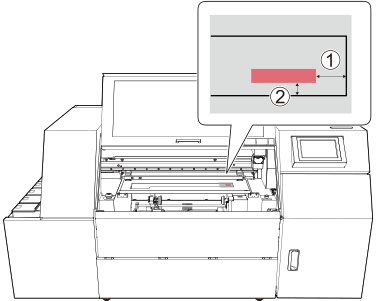
Fix the nozzle drop-out test paper to the light shield cover with masking tape or something similar.
The printing size for the nozzle drop-out test is approximately 200 mm × 150 mm (7.87 in. × 5.91 in.) (landscape).Fix the test paper in alignment with the printing position (approximately 70 mm (2.76 in.) × 20 mm (0.79 in.) from the edge of the irradiation window of the light shield cover).
-
Tap
 on the operation panel.
- Tap .
-
Tap Execute.
Printing of the test pattern starts.
-
Open the front cover.
MEMO
Be sure to hold the handle of the front cover and keep holding it until the cover is completely opened or closed.
If you do not open and close the front cover gently, it may break or you may be injured.
-
Check whether there is dot drop-out or dot displacement in the test pattern.
Missing blocks indicate dot drop-out. Collapsed or inclined blocks indicate dot displacement.
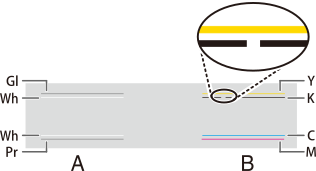
MEMOIf the printing-test results are difficult to interpret
Try changing the test paper color, or check the results in a bright location while changing your line of vision. They are visible using the reflection of the light.
-
Close the front cover.
MEMO
Be sure to hold the handle of the front cover and keep holding it until the cover is completely opened or closed.
If you do not open and close the front cover gently, it may break or you may be injured.
If no dot drop-out or dot displacement occurs, preparations for output are finished.