
Emergency Measure) Cleaning the Print Head Surface
This operation is an emergency measure. It may damage defect-free parts depending on the symptoms, worsening the symptoms. If you have any questions, contact your authorized dealer.
Do not perform cleaning immediately after printing has finished. (Wait approximately 15 minutes after printing finishes.)
The area around the UV-LED device is hot and may cause burns.
Be sure to perform operations as specified by the instructions, and never touch any area not specified in the instructions.
Sudden movement of the machine may cause injury or burns.
Important notes on this procedure
- Before performing this operation, remove any objects.
- To prevent the print heads from drying out, finish this procedure in 10 minutes or less. A warning beep sounds after 10 minutes.
- Never use any implements other than the included cleaning sticks. Cotton swabs or other lint-producing items may damage the print heads.
- Do not use cleaning liquid other than the included cleaning liquid.
- Be sure to use new cleaning sticks. Reusing cleaning sticks will adversely affect the printing results.
- Do not put a cleaning stick that has been used for cleaning into the cleaning liquid. Doing so will deteriorate the cleaning liquid.
- Never rub the print head surface (nozzle surface).
- If you use up the cleaning sticks or cleaning liquid, contact your authorized dealer or visit our website (https://www.rolanddg.com/).
When a warning beep sounds during cleaning
- A warning beep sounds 10 minutes after operation starts. Stop work, close all the covers, and then tap Finish All to end the manual cleaning mode. After that, restart the procedure from the beginning.
| Required items | |
|---|---|
 |
 |
| Cleaning stick | Cleaning liquid |
- Remove the object.
-
Tap
 on the operation panel.
- Tap .
-
Tap Execute.
Tap Execute to display a message reminding the user to wear protective gear.
-
Tap OK.
Tap OK to move the print-head carriage and the rotary device.MEMO
The cleaning of the print head surface (as an emergency measure) uses the manual cleaning menu and moves the print-head carriage to the left side of the machine. For this purpose, the manual cleaning procedure is displayed on the operation panel. However, ignore the screen instructions and perform the following operations.
-
Open the front cover.
MEMO
Be sure to hold the handle of the front cover and keep holding it until the cover is completely opened or closed.
If you do not open and close the front cover gently, it may break or you may be injured.
- Touch the metal part at the bottom inside the printer to discharge any static electricity from your body.
-
Apply a large amount of cleaning liquid to a new cleaning stick.
IMPORTANT
- Be sure to use one of the included cleaning sticks.
- Do not use a previously used cleaning stick.
- Do not put a previously used cleaning stick into the cleaning liquid.

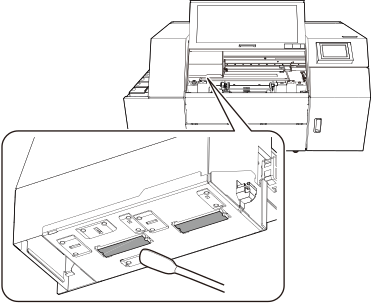
- Very gently touch the cleaning stick against the print head surface (nozzle surface).Very softly press the cleaning stick against the print head so that cleaning liquid soaks into the print head surface (nozzle surface). Never rub the stick on the surface or press it forcibly.
- Tap Finish All.