
Replacing the Print Head Caps
Replacement is necessary if the The time for cap replacement has arrived. message appears.
WARNING
Be sure to perform operations as specified by the instructions, and never touch any area not specified in the instructions.
Sudden movement of the machine may cause injury or burns.
IMPORTANT To prevent the print heads from drying out, finish this procedure in 10 minutes or less. After 10 minutes, the alarm will sound, so pause the procedure and perform the following operations.
- Close all the covers.
- Tap Finish All to finish the work.
- Restart the procedure from the beginning.
| Required items | ||
|---|---|---|
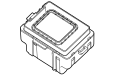 |  |  |
| Print head cap | Cloth (that is not fluffy) | Cleaning stick |
Procedure
- When the message The time for cap replacement has arrived. appears, tap OK.
- Remove any media.
- Tap
 to display the messages.
 - Tap The time for cap replacement has arrived..The Cap Replacement screen appears.
- Tap Execute.
- Follow the instructions on the operation panel to replace the print head caps.
- Tap
 or
or  to check the procedure.
 - If you complete the work without viewing the instructions, tap Finish All.
- Tap
- When the print head cap replacement is finished, tap Finish All.