
Menu
Menu Operation Legend
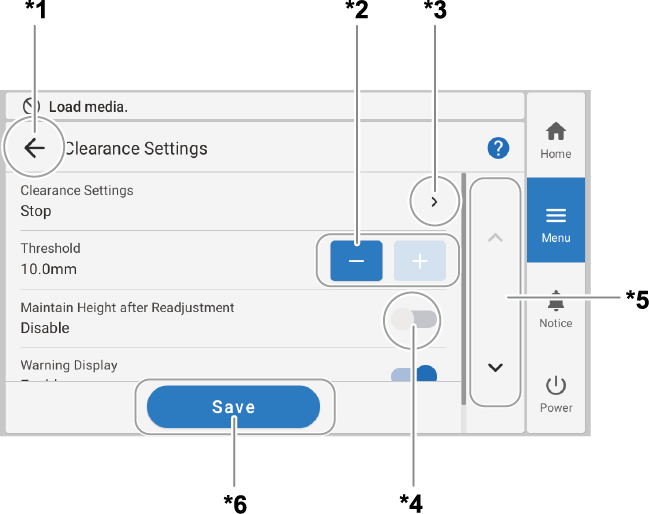
*1: Tap  to return to the previous screen. to return to the previous screen. |
*2: Tap  or or  to change the setting (value). to change the setting (value). |
*3: Tap items marked with  to switch to the settings screen for that item. to switch to the settings screen for that item. |
| *4: Switches settings on or off. |
*5: Tap  or or  to scroll the screen up or down. to scroll the screen up or down. |
| *6: Tap Save to confirm changed details. |
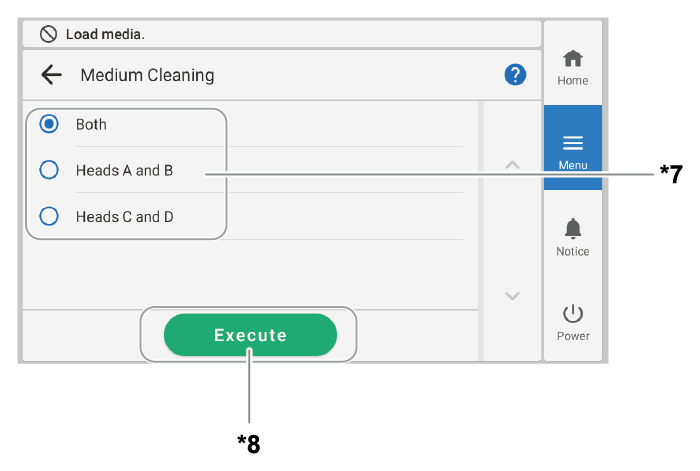
| *7: Switches the selection. |
| *8: Tap Execute to start the work. |
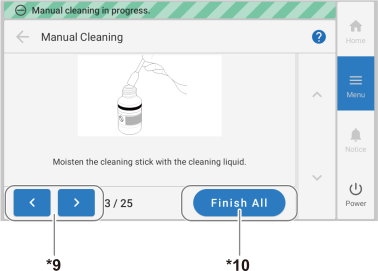
*9: When performing a series of work, tap  to display the next step. Tap to display the next step. Tap  to return to the previous step. to return to the previous step. |
| *10: Finish configuring settings at this stage and skip all subsequent steps. If all operations have been completed, the work is finished. |
Menu List
Tap  to display the list of operations.
| Level 1 | Level 2 | Level 3 | Level 4 | Details |
|---|---|---|---|---|
| Job Management | Direct Printing | Perform VersaWorks and Queue Folder via Roland DG Connect Hub, and then output the job. | ||
| Printing Log |
Displays the printing log of the job. The Job Properties for each job, and the Total Time and Total Area for all jobs, can be checked. |
|||
| Media Settings*1 | List of Media Settings | Lists the settings of the object to be printed on that has been set up. Tap a setting to move to a screen for changing this setting. | ||
| Printing Zone | Changes the print origin and printing area. | |||
| Media Suction Force | Adjusts the suction force applied to the object on the flat table. | |||
| Printing Movement Range | During printing, select the movement range of the print-head carriage from Output Data Width, Media Width, or Full Width. | |||
| Wait Time Per Scan | Set this item when the image quality is rough due to recoil caused by the movement of the print-head carriage during printing. | |||
| Batch Media Settings | The minimum settings required for object setup can be configured by following the on-screen instructions on the operation panel. | |||
| Media Management | Displays a list of registered media. Up to 50 media names can be saved, and the following operations on media settings are possible.
|
|||
| Cleaning | Printing Test | Before printing, use Nozzle Drop-out Test to check whether ink is discharged from the print heads correctly. If dot drop-out is present, perform cleaning appropriate for the severity of the drop-out. If faulty ink discharge cannot be improved, the problematic nozzle can be identified with Nozzle Mask Test, making it possible to stop using this nozzle. | ||
| Normal Cleaning*2 | If dot drop-out or dot displacement occurs, select the target print head, and then clean it. If the problem cannot be fixed, perform more powerful cleaning. Powerful Cleaning also has the effect of improving uneven colors with white ink. If the media has already been set up, the After cleaning, perform a printing test. menu appears. When this is turned on, a printing test is performed after cleaning. |
|||
| Medium Cleaning*2 | ||||
| Powerful Cleaning*2 | ||||
| Manual Cleaning*2 | Use cleaning liquid and a cleaning stick to clean the area around the print heads. | |||
| Maintenance | UV Lamp Manual Cleaning | Cleans dirt from the glass surface of the UV-LED device. | ||
| Wiper Replacement | Replaces the wiper used in cleaning the print heads. | |||
| Cap Replacement | Replaces the print head caps, which are used to protect the print heads from drying out and from dust. | |||
| UV Mist Filter Replacement | Replaces the UV mist filters used to absorb ink mist. | |||
| Flushing Sponge Replacement | Replaces the flushing sponge that absorbs the ink discharge to prevent clogging of the print heads. | |||
| Cleaning of Non-Contact Sensor*4 | Moves the flat table to a position where it is easier to clean the non-contact sensor. | |||
| Ink Renewal*2 |
Perform Ink Renewal when ink discharge issues or uneven colors are not resolved. However, this operation consumes a large amount of ink and may damage the print heads, so do not perform it more than necessary. |
|||
| Ink Renewal Inside Damper*2 |
Perform this operation to stabilize output when uneven color issues with the ink are not resolved. However, this operation consumes a large amount of ink and may damage the print heads, so do not perform it more than necessary. |
|||
| Ink Circulation*2*3 |
Circulates ink to prevent uneven color issues with white ink. If the media has already been set up, the After ink circulation, perform a printing test. menu appears. When this is turned on, a printing test is performed after Ink Circulation. |
|||
| Drain Bottle | Use this menu to discard discharged fluid at any desired time, regardless of any notifications or errors. | |||
| Automatic Maintenance | Set the maintenance items that are performed automatically and the Type and Frequency according to the printer service environment, types of products that are frequently output, and other factors. A maximum of five settings for automatic maintenance can be saved. | |||
| Automatic Sub Power On Settings |
You can configure the settings so that the printer's sub power switches on automatically on the specified days of the week. The time when the sub power is turned on and the cleaning execution setting can also be configured. You can also specify days when the sub power will not automatically be turned on. |
|||
| Preferences | Printing Zone Preview | This is displayed when the object to be printed on is set up. Tap Execute to use the pointer to indicate the printing area that has been set. | ||
| Continuous Printing Settings | Select whether to pause for each print data when multiple print data are sent. For example, if you want to replace the object to be printed on during positioning each time printing is finished, disable continuous printing. | |||
| Sound at End of Printing | Select whether to play a sound at the end of printing. | |||
| Base Printing Position | Select the origin position of the printing area. | |||
| Crop Mark Detection Sensitivity | Set the sensitivity for reading of the crop marks. | |||
| Status Light | Set whether the status light is turned on or off. | |||
| Printing Test Position | Sets the direction for test pattern printing: Feed or Scan. If you set it to None, the test pattern will print in the same position. | |||
| Preferences | Clearance Settings | Clearance Settings | Set whether the height is re-set or not when the object to be printed on touches the head gap sensor during printing. | |
| Threshold | Set the maximum value for when the height is re-set during printing. | |||
| Maintain Height after Readjustment |
Set whether to overwrite the registered media settings with the flat table height to which the table was readjusted during printing. This setting is only enabled when Readjust is selected in Clearance Settings. |
|||
| Warning Display | If this setting is enabled, a message is displayed when the height is readjusted. | |||
| Z-axis Origin | You can select whether to set the origin of the Z axis (which indicates the distance in the height direction) to the lowest or highest position on the Z axis. | |||
| Rotary Axis Unit Attachment/Removal | Moves the flat table to a position where the rotary axis unit can be inserted/removed. | |||
| Vacuum | Set whether the start and end of suction is to be switched automatically or manually in conjunction with printing. | |||
| Operation before Printing | When On is selected, the flat table moves slowly from the back to the printing-start location, the height of the object to be printed on is checked, and similar operations are performed. | |||
| Table High-Speed Operation | When this function is enabled, the flat table moves forward/backward at a faster speed for operations other than printing. | |||
| Table Position After Setup Completion | Specifies the table position after the object to be printed on is set up. | |||
| Register Standard Waveform of Height Sensor*4 | When the non-contact height sensor cannot correctly measure the height of the object to be printed on, execute this function. | |||
| Use a Non-contact Sensor During Automatic Height Detection*4 | You can select the way to detect the height of the object to be printed on. | |||
| Notifications On/Off | When this is set to on, notifications are displayed at the appropriate times.
|
|||
| Sleep Time | Sets the time until sleep mode (the state in which the power-saving features operate) activates. | |||
| Stopping the Warning Beep | Sets the duration of the warning beep that sounds when, for example, an error occurs. | |||
| Post-Scan Length | Sets the time for which to shine ultraviolet light during printing. | |||
| Thumbnail Settings | You can change the orientation of the image (thumbnail) that is being output and is displayed on the operation panel. | |||
| Time before Automatically Returning to Home Screen | When Menu operation in progress: Press [Home] to enable output. is displayed in the status bar and this set time elapses while the menu is displayed, the display will automatically switch to the home screen. | |||
| Operator Mode | To prevent operators from performing inadvertent panel operations, you can enable Operator Mode to limit some panel operations. | |||
| Reset to Factory Defaults | Returns all settings other than Language and Units to their factory default values. | |||
| System Information | Machine Information | Displays the Model, Serial Number, Ink Type, Firmware Version, and MAC Address. | ||
| Network | Sets the Obtain IP Address Automatically, IP Address, Subnet Mask, and Default Gateway to connect the machine to a computer. | |||
| Units | Sets the Length and Temperature. | |||
| Language | Sets the language. The language can be set to Japanese, English, French, Italian, German, Spanish (Europe), Spanish (South America), or Portuguese (South America). | |||
| Date/Time | Sets the current year, month, day, hour, minute, and second. | |||
| Appearance | Sets the operation panel to Light or Dark. | |||
| Screen Brightness | Sets the brightness of the operation panel's screen. | |||
| Screen Operation Sound | Turns the operation sound of the operation panel on/off. | |||
| 2D Codes | User's Manual | Displays the 2D code for viewing the manual using a smartphone or other mobile terminal. | ||
| Roland DG Connect | Displays the 2D code for accessing Roland DG Connect using a smartphone or other mobile terminal. | |||
| License | Displays the license information of the operation panel. | |||