
Method for Ink Renewal Inside Damper
Ink Renewal Inside Damper can be used to stabilize the output colors by replacing the ink.
Perform Ink Renewal Inside Damper in the following situations.
- Normal Cleaning
- Medium Cleaning
- Powerful Cleaning
- Manual Cleaning
- Ink mixing
- Ink mixing
- Ink Circulation
- Powerful Cleaning
-
Ink Renewal Inside Damper consumes more ink than Powerful Cleaning.
-
When you perform Ink Renewal Inside Damper, replace the ink pouch in the target ink cartridge with a new ink pouch. If the ink runs out during cleaning, a Cleaning Error (Ink Cartridge) will occur and cleaning will stop.
-
The ink pouches that you have removed can still be used in operations other than ink renewal inside the damper (such as printing).
-
-
Tap
 .
.
- Tap .
- Replace the ink pouch in the target ink cartridge with a new ink pouch.
-
Select the group of print heads for which you will perform ink renewal inside the damper.
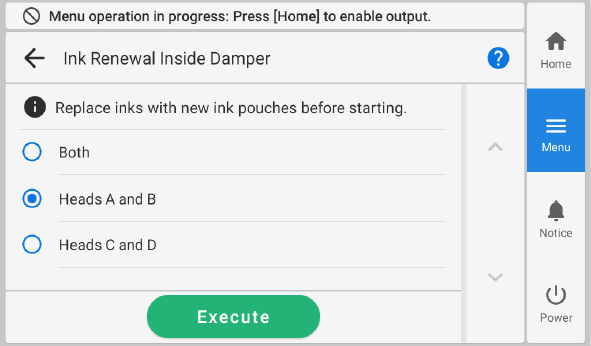
- Tap Execute.
Starts the Ink Renewal Inside Damper function. The details of the operation in progress and the (approximate) remaining time of that work are displayed in the status bar at the top of the screen.
When the work is finished, the status bar returns to its original display.
MEMOIf Discard the discharged fluid in the bottle. appears after tapping Execute
1. Remove the drain bottle and discard the discharged fluid.IMPORTANTWhen you remove the drain bottle, a few drops of discharged fluid may come out of the machine. Exercise caution to prevent this fluid from soiling your hands or the floor.
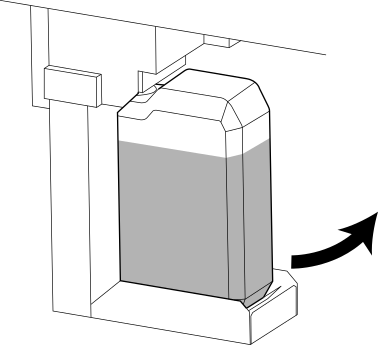
2. Quickly attach the emptied drain bottle to the machine once more.
3. Tap Finish.
CAUTIONBefore you detach the drain bottle, be sure to wait for the screen to display Discard the discharged fluid in the bottle.. After discarding the discharged fluid, promptly attach the drain bottle to the machine.
Failing to follow this procedure may cause discharged fluid to flow out of the tube and spill, soiling your hands or the floor.
WARNINGNever place discharged fluid or ink near an open flame.
Doing so may cause a fire.
CAUTIONTo store discharged fluid temporarily, place it in the included drain bottle or in a durable sealed container such as a metal can or polyethylene tank, and cap the container tightly.
Any spillage or vapor leakage may cause fire, odor, or physical distress.
IMPORTANTDo not store discharged fluid in a location where it is exposed to direct sunlight.
When temporarily storing discharged fluid in the included drain bottle, do not store it in a location that is exposed to direct sunlight. The discharged fluid may harden, making the drain bottle unusable. The drain bottle may also deteriorate, leading to discharged fluid leaks.
IMPORTANTDispose of discharged fluid properly, in accordance with the laws in effect in your locale.
Discharged fluid is flammable and contains toxic ingredients. Never attempt to incinerate discharged fluid or discard it with ordinary trash. Also, do not dispose of it in sewer systems, rivers, or streams. Doing so may have an adverse impact on the environment.
- If uneven output color issues with ink are not resolved even after performing Ink Renewal Inside Damper, perform Ink Renewal.
-
Tap
 to return to the home screen.