
Toolbar
Adjust, Voltage, and Advance are used when this machine is installed. Do not change the settings.

| Icon | View | Description | ||
|---|---|---|---|---|
 |
This executes printing. Click this button to display the Confirm before printing window. | |||
| Start Printing | Printing starts. | |||
| Cancel Print | This cancels printing. | |||
| Z axis Debugging |
This adjusts the head height again. Click this button to display the Z axis control panel window. |
|||
 |
Pause | Pauses printing. | ||
 |
Cancel | This cancels printing. | ||
 |
Check |
This starts a test printing. Click this button to display the Confirm before printing window. |
||
| Start Printing | Printing starts. | |||
| Cancel Print | This cancels printing. | |||
| Z axis Debugging |
This adjusts the head height again. Click this button to display the Z axis control panel window. |
|||
 |
Flush |
This selects whether or not to perform automatic periodic discharge of ink in order to prevent clogging of the print head nozzles. When this button is clicked with ink discharge enabled, TIP: Whether to close flush? is displayed. When this button is clicked with ink discharge disabled, TIP: Whether to open flush? is displayed. Selection choices: OK/Cancel |
||
 |
Margin |
Click this button to set the current print head position as the base point on the X axis (scan direction). Clicking this button displays the pop-up window asking TIP: Whether to the current pos is X margin?. Selection choices: OK/Cancel |
||
 |
 |
Left/Right Ahead/Back |
Click each button to move the print-head carriage. | |
 |
 |
|||
 |
 |
X Reset/Y Reset |
These reset the printing start position on the X axis (scan direction) and Y axis (feed direction). Click this button to return the Margin Setting value on the Setting tab to 0. |
|
 |
Z Axis |
This sets the Z axis (height). Click this button to display the Z axis control panel window. |
||
 |
Spot | This machine does not use this function. | ||
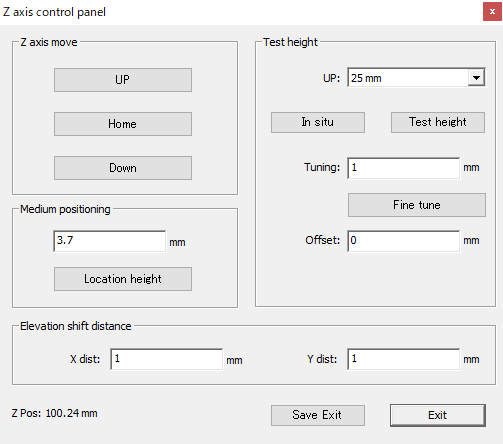
Z axis control panel Window
| View | Description | |
|---|---|---|
| Z axis move | This moves the print-head carriage on the Z axis. | |
| UP | Moves the print-head carriage upward. | |
| Home | Returns the print-head carriage to a specified value position. | |
| Down | Moves the print-head carriage downward. | |
| Medium positioning |
This moves the print-head carriage on the Z axis. Enter a value and click Location height. The print-head carriage moves to the height of the entered value. |
|
| Test height | This detects the thickness of the object to be printed on and automatically adjusts the print-head carriage height. | |
| In situ |
This automatically adjusts the print-head carriage height after the carriage moves from the current position to the position specified with UP. *1
When automatic adjustment is complete, the Test height fine-tuning/Finishing window is displayed. To change the automatically adjusted height, enter the desired value in Tuning and click Fine tune. The value entered in Tuning will be added to the print-head height that has automatically been adjusted, for fine tuning. The print-head carriage moves upward or downward by the value entered in Tuning every time Fine tune is clicked. To exit, click Test Height completed. |
|
| Test height | This machine does not use this function. | |
| Fine tune |
The print-head carriage moves upward or downward by the value entered in Tuning. The print-head carriage moves upward or downward by the value entered in Tuning every time Fine tune is clicked. |
|
| Elevation shift distance | This machine does not use this function. | |
| Z Pos |
This displays the current height of the print-head carriage (the distance between the flat table and the bottom surface of the print-head carriage). |
|
In UP, enter a value that is larger than the thickness of the object to be printed on. If a value smaller than the thickness of the object to be printed on is entered, the print head may contact the object, causing damage. If a value that is much larger than the thickness of the object to be printed on is entered, this will increase the time required for height measurement. Enter an appropriate value.