
Rinsing and Draining the Coolant Lines
After rinsing the coolant lines running through the machine, drain the remaining fluid.
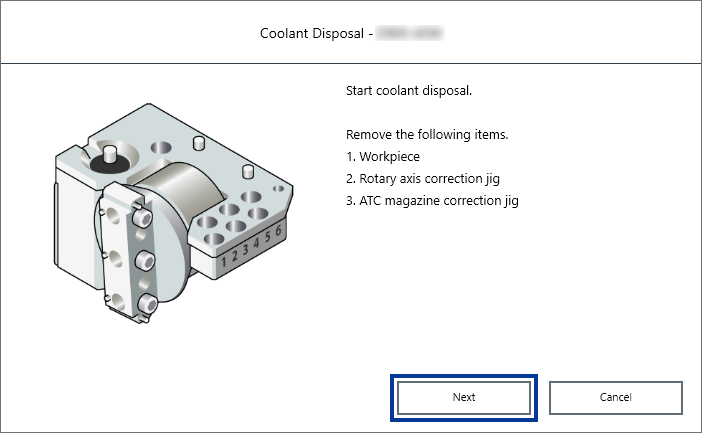
If workpieces, milling burs, correction jigs, and other such items are attached to the machine, remove all of them before performing this work.
When to Perform This Work
- When there are no plans to use the machine after replacing the coolant
- Before moving the machine
Item to Prepare Yourself
- Purified water
1. Setting coolant disposal
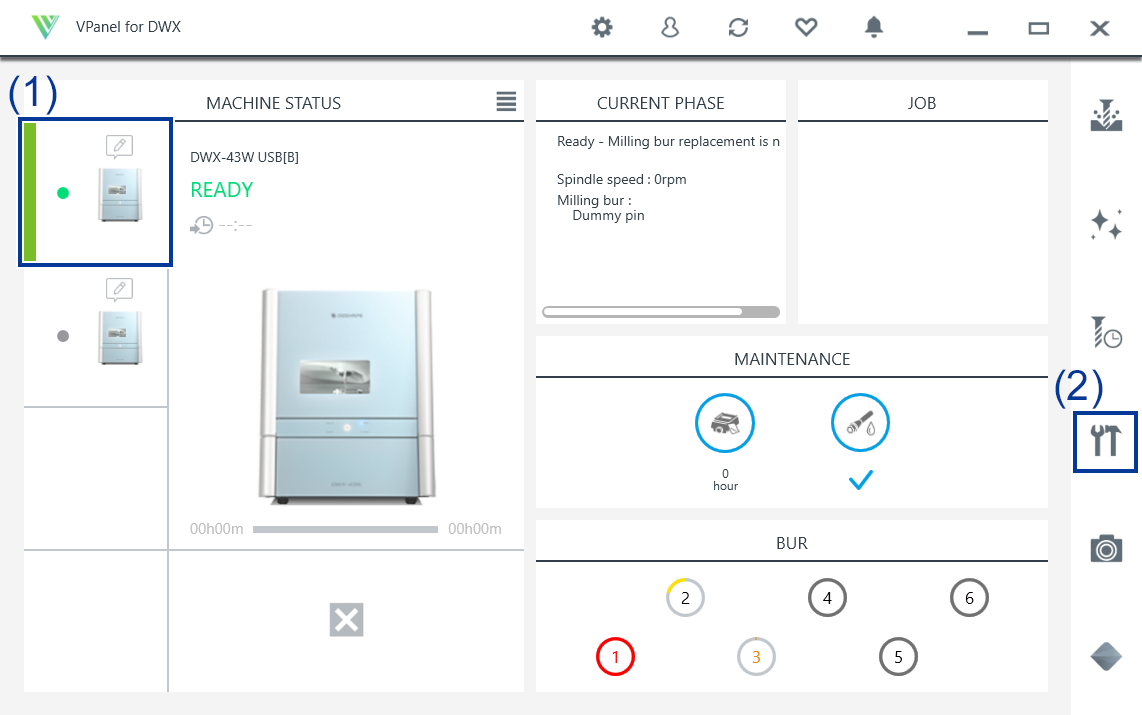
- Show VPanel.
-
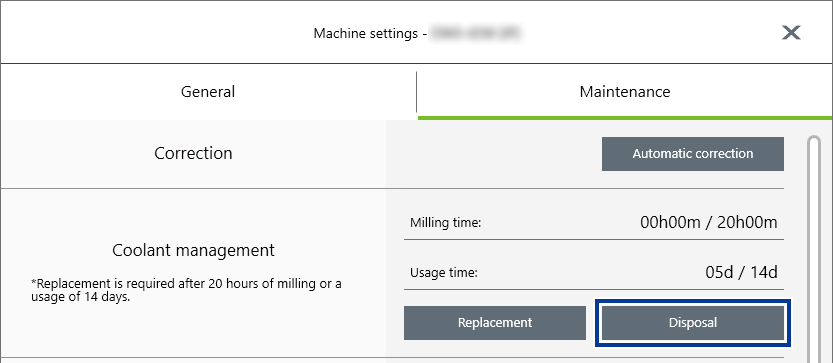
Open the Machine settings window.
-
Click
 .
.
The Machine settings window is displayed.
-
Click
-
On the Maintenance tab, click .
-
Open the front cover.
Hold the parts shown in the figure with both hands and open the cover.

- Remove the workpiece, rotary axis correction jig, and ATC magazine correction jig.
-
Click Next.
-
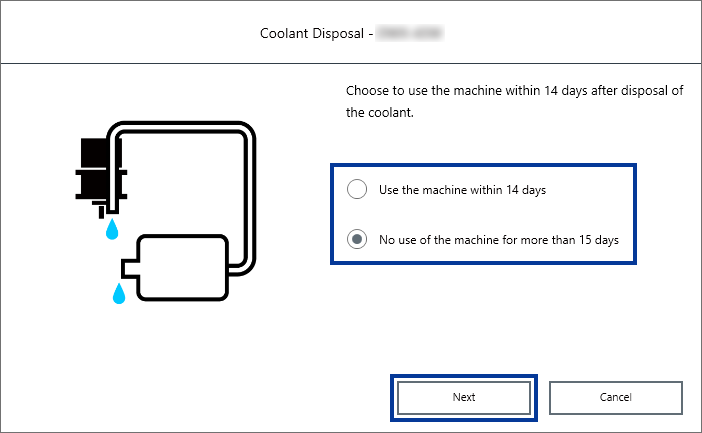
Select the machine use time, and then click Next.
2. Clean the coolant tank
-
Gently push the bottom cover, and then lower it toward you to open it.

-
Remove the coolant tank.
MEMO Move the coolant tank slowly. Forcefully moving the coolant tank may cause the coolant to spray out.
 CAUTION
When removing the coolant tank, hold the handle as shown in the figure.
Placing a finger under the drawer may lead to injury due to your finger hitting the cover.

-
Remove the lid () and basket filter () of the coolant tank.
By lifting up the basket filter, both the lid and the basket filter can be removed together.

-
Place the basket filter in the included cleaning tray.
When much milling waste has accumulated in the basket filter, or when milling PMMA, coolant may accumulate inside the basket filter.
In this case, wait until the coolant flows out from the basket filter.

-
Clean the basket filter.
-
Use the included cleaning spatula to remove the milling waste from inside the filter.

-
Put water in the included measuring cup and rinse out the remaining milling waste in the basket filter.
In order to prevent clogging, after adding water and mixing the remaining milling waste in the basket filter, thoroughly rinse the basket filter so that no milling waste remains.

-
Use the included cleaning spatula to remove the milling waste from inside the filter.
-
Remove the drain cap of the coolant tank, and then drain the coolant.
IMPORTANT
Dispose of coolant and milling waste appropriately in accordance with local regulations.
Do not thoughtlessly dispose of them in sewers or rivers or dump them in inappropriate locations. Doing so may have an adverse impact on the environment.

-
Clean the inside of the coolant tank.
-
Remove the milling waste that was collected in the collection tray.
After removing the milling waste, use tap water and rinse off any remaining waste in the collection tray.

-
Remove the milling waste that was collected in the collection tray.
-
Attach the drain cap to the coolant tank.

-
Place the collection tray () into the coolant tank.
The side of the collection tray with the hole faces the front (the side where the coolant cap is). Move it toward the front and place it in the center in the left-right direction.

-
Install the basket filter into the coolant tank.

-
Pour purified water into the coolant tank.
The purified water is used for regular flushing.
Add purified water until the water level in the tank reaches the "MIN" position.

-
Place the lid on the coolant tank.

3. Rinsing and draining
-
Return the coolant tank to its original position.

-
Push the coolant tank toward the back of the machine.
Push the coolant tank to the point where you feel a click.
 MEMO
MEMOMove the coolant tank slowly. Forcefully moving the coolant tank may cause the coolant to spray out.
Align the label affixed to the right side of the coolant tank with the label affixed to the machine.

-
Close the bottom cover.
Flushing starts.

-
Follow the instructions on the screen and empty the coolant tank.
Water drainage starts.MEMO
If Use the machine within 14 days was selected in Step 7 of 1. Setting coolant disposal, water drainage would not start. Proceed to 4. Clean the inside of the machine..
- Follow the instructions on the screen and again empty the coolant tank.
4. Clean the inside of the machine.
Clean inside the machine with a dry cloth.
Use a dry cloth to clean the inside of the equipment.
Failure to do so may cause the components inside the equipment to degrade, which can lead to injury.
Be careful of the pointed portion inside the front cover.
There is a pointed portion inside the front cover. Exercise caution when cleaning.
-
Open the front cover.
Hold the parts shown in the figure with both hands and open the cover.
-
Follow the on-screen instructions to clean inside the machine, and then click Next.
Clean carefully with a dry cloth. Carefully wipe around the spindle head and the rotary axis parts shown in gray in the following figure.
Fluid and milling waste in these areas may affect milling results.
CAUTIONBe careful around milling waste.
Sharp milling waste may become mixed. To avoid injury, exercise caution.
MEMO The front cover window scratches easily, so do not wipe it off with a cloth.- Inside the machine
-

- When you have finished cleaning, close the front cover.
- Click Next.
5. Remove the collet.
-
Open the front cover.
Hold the parts shown in the figure with both hands and open the cover.
-
Press the collet replacement jig () against the collet, and then insert the collet tap ().
Align the hexagonal tip of the collet and the hexagonal portion of the collet replacement jig.

-
While gently pressing the collet tap up into the hole, rotate the collet replacement jig in the direction indicated in the figure.
Rotate the collet replacement jig until the collet naturally comes free.
CAUTIONRotate the collet replacement jig with the collet tap inserted.
If the collet replacement jig is rotated without the collet tap inserted, the collet may be damaged.

6. Clean the collet.
-
Clean the inside of the spindle (where contact with the collet is made) with the taper cleaner.
Insert about 2/3 of the taper cleaner tip into the spindle and clean the entirety of the inside of the spindle while moving the cleaner up and down aligned with the tapered (slanted) part.
MEMO As a general guide, the taper cleaner should be replaced after 20 cleaning operations.
-
Wipe the outer portion of the collet with a clean, dry cloth.
Do not hold the tapered portion tightly. This part being deformed may result in malfunctions.

-
Clean the inner portion of the collet with the collet brush.
Rotate the collet brush left and right as if you are brushing the inner portion of the collet.

-
Apply a thin layer of grease to two locations: the tapered portion on the outside of the collet () and the spindle head ().
A thin application of grease is sufficient. Do not apply excessively.

-
Assemble the collet (), collet replacement jig (), and collet tap () as shown in the figure, and then insert this assembly into the spindle.

-
While gently pressing the collet tap up into the hole, rotate the collet replacement jig in the direction indicated in the figure to tighten the collet.
Keep rotating until the collet replacement jig will not rotate any more.

-
Remove the collet replacement jig () and the collet tap ().

7. Clean the dummy pin.
-
Clean the handle () of the dummy pin with a dry cloth.
Clean only the handle of the dummy pin with it inserted. Do not pull the dummy pin out.

- Close the front cover.
- When a message indicating that the operation is complete appears, click Complete.