Adjustments before Output
Before output, perform a printing test and a cutting test and make various adjustments.
This work is required to obtain this machine's proper printing and cutting performance. Carry out this work before daily operations, when the media type is changed, and in similar situations.
Use the following link to view a reference video for this procedure. We recommend that you view this video to understand the overall flow of work.
https://youtu.be/S0W2tr8Fqg4Starting Adjustments
-
In the computer's notification area, click
.
BN-20D Utility appears.
-
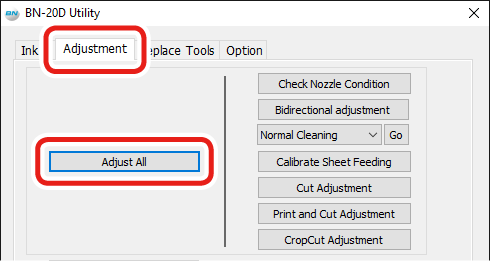
On the Adjustment tab, click Adjust All.

- Click Next on the screen that is displayed.
Checking for Nozzle Drop-out
-
Click Test Print.
A test pattern is printed. Read the on-screen description and check for nozzle drop-out.
- If there is nozzle drop-out, proceed to step 2.
- If there is no nozzle drop-out, click Close and proceed to step 4.
-
Select the Normal Cleaning, and then click Go.
Normal cleaning will start.
-
Click Test Print to check for nozzle clogging again in the same manner as step 1.
If the nozzle drop-out is still present, repeat the Normal Cleaning.
For details on Medium Cleaning and Powerful Cleaning, see the pages related to maintenance in the "BN-20D User's Manual."
MEMOEven if nozzle drop-out occurs after cleaning, output quality will not be affected if this drop-out occurs in about two or three locations.
If you can confirm that the actual printing data can be printed without any problems, you can use the machine without any further adjustments.
- Click Next on the screen that is displayed.
Performing Bidirectional Adjustment
-
Click Test Print.
A test pattern is printed.
- Follow the on-screen instructions and enter the value for New Value.
-
Click Apply.
The value in Present Value changes to the entered value.
- Click Close.
- Click Next on the screen that is displayed.
Correcting Media Feeding
-
Click Test Print.
A test pattern is printed.
-
Follow the on-screen instructions and enter the value for New Value.
The current correction value (A) is that of the figure indicated by "
." Select the value to make the gap (B) and overlap (C) between the upper/lower squares smallest. In the case of the following figure, select "−1.05%." When you cannot choose between two sequential numbers, specify a value that is between them.
-
Click Apply.
The value in Present Value changes to the entered value.
- Click Close.
-
Click Skip on the subsequent adjustment screens.
Cut adjustment, Print and Cut adjustment, and Crop cut adjustment are not necessary with this machine, so do not perform these adjustments here.