
2. Perform printing.
UV light is emitted when printing starts. Put on protective eyewear before clicking  Print.
Recommended printing settings
Large differences in print quality occur due to the combination of Select Solution:, Speed:, Feather level:, and Feather type:. The recommended printing settings are the following.
| Select Solution: | 960 x 900_6P_23-0909X |
| Speed: | High |
| Feather level: | High |
| Feather type: | Default type |
| Select Solution: | 960 x 900_6P_23-0909X |
| Speed: | High |
| Feather level: | Mid |
| Feather type: | Enhanced type |
| Select Solution: | 960 x 900_6P_23-0909X |
| Speed: | High |
| Feather level: | High |
| Feather type: | Enhanced type |
| Select Solution: | 960 x 1200_8P_23-0908X |
| Speed: | High |
| Feather level: | High |
| Feather type: | Enhanced type |

- Start Future RIP.
-
Create a new print job.
Click New in the toolbar.
-
Load print data into Future RIP.
Click Import and specify the location where the print data is saved.
-
Contain the print data within the layout area indicated by the red broken lines.
MEMO
The portion of the print data that is not in the layout area indicated by the red broken lines will not be printed.

-
Click
 Print Set to set.
-
Use Spot Set under Spot Mgr to configure the spot color settings when using white ink or gloss ink for printing.
- Select the Enable check box for W_Spot1 and V_Spot2.
- Check that the W_Spot1 Input Channel is Spot1 and V_Spot2 Input Channel is Spot2.
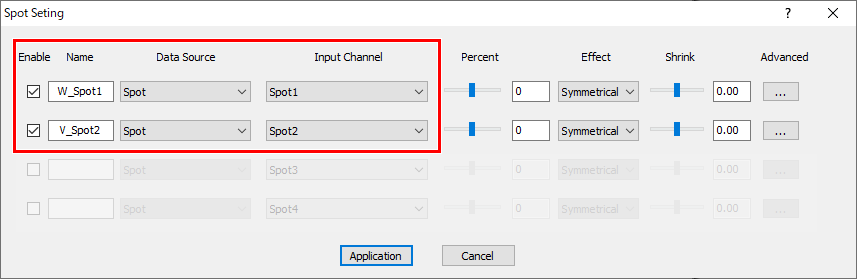
After configuring the settings, click Application.
-
Use Spot Set under Spot Mgr to configure the spot color settings when using white ink or gloss ink for printing.
-
Select the input profile with
 Color Management.
-
Click Driver Setting and configure the printing settings.
-
Set the inks to use for printing with Color combinations:.
MEMO
When using white ink or gloss ink, it is necessary to specify spot colors in the print data. For information on the how to set spot colors, refer to Spot Color Ink Guide.
https://downloadcenter.rolanddg.com/BF-16Color combinations: Application example Description WCV 
White ink is used as the color ink undercoat, and gloss ink is used on top of the color ink.
W 
Only white ink is used.
C 
Only CMYK ink is used.
V 
Only gloss ink is used.
WC 
White ink is used as the undercoat for color ink.
WV 
Coating is performed using gloss ink on top of the white ink.
CV 
Coating is performed using gloss ink on top of the color ink.
CW 
White ink is used on top of color ink.
This is used for reverse printing on transparent objects.
WCV (F) White ink is used as the undercoat for color ink, gloss ink is used on top of the color ink, and a matte finish is created.
V (F) Only gloss ink is used, and a matte finish is created.
CV (F) Coating is performed using gloss ink on top of the color ink, and a matte finish is created.
WV (F) Coating is performed using gloss ink on top of the white ink, and a matte finish is created.
CWC 
White ink is used on top of the color ink, and color ink is used on top of the white ink.
This is used for printing that is visible from both front and back sides on transparent objects.
-
Set the inks to use for printing with Color combinations:.
-
Click Print.
The process for converting the data into data that is suitable for printing is started. When the process ends, printing starts.