
Manual Cleaning
When Manual Cleaning Is Necessary
When the Following Symptoms Occur
It is recommended to perform manual cleaning when any of the symptoms given below occur and cannot be solved by the processes from normal cleaning through powerful cleaning.
Wiper replacement may also be effective in improving these symptoms.
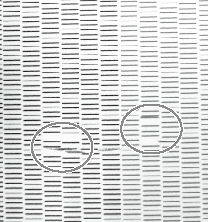
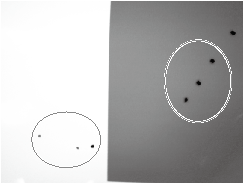
| Dot drop-out or dot displacement | Ink drips | Dragging dirt |
|---|---|---|
 |
 |
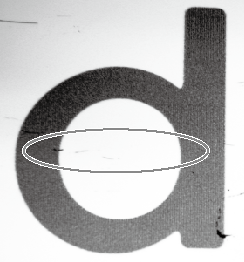 |
| Dust or other foreign matter adheres to the print heads and impedes correct ink discharge. | Ink pools in dust or dirt adhered to the print heads, and drips onto the media. | The phenomenon where dirt or dust accumulates on the print heads. |
- If you use up the cleaning sticks and cleaning liquid used for manual cleaning, contact your authorized dealer.
- The print heads are consumable parts and will need to be replaced depending on the frequency of use or usage conditions.
Manual Cleaning Method
Be sure to perform operations as specified by the instructions, and never touch any area not specified in the instructions.
Sudden movement of the machine may cause injury.
Important notes on this procedure
- To prevent the print heads from drying out, finish the manual cleaning within 10 minutes after the automatic cleaning. A warning beep sounds after 10 minutes.
- Never use any implements other than the included cleaning sticks. Cotton swabs or other lint-producing items may damage the print heads. If you use up the cleaning sticks, contact your authorized dealer.
- Use a new cleaning stick per cleaning session. Reusing cleaning sticks may reduce print quality.
- Do not put a cleaning stick that has been used for cleaning into the cleaning liquid. Doing so will deteriorate the cleaning liquid.
- Stroke the sponges very gently, applying as little pressure as possible. Never rub, scrape, or crush them.
When a warning beep sounds during cleaning
To prevent the print heads from drying out, an alarm sounds about 10 minutes after automatic cleaning finishes. Perform the operation by following the message displayed in Utility.
Do not use a manual cleaning tool that may have been deformed by striking or dropping it. Instead, replace it before cleaning.
Using a deformed manual cleaning tool may prevent manual cleaning from being carried out properly or damage the machine.
Only attach the manual cleaning tool to the machine when performing manual cleaning work.
The machine's internal operation may cause the flat table and manual cleaning tool to come into contact, damaging the machine and the manual cleaning tool.
| Required items | ||
|---|---|---|
 |
 |
 |
| Cleaning sticks | Cleaning liquid | Manual cleaning tool |
Use the following link to view a reference video for this procedure. We recommend that you view this video to understand the overall flow of work.
- Remove the object to be printed on.
- If the manual cleaning tool is stored inside the unit, take it out.
- Close the front cover.
-
Access the manual cleaning menu using one of the following methods.
- Notifications: Click
 , and then click
  for The time for manual cleaning has arrived..
 - Click
 Cleaning on the Utility home screen, then click Execute for Manual Cleaning.
MEMO The manual cleaning work procedure is displayed in Utility. Carefully read the on-screen instructions and carry out the work. - Notifications: Click
-
Wear protective gear (gloves and glasses).
Put on the protective equipment, and then click Next in Utility.
-
Prepare a manual cleaning tool.
-
Apply a large amount of cleaning liquid to the cleaning stick.

-
Attach the cleaning stick to the manual cleaning tool.
Push in the cleaning stick as far as it will go.
 After installing the cleaning stick, click Next in Utility.
-
Apply a large amount of cleaning liquid to the cleaning stick.
- Open the front cover.
-
Use the manual cleaning tool retaining screw to secure the manual cleaning tool in the position shown in the figure.

-
Close the front cover.
After closing the front cover, click Next in Utility.Perform automatic cleaning near the print heads.
-
When Automatic cleaning has finished. is displayed in Utility, open the front cover and remove the manual cleaning tool.
- Use the cleaning stick to clean the wiper, scraper, and cap top after cleaning the print heads.
- It is recommended that you store the manual cleaning tool in front of the deodorizer.
IMPORTANT Store the manual cleaning tool fixing screw so that you do not lose it. -
Close the front cover.
Remove the manual cleaning tool. Close the front cover, and then click Next in Utility.The print-head carriage will move to the left.
- Open the front cover.
-
Follow the guidelines below to clean the wiper, scraper, and cap top.
-
Clean the right side and top of the wiper.

-
Clean the scraper.

-
Clean the four sides around the cap top.

-
Use the wide surface of the cleaning stick, and then shift it to a different location, pressing the cleaning stick lightly against the cap top to absorb the dirt there.

After closing the front cover, click Next in Utility. -
Clean the right side and top of the wiper.
- When cleaning finishes, click Close to return to the original screen.
- Set up the nozzle drop-out test paper.
-
Click Cleaning.
-
Click Output under Nozzle Drop-out Test.
Printing of the test pattern starts.

- When printing is complete, open the front cover.
-
Check whether there is dot drop-out or dot displacement in the test pattern.
Missing blocks indicate dot drop-out. Collapsed or inclined blocks indicate dot displacement.
 MEMO
MEMO- If the problem persists, perform manual cleaning again.
- If problems such as dot drop-out and dot displacement persist even after you have performed manual cleaning several times, perform Ink Renewal.
If no dot drop-out or dot displacement occurs, preparations for output are finished. - Click Close to return to the original screen.