The cap top is a protective part that prevents the print heads from drying out.
You will be notified with The time for cap top replacement has arrived. when it is time to replace the cap top, so replace it when you are so notified.
For information about purchasing cap tops, contact your authorized dealer.
WARNING
Be sure to perform operations as specified by the instructions, and never touch any area not specified in the instructions.
Sudden movement of the machine may cause injury.
IMPORTANT
When the warning alarm sounds during cap top replacement
This operation consists of three procedures: replacement, cleaning, and confirmation. To prevent the print heads from drying out, a warning beep sounds about 30 minutes after the start of replacement and about 5 minutes after the start of post-cleaning confirmation. If this beep sounds, perform operations by following the message displayed in the Utility window.
MEMO
Cap top replacement involves the process of removing the ink tube. If the removed tube is exposed to ultraviolet light, the ink may cure inside the tube.
If the area around the cap top is dark, use a light that does not emit UV light (light with a wavelength of 450 nm or shorter).
Click on the Utility home screen to display the message.
Click under The time for cap top replacement has arrived..
The Cap Top Replacement window appears.
Put on protective equipment (gloves and glasses), and then click Next.
The print-head carriage moves to a location where cap top replacement is possible.
Follow the on-screen instructions and perform the procedure below to replace the cap top.
Open the front cover.
Open the front cover, and then click Next.
Push the foundation to which the cap top is attached to the right.
While still pushing the foundation, click Next.
Remove the cap top.
The cap top is fixed in place at the three points shown in the figure. Push the cap top down, and then slide it to the left to dislodge it.
Once the cap top is removed, release the foundation that was holding it.
After removing the cap top, click Next.
Remove the spring inserted in the groove on the bottom of the cap top.
If you cannot remove the spring correctly, twist it slightly. This will make it easier to remove the spring.
After removing the spring from the groove, click Next.
Hold the upper part of the tubes, and then remove the cap top from the tubes.
IMPORTANT
Take care to ensure that the tubes do not fall into the machine.
If the tubes fall into the machine and you cannot remove them, contact your authorized dealer.
After removing the cap top from the tubes, click Next.
Compress the spring.
Remove the spring from the foundation.
Compress the spring with twist ties.
Attach the spring to the foundation.
Attach the new cap top to the tubes.
Hold the cap top with the two protrusions on the cap top facing toward the back.
Insert the sleeve (A) at the end of the tubes into the cap top by pinching the end of the sleeve so as not to push the sleeve deep into the tube.
After inserting the tubes, click Next.
Remove the twist ties that are compressing the spring.
IMPORTANTRelease the spring slowly, ensuring that the force of the spring is not suddenly applied to the cap top.
While holding the cap top, insert the spring into the bottom of the cap top (A) and the groove on the foundation (B).
After inserting the spring, click Next.
Push the foundation to the right.
While still pushing the foundation, click Next.
Attach the cap top to the foundation.
Push the cap top down () with the cap top in a horizontal position and slide it to the right ().
MEMOCorrect Attachment
The cap top is secured in the three positions shown in the figure.
The cap top and foundation are parallel.
After attaching the cap top, click Next.
When the operation is complete, close the front cover.
Click Next.
The print-head carriage returns to the original position, and then head cleaning starts. When head cleaning finishes and two short beeps sound, proceed to the next step.
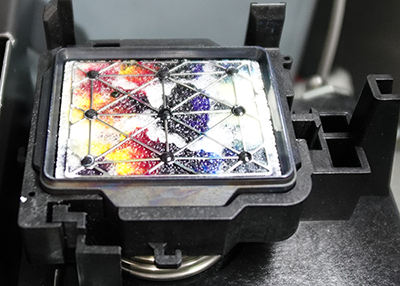
Open the front cover, and then check that there is ink on the cap top.
If there is no ink on the cap top, the tubes may not have been inserted as described in step 5-(7). Remove the cap top again and check the connection.
Close the front cover, and then click Finish.
The print-head carriage returns to the original position, and then head cleaning starts. When head cleaning finishes and two short beeps sound, the work is complete.


 on the Utility home screen to display the message.
 under The time for cap top replacement has arrived..
The Cap Top Replacement window appears.
under The time for cap top replacement has arrived..
The Cap Top Replacement window appears. While still pushing the foundation, click Next.
 After removing the cap top, click Next.
 After removing the spring from the groove, click Next.
 After removing the cap top from the tubes, click Next.
 After inserting the tubes, click Next.
 After inserting the spring, click Next.
 While still pushing the foundation, click Next.
 After attaching the cap top, click Next.