Step 1: Creating Printing Data

Set the printing size, and then create the print data.
MEMO Follow the procedure below to operate FlexiDESIGNER Ver. 22.0.4, build number 4398. Operation methods may vary depending on the version of FlexiDESIGNER.
Procedure
  1. Follow the procedure below to start FlexiDESIGNER.
    1. Start Roland DG Connect Hub.
      • Windows 11
        1. Click Start - All apps.
        2. From the list of apps (programs), click Roland DG Corporation - Roland DG Connect Hub.
      • Windows 10
        1. Click Start.
        2. From the list of apps (programs), click Roland DG Corporation - Roland DG Connect Hub.
    2. Click the machine (BD-8) to use.
    3. Click Open for FlexiDESIGNER.
  2. Follow the procedure below to set the size of the printing data.
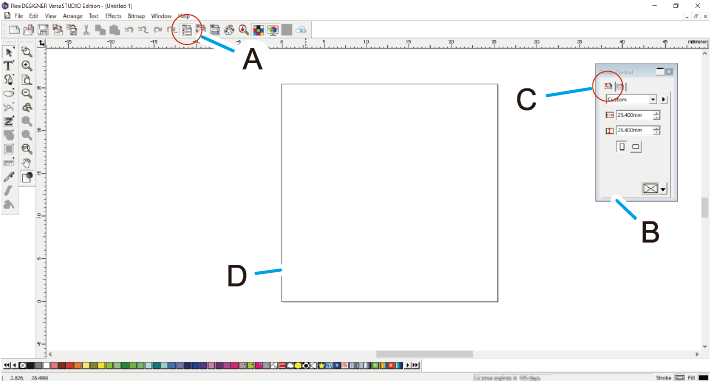
    1. Click the BD-8_Flexi-Icon_DesignCentral icon (A).
      The DesignCentral dialog box (B) opens.
    2. On the BD-8_Flexi-Icon_Documents tab (C), click the pull-down menu [▼], and then select Custom.
    3. Enter the printing size for golf balls.
      IMPORTANT For printing on golf balls, set the Media Type as follows as appropriate for the printing area.
      • General: Printing area up to 18 mm (0.7 in.) in diameter
      • Generic Distance: Printing area from 18 mm to 29 mm (0.71 in. to 1.14 in.) in diameter
      A printing size frame (D) is created in the design area.
    BD-8_Flexi_GolfBall1
  3. Create data for printing.

    In this section, you design the message and the shapes. Specify the fonts and angles of text, the sizes of shapes, and other parameters.
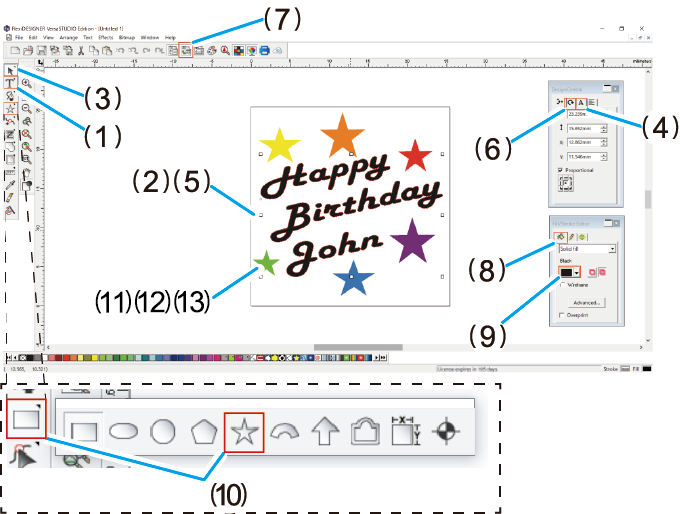
    1. Click BD-8_Flexi-Icon_TextText Tool.
    2. Click a location close to where you want to enter the text, and then enter the text.
    3. Click BD-8_Flexi-Icon_SelectSelect Tool, and select the text entry.
    4. Click the BD-8_Flexi-Icon_DesignCentralText tab in the DesignCentral dialog box, and then adjust the font and size.
    5. Select the text, and then place them in the desired position.
    6. Click the BD-8_Flexi-Icon_Rotation tab to adjust the angle.
    7. Click the BD-8_Flexi-Icon_PaintLineEdit icon.
    8. With the text selected, click the pull-down menu in the BD-8_Flexi-Icon_Paint tab, and then select Silid fill.
    9. Select any color from the pull-down menu.
    10. Hold down BD-8_Flexi-Icon_FigureRectangle Tool, and then select BD-8_Flexi-Icon_Figure-StarStarburst Tool.
    11. Drag near the location where you want to add the shape.
      A star shape will be drawn corresponding to the length of the drag.
    12. With the shape selected, click the pull-down menu in the BD-8_Flexi-Icon_Paint tab, and then select Silid fill.
    13. Select any color from the pull-down menu.
    14. Repeat steps (11) through (13), and then place the shapes.
    BD-8_Flexi_GolfBall
  4. Click File - Save to save the data.