
Correcting the Misalignment of Printing and Cutting
Procedure
-
Tap
 .
.
- Tap .
-
Tap Execute next to Printing Test 1(Misalignment Check).
Printing Test 1 is printed and cut.
-
Check the result of Printing Test 1.
Check whether the printing position (shaded part) and the cutting position (red line) are aligned. An example of the printing position and the cutting position being misaligned is shown in the following figure.
F indicates the feed direction of the media (the feed direction) and S indicates the direction of print head movement (the scan direction).
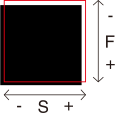
If the printing position and the cutting position are aligned, no corrections are necessary. Proceed to step 10.If the printing position and the cutting position are not aligned, proceed to the next procedure.
-
Tap Execute next to Printing Test 2(Correction Values).
Printing Test 2 is printed and cut.
-
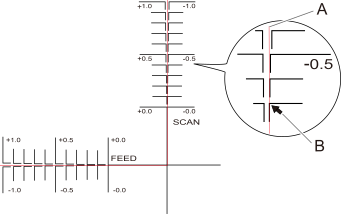
Check the correction values from the Printing Test 2 condition.
The point where the cutting line (A) intersects the correction-value scale (B) is the correction value. In the following figure, the correction value is "−0.3."
Check the media feed direction (the feed direction) and the direction of print head movement (the scan direction).
-
Set the correction values in the feed direction of the media (the feed direction) and the direction of print head movement (the scan direction).
-
Tap
 or
or  next to Correction Value (Feed) to set the correction value in the feed direction of the media (the feed direction).
-
Tap or next to Correction Value (Scan) to set the correction value in the direction of print head movement (the scan direction).
-
Tap
-
Tap Save.
The correction values are saved.
-
Tap Execute next to Printing Test 1(Misalignment Check).
Printing Test 1 is printed and cut. If the printing and cutting lines are aligned, adjustment is complete. If further adjustment is needed, tap or next to Correction Value (Feed) and Correction Value (Scan) to fine-tune the printing and cutting position, and then tap Save.MEMODefault settings
- Correction Value (Feed) (correction value of the media feed direction): 0.00 mm (0.00 in.)
- Correction Value (Scan) (correction value of the print head movement direction): 0.00 mm (0.00 in.)
-
Tap
 .
The home screen appears.
.
The home screen appears.