
Registering New Media
Media settings define the resolution, profile, ink limits, gradation curve values, and other detailed parameters that are used.
- Creating by replicating genuine media and changing the settings: Refer to Customizing Media for details.
- Obtaining existing media: Refer to Using an Existing Media File for details.
- Creating from a template: Refer to the following procedure to create new media.
Step 1: Creating New Media
- Select the printer to use, and then click
 (the hamburger menu).
 - Click Media Explorer.
- Click
 .The Create New Media window appears.
 - Enter the media name in Media Name.
- Select the Template, and then click OK.The media you created is added to the Media Explorer window.MEMO
- Available templates vary by printer. Select the template according to the type of media (such as PVC and banner) to be registered.
- To create new media by using existing media as a template, follow the procedure below.
- Select the media to use as the template, and then click
 .
.The Copy Media window appears.
- Enter the media name, and then click OK.
- Select the media to use as the template, and then click
- You can rename the media later.
- Select the media, and then click
 .
.The Change Media Name window appears.
- Enter the new name for the media, and then click OK.
- Select the media, and then click
Step 2: Preparing to Create a Profile
- Set the measurement instrument.Set it to make it ready to perform the measurement.
- Click
 for the created media to expand the list, and then select the quality, resolution, and ink mode to use.
- Variable dot modes (modes that use dots of varying sizes) have "(v)" next to their name. Modes without "(v)" next to their name are printed using dots of a fixed size.
- Halftone printing mode is available in some of the modes that use fixed dots (the Halftone setting becomes Angled Screen).
MEMO Hide Non-recommended Modes functionIn the initial settings, the checkbox for this function is selected, but clear this checkbox to display all the available modes as necessary.- Double-click the created media. Alternatively, with the media selected, click
 .
.The window changes.
- Click Other Controls under Category.
- Unselect the Hide Non-recommended Modes checkbox.
- Click or double-click the ink mode to use.The window changes.
- Perform Print Quality.As necessary, set the Halftone, Direction, Head Speed, Feed Speed, Overprint, and Optimizer Level. (Also set Frequency, Dot Shape, and Angle under Halftone Options if Angled Screen is selected for the Halftone.)
- Perform Calibration Settings.
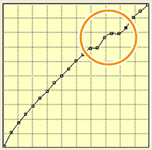
- If the slope of any portion of a density curve is zero or negative as shown in the figure, adjust the curve so that its slope is always positive.
Click the Output that you want to adjust, and then input the value to adjust. Or, change the value from
 .
.
- If the slope of any portion of a density curve is zero or negative as shown in the figure, adjust the curve so that its slope is always positive.
- Set the Total Ink Limit.
- Click Set Ink Limit under Total Ink Limit, and then enter the total ink limit that you determined in the previous step into Total Ink. Or, change the value from .
- Click Set Ink Limit under Total Ink Limit, and then enter the total ink limit that you determined in the previous step into Total Ink. Or, change the value from
- Click OK.The display of the window changes.
- Click OK.A confirmation window appears to confirm that you want to apply the changes.
- Click Yes.The settings of the new media are saved.IMPORTANT Be sure to click Yes. Clicking No closes the window without saving the settings of the new media.
Step 3: Creating a Profile
-
Create an ICC profile.
For information on how to create profiles and on how to operate the profile creation software, refer to the instruction manual of your software.
- Save the created ICC profile to the desired location.
Step 4: Registering a Profile
- Select the printer to use, and then click (the hamburger menu).
- Click Media Explorer.
- Select the new media you added in Step 1: Creating New Media.
- Click to expand the list, and then select the quality, resolution, and ink mode to use.
- Click or double-click the ink mode to use.The window changes.
- Click Select Profile for Profile Settings under Category.
- Click
 , and then select the profile you saved in Step 3: Creating a Profile.
 - Click Open.
- Click OK.The window changes, and the selected profile is applied.
Step 5: Configuring the Default Printer Control Settings
- Double-click the media. Alternatively, with the media selected, click .The window changes.
- Set the Printer Controls.For the items below, apply the settings that are recommended for the media.These settings are applied when you select Use Default Media Settings with Printer Controls in the Queue Properties window or the Settings window. For information on the setting method, refer to Printer Control Settings.
- Feed Calibration Controls
- Feed Calibration
Enter the media feed calibration value that is appropriate for the selected media. To enter this value, the feed calibration value must be measured on the printer. For information on how to measure the feed calibration, refer to the instruction manual of your printer.
- Change Calibration For All Models
Only when there are series models (for example, the SOLJET PRO2V series), you can change the feed calibration value when using the selected media with another series model.
- Feed Calibration
- Other Controls
- Vacuum Power
Sets the intensity of the vacuum that holds the media flat on the platen.
- Dry Time
Sets the time (in minutes) to wait before printing the next page or cutting.
- Head Height
Sets the height of the print head.
- Vacuum Power
- Heater Controls
- Pre Heater
- Print Heater
- Dryer
Set the temperature for each type of heater. Clearing these options will set the default settings to off when printing. The devices that can be set vary depending on the printer.
- Feed Calibration Controls
- As necessary configure the Cut Controls setting.If you want to print and cut or just cut the selected media, click Cut Controls, and then configure the following settings.
- Cut Passes
Enter the number of cutting passes for each cutting line. Increase the value for media that is difficult to cut.
- Speed
Enter the movement speed of the blade (the cutting speed) in cm/s.
- Pressure
Enter the blade force in units of gram-force.
- Offset
Enter the blade offset value (the offset value from the center of the blade to the tip of the blade) in millimeters.
MEMO Deselecting Enable Cutting disables Cut Controls in the Queue Properties window and the Settings window, which makes it impossible to set cutting. - Cut Passes
Step 6: Finalizing the Registration of the New Media
- Click OK.The window changes to Media Explorer.
- Click OK. A confirmation window appears to confirm that you want to apply the changes.
- Click Yes. The changed media settings are saved.IMPORTANT Be sure to click Yes. Clicking No closes the window without saving the changes to the media settings.