Previewing Printing Data
In the job list, double-click a job or right-click a job and click Job Settings to open the Job Settings window.
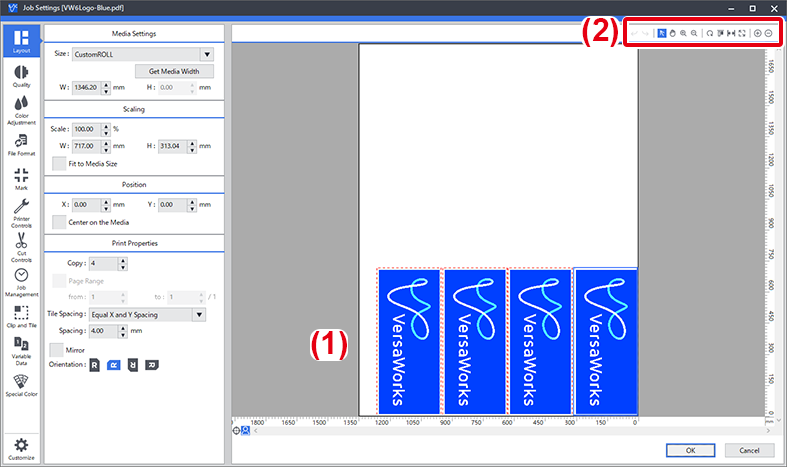
A preview of the job is displayed in the layout area (1) on the right side. You can check the media for items such as the printing position, the placement of multiple jobs, the addition of labels and marks, the output of spot color plates, and cutting lines.
Also, the following tools are displayed at the top of the layout area (2) and can be used to change the preview display.

| Icon | Tool name | Operation |
|---|---|---|
 | Undo Tool | Returns the operation to the previous state. |
 | Redo Tool | Redoes the undone operation. |
 | Selection Tool | Click the preview image in the layout area to highlight the preview image of the selected job with a light blue border. Then, you can drag the selected preview image to a new location in order to set its printing position. |
 | Hand Tool | Drag the mouse pointer to move within the window. |
 | Zoom Tool | Specify the area to enlarge by dragging the mouse pointer. You can also enlarge an area by clicking it in the layout area. |
 | Zoom Tool | After enlarging an area, click in the layout area to zoom out. |
 | Rearrange Tiles | Click this tool after placing a job with the Selection Tool to place the job again with the Layout tab settings. |
 | Align Tiles | Click this tool after changing the placement of a job with the Selection Tool to align the jobs. |
 | Fit to Width | Matches the width of the media to the width of the layout area. |
 | Fit to Page | Changes the width and length of the media so they can be displayed in the layout area. Roll media and vertically long jobs are matched to the width of the layout area. |
 | Zoom-In | Zooms in. |
 | Zoom-Out | Zooms out. |