Saving the Current Settings in Presets
Up to eight types of presets can be saved. You can assign a name to each one. Using media names for these may aid recognition and clarity. Making changes for each menu item every time you change the media can be troublesome. That's why it can be useful to save the menu-item settings optimized for an often-used type of media as a preset. The next time you use the media, you can change the menu-item settings to the optimal values for the media simply by loading the preset you saved.
Procedure
- Press [MENU].
-
Press [▼] to display the screen shown below.
-
Press [▶] once, and then press [▼] twice to display the screen shown below.
-
Press [▶] to display the screen shown below.
-
Decide on the preset number.
- Press [▲] or [▼] to select one option from "NAME1" to "NAME8."
-
Press [ENTER] to confirm your entry.
The current menu settings are saved, and then the screen shown below appears.
-
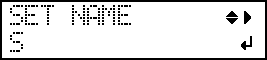
Set the preset name.
- Press [▲] or [▼] to select a character.
-
When you have selected the character you want to enter, press [▶].
The characters you can enter are "A" through "Z," "0" through "9," and the "-" character.
-
Press [▲] or [▼] to select the next character.
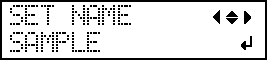
Select the following characters in the same way. You can enter up to 15 characters, including spaces.
- When you have finished, press [ENTER] to confirm your entry.
-
Press [MENU] to go back to the original screen.
The menu items that can be saved in presets are listed below.
Menu item Reference page [PRINT] (print heater), [DRYER] Setting the Print Heater Temperature [PREHEATING] Setting the Temperature during Preheating [FEED FOR DRY] Drying the Trailing Edge of the Printing Area on the Dryer [DRYING TIME] Setting the Drying Time after Printing [MEDIA GAP ADJ. SIMPLE SETTING] Adjusting the Misalignment of the Ink Landing Position [MEDIA GAP ADJ. DETAIL SETTING] Accurately Adjusting the Misalignment of the Ink Landing Position [CALIBRATION] Reducing Horizontal Bands (Feed Correction Function) [SHEET TYPE] [SHEET WIDTH] [SHEET POS.] Using Transparent Media [SIDE MARGIN] Set the margins. [SCAN INTERVAL] Using Hard-to-Dry Media [VACUUM POWER] Using Media That Wrinkles Easily/Does Not Move Smoothly [FULL WIDTH S] Speeding Up Output for Narrow Media [MEDIA RELEASE] Using Sticky Media