


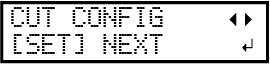
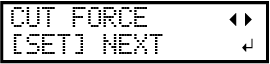
6. Set the blade force.
Procedure
- Press [◀] to select "SET".
- Press [◀] to select "SET".
- Peel off the two cut shapes (a circle and a square).

- Check how the two shapes peel off.
- Two shapes are peeled off together/backing paper is also cutPress [◀] to select "YES".
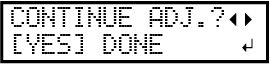
- Two shapes are peeled off separatelyPress [▶] to select "DONE".
- Two shapes are peeled off together/backing paper is also cut
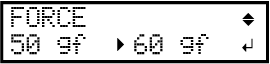
- Press [▲] or [▼] to adjust the blade force.
If the two shapes are peeled off together → increase the blade force.
If the backing paper is also cut → reduce the blade force.
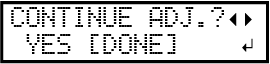
- Check how the two shapes peel off.
- Two shapes are peeled off together/backing paper is also cutPress [◀] to select "YES".
- Two shapes are peeled off separatelyPress [▶] to select "DONE".
- Two shapes are peeled off together/backing paper is also cut