
3. Filling the Machine with Ink
Insert the ink bottle into the ink tank and fill it with ink.
IMPORTANT
- Be sure to use a new ink bottle.
- Never under any circumstances use anything other than the specified type of ink bottle.
-
The ink bottles must be purchased separately. Contact your authorized dealer or visit our website (https://www.rolanddg.com/).
Procedure
- Remove the ink bottle and ink ICs from the ink bottle box.
-
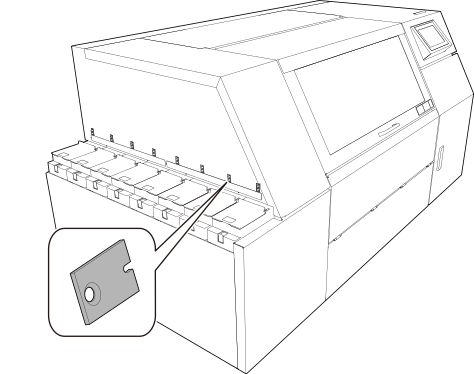
Insert an ink IC into each slot.
-
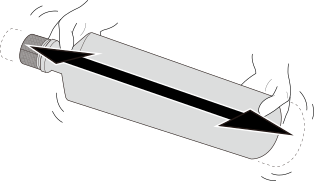
Before inserting the ink bottles, shake all ink bottles 50 times (about 20 seconds).
The precipitation of the ingredients in the ink disables printing in normal color. So that the ink mixes well, turn the ink bottle so it is horizontal and shake it left/right.IMPORTANT
Firmly hold the ink bottle so that you do not drop it. If the ink bottle falls, it may cause damage or printer malfunctions.
-
Open the ink bottle lid.
Do not remove the sealing attached to the ink bottle pouring port. The properties of UV ink cause it to harden when exposed to light. Using hardened ink may cause machine malfunction.
- Open the ink tank lid.
-
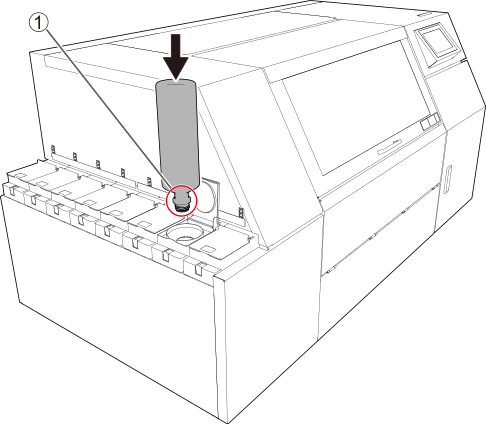
Insert the ink bottle into the ink tank.
Place the ink bottle pouring port () against the projection on the ink tank and press it all the way in. The sealing is broken and ink flows into the ink tank.
IMPORTANT- Ink labels indicating the colors are affixed to the machine. Insert each ink bottle into the slot whose label matches the color of the ink in the bottle. Inserting an ink bottle of the wrong color may cause malfunction. Be careful not to insert the wrong ink bottle. If you insert an incorrect ink bottle by mistake, contact your authorized dealer.
- Do not pull the ink bottle out while it is filling the tank with ink. Several minutes will be required until all ink in the ink bottle has flowed into the ink tank. If the ink bottle is pulled out before filling is completed, ink will spill. Therefore wait without touching the ink bottle until the panel display changes.
-
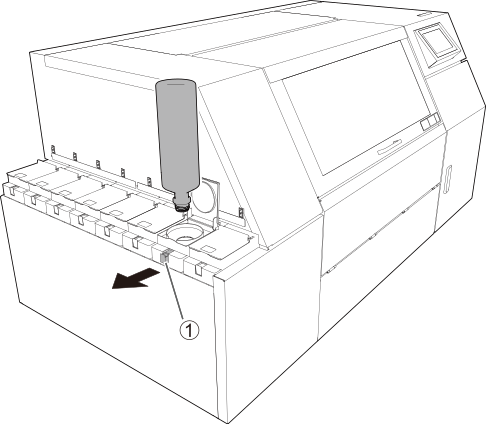
After all the ink in the bottle flows into the ink tank, remove the ink bottle while keeping the lock () released.
-
Immediately turn the ink bottle so the pouring port faces up.
If ink remaining in the bottle drips out, wipe it away immediately.
- Close the ink tank lid.
- After pouring ink into all the ink tanks, tap OK.