
Creating Data for Additive Printing
Import an STL file to create the data for additive printing with the 3D printer.
Slice the shape into layers with the pitch spacing, and then create images by filling in the contour line of each layer.
Procedure
-
Start [Agile3ds.exe] (
 ).
The main screen is displayed.
).
The main screen is displayed. - Click file.
-
Click Import the mold (
 ) to import the STL format 3D data.
-
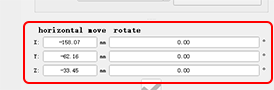
If necessary, change the orientation and output position of the 3D data.
Click the 3D data to select it, and then enter the rotation angles and position.
IMPORTANT The more layers there are, the longer printing takes, so you can shorten the printing time by setting the lateral direction of the shape to the height direction of the printer. However, do not just think about shortening the printing time. Also take into consideration factors such as quality and yield improvement. For example, it may be easier to remove a given shape from the molding pool in a certain direction, and it may be beneficial to have a certain surface placed at the upper side of the Z axis, where the printing accuracy tends to be improved. -
If you are placing multiple jobs, perform steps 2 and 3.
When placing multiple instances of the same shape, copy it and set each shape's orientation and position.
- Click slice.
-
Click Generate a slice file (
 ).
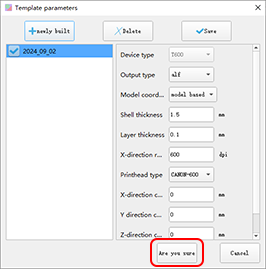
The Template parameters window is displayed.
).
The Template parameters window is displayed. -
Click Are you sure without changing the parameters.
Each parameter is adjusted to a value that suits the model being used. Do not change the parameter values.
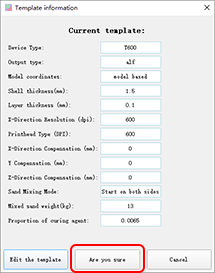
The Template information window is displayed.
-
Click Are you sure.
-
Specify where to save the slice data and the file name, and then click Save.
The progress of the work is displayed on the layer progress window.
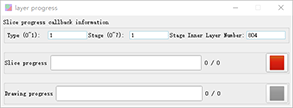
When the creation and saving of all the slice data finishes, this window closes automatically.
-
To check the details of the created slice data, perform the following operations.
-
Click Import a slice file (
 ).
).
-
Click
 or
or  to display the slice image of each layer.
To display the image of a specific layer number (such as layer 100 or 200), enter the number in the Jump field, and then click Jump to layer.
to display the slice image of each layer.
To display the image of a specific layer number (such as layer 100 or 200), enter the number in the Jump field, and then click Jump to layer.
-
Click Import a slice file (