
Performing Printing
Print data is created and then output to the machine using VersaWorks.
If you are using white ink
When printing for the first time for the day, remove just the white ink cartridge, shake it 50 times (about 20 seconds), and then reinsert the cartridge. So that the ink mixes well, shake the ink cartridge horizontally with a stroke length of around 5 cm (1.97 in.) from each end of the ink cartridge.
The ingredients in white ink tend to settle. Each day, before starting the day's operations, be sure to shake this cartridge. Allowing the ink to stand can cause the settled material to harden, resulting in malfunctions or other problems.
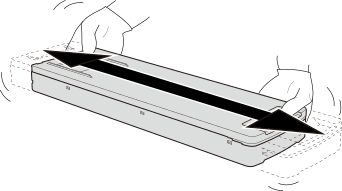
- Before shaking the ink cartridge, wipe off any ink from around its mouth. If you do not wipe off the ink, it may splatter when you shake the ink cartridge.
- When shaking the ink cartridge, firmly hold it with both hands to prevent the ink cartridge cover from coming loose. The cover and ink pouch coming loose and falling may lead to damage or printer failure.
- When you have finished mixing the ink, reattach the ink cartridge immediately. Taking time to reattach the ink cartridge will adversely affect the ink path.
- Even if you are not using the printer, shake the white ink cartridge 50 times (about 20 seconds) once a week.
- Start VersaWorks.
-
Click the printer to use.
Check that:
- The printer to use is connected.
- The machine's status is “[Ready to Print].
-
Click the Gear Icon of
the folder where you want to enter the print data.
The Queue Properties window appears.
-
Click Get Media
Width.
Obtain and then set the printing area set in "Determining the Print Surface Height and Printing Position" from the printer. For other VersaWorks settings, see the VersaWorks manual.
- Click OK.
- When a setting change confirmation window appears, click OK.
-
Enter the print data in the queue folder for which the size
was obtained in Step 4.
Drag the print data to the job list in the target queue folder.
-
Double-click the entered print data.
The job settings window is displayed.
Use this window to fit the print data in the printing area and adjust its position.
The white part in the layout area is the loaded printing area. Print data that does not fit within this area will be split.MEMO If Base Printing Position is set to Center, select Center on the Media under Printing Position in VersaWorks. - For Media Type on the Quality tab, select Rotary.
-
On the Printer
Controls tab, set Nozzle Amount to
Use in Printing for Rotary
Controls.
- Once setup is complete, click OK.
-
Click the Print
icon.
The Advanced Print Settings window appears.
Set Print Count, and then click Print to start printing.
The operation panel will change to the display indicating that printing is in progress.
MEMOIf the expected printing quality cannot be obtained or ink mist is a concern, adjust Nozzle Amount to Use in Printing.
Reducing Nozzle Amount to Use in Printing increases the printing quality but also increases the printing time. Increasing Nozzle Amount to Use in Printing reduces the printing time but affects the printing quality due to issues such as the generation of mist because the printed surface is far away. Consider the printing quality and the printing time while making adjustments.