
Batch Settings for Printing
Malzeme boyutuna ve tipine göre en iyi çıkışı garanti etmek için bu makinede çeşitli ayarları yapılandırabilirsiniz. Ancak, bu ayarları teker teker yapılandırmak çok zordur. Minimum gerekli ögeyi bir yığın olarak yapılandırmak için "MALZEME AYARI"menüsünü kullanabilirsiniz. Ayar ayrıntılarını ön ayar olarak kaydedebilirsiniz.
Burada ayarlanan tüm öğeleri bireysel olarak da ayarlayabileceğinizi unutmayın.
1. Start the "MALZEME AYARI" menu.
-
Set up the media.
Setup of Media
Check that the media is not sagging. If any sagging exists, settings such as the correction values will not function effectively.
- Press [MENÜ].
-
Press [ENTER].

If you want to cancel the batch settings before they are completed, see the following page.
2. Baskı ısıtıcısını ve kurutucu sıcaklıklarını ayarlayın.
-
Sıcaklık değerini onaylamak için[▲]ya da[▼]basın"BASKI ISITICISI".
Önerilen sıcaklık: 40°C (104°F)

- Girilen değeri onaylamak için[ENTER]tuşuna basın.
-
Sıcaklık değerini ayarlamak için[▲]ya da[▼]basın"KURUTUCULAR".
Önerilen sıcaklık: 50°C (122°F)

- Girilen değeri onaylamak için[ENTER]tuşuna basın.
3. Adjust the print head height.
- Press [◀] to select "DEĞİŞTİR".

- Girilen değeri onaylamak için[ENTER]tuşuna basın.You can select "DEVAM" and press [ENTER] to skip the current menu and proceed to the next menu.
- When the following screen is displayed, open the front cover.

-
Move the height-adjustment lever to adjust the head height.
When you change the position of the height-adjustment lever, the display screen changes and the buzzer sounds at the same time.

Position Description "DÜŞÜK" Normally set the height-adjustment lever to "DÜŞÜK". "ORTA" For media that is wrinkled or comes loose from the platen during printing, set the height-adjustment lever to "ORTA". "YÜKSEK" For media that is wrinkled or comes loose from the platen during printing even when the height-adjustment lever is set to "ORTA", set the lever to "YÜKSEK". NOT The printing quality degrades as the distance between the media and the print heads increases. Do not move the height-adjustment lever to "YÜKSEK" needlessly. - Press "ENTER".
- Ön kapağı kapatın.
4. Besleme yönünün konum ayarını yapın (yatay şeritleri azaltın).
- Seçmek için[◀]basın"AYARLA".

-
Girilen değeri onaylamak için[ENTER]tuşuna basın.
Test deseninin yazdırılması başlar.
Seçim yapın:"DEVAM"ve geçerli menüyü atlamak için[ENTER]düğmesine basın ve sonraki menüye geçin.
-
Girilen değeri onaylamak için[ENTER].

-
Basılan test desenini görüntüleyin ve ardından düzeltme değerini belirleyin.
Mevcut düzeltme değeri (), "
 " ile gösterilen şeklin değeridir. Boşluğu oluşturmak () ve üst üste bindirmek için () en küçük üst/alt kareler () silmemeye dikkat edin. Aşağıdaki şekil söz konusu olduğunda "-0,40"ı seçin. İki ardışık sayı arasında seçim yapamıyorsanız, bunların arasındaki bir değer belirleyin.
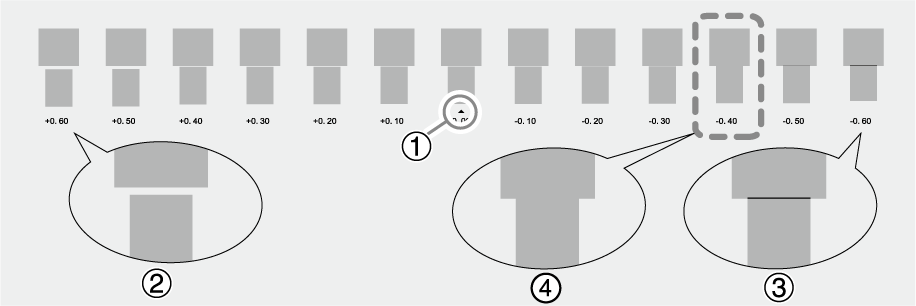
-
Düzeltme değerini seçmek için[▲]ya da[▼]tuşuna basın.

- Girilen değeri onaylamak için[ENTER]tuşuna basın.
- Seçmek için[◀]basın"AYARLA".

- Girilen değeri onaylamak için[ENTER]tuşuna basın.Test örneği tekrar yazdırılır. Boşluğun ve üst üste binmenin "" ile gösterilen (yani geçerli düzeltme değeri) şekil için en küçük olup olmadığını kontrol edin. Boşluk ve üst üste binme başka bir şekil için daha küçükse, ayarı tekrar yapmak için 5. adıma geri dönün.
Düzeltme değerini değiştirmeniz gerekmiyorsa, şuna[ENTER]tekrar basın.
- Seçmek için[▶]basın"BİTTİ".

- Girilen değeri onaylamak için[ENTER]tuşuna basın.
5. Adjust the misalignment of the ink landing position.
- Press [◀] to select "AYARLA".

-
Girilen değeri onaylamak için[ENTER]tuşuna basın.
Test deseninin yazdırılması başlar.
Seçim yapın:"DEVAM"ve geçerli menüyü atlamak için[ENTER]düğmesine basın ve sonraki menüye geçin.
-
View the printed test pattern, and then determine the correction values from "MALZEME BOŞLUĞU AYARL. No.1" to "MALZEME ARA ADJ. NO. 2".
Select the value that gives the least misalignment between the two lines. In the case of the following figure, select "+5" for "H1" and "+4" for "H2". When you cannot choose between two sequential numbers, select a value that is between them (you can set correction values in units of "0.5"). When you cannot choose between two sequential numbers, select a value that is between them (you can set correction values in units of "0.5").

-
Girilen değeri onaylamak için[ENTER].
-
Set the "MALZEME BOŞLUĞU AYARL. No.1" correction values.
-
Press [▲] or [▼] to select the correction value.

-
When you have finished setting the correction values, press [ENTER].
The following screen appears.

-
Press [▲] or [▼] to select the correction value.
- Set the "MALZEME ARA ADJ. NO. 2" correction values in the same manner as step 5.
-
When the following screen appears, press [ENTER] to confirm your entry.
-
Girilen değeri onaylamak için[ENTER]tuşuna basın.
The test pattern is printed again. Check that the misalignment is the smallest for the figure indicated by "" (that is, the current correction value). If the misalignment is smaller for another figure, return to step 5. to perform the setting again.
If you do not need to change the correction value, press [ENTER] again.
-
Press [▶] to select "BİTTİ".
- Girilen değeri onaylamak için[ENTER]tuşuna basın.
6. Yazdırma sonrasındaki kurutma yöntemini ve süresini ayarlayın.
-
Girilen değeri onaylamak için[▲]ya da[▼]basın"ETKİNLEŞTİR"ya da"DEVRE DIŞI BIRAK".
1. sayfa yazdırıldıktan sonra yazdırma alanının arka kenarı kurutucuya yerleştirilene kadar malzemenrin beslenip beslenmeyeceğini belirleyin. Yazdırma alanın tamamının kuru olduğundan emin olmak için"ETKİNLEŞTİR". Eğer"DEVRE DIŞI BIRAK"seçilirse, sonraki bir yazdırma işlemine devam etmediğiniz sürece yazdırma alanının arka kenarı kurutucuya verilmez.

- Girilen değeri onaylamak için[ENTER]tuşuna basın.
-
Girilen değeri onaylamak için[▲]ya da[▼]tuşuna basın.
1. sayfa yazdırıldıktan sonraki kurutma süresini ayarlayın. Ayarlanan süre geçene kadar bir sonraki işlem başlatılmaz.

NOT-
Yazılım RIP'sinde kurutma süresi ayarlandığında, yazılımın RIP'sinin ayarına öncelik verilir.
-
Süre ayarlama örneği (genel kılavuz)
Ayarlanacak süresi, malzeme tipi ve baskı kalitesi gibi ayarlara göre değişir.- Kaplamasız vinil klorür malzeme durumu
- Ayarlanan süre: Yaklaşık üç dakika
-
- Girilen değeri onaylamak için[ENTER]tuşuna basın.
7. Save the settings as a preset.
-
Press [◀] to select "KAYDET".

-
Press [ENTER] to confirm your entry.
If you select "DEVAM" and press [ENTER], the screen in step 6 is displayed and the settings you have selected up to this point are not saved as a preset. However, they will remain as the current setting values for the machine.
-
Press [▲] or [▼] to select a destination to save the preset.
You can select a name from "NAME1" to "NAME20".

- Press [ENTER] to confirm your entry.
-
Set the name.
-
Set the following characters in the same way.
You can enter up to 15 characters.

-
Set the following characters in the same way.
-
Press [ENTER] to confirm your entry.

-
Press [MENÜ] twice to go back to the original screen.
This completes the operation of the "MALZEME AYARI" menu.
8. Tamamlanmadan önce"MALZEME AYARI"yığın ayarlarını iptal edin.
- Girilen değeri onaylamak için[MENÜ]tuşuna basın.
-
Girilen değeri onaylamak için[◀]basın"EVET".

-
Girilen değeri onaylamak için[ENTER]tuşuna basın.
Aşağıda gösterilen ekran tekrar görünür.
2. adımda"HAYIR"öğesini seçerseniz,[MENÜ].
NOTMalzeme ayarlarını tamamlanmadan önce iptal etseniz bile, o ana kadar ayarlanan değerler kaydedilir.