
Changing the Network Settings
This section explains how to configure the settings when using the machine with a fixed IP address.
1. Determine the network addresses.
The settings listed here are only an example. The procedure and settings given in this manual do not match every environment. In an environment where the computer being used is connected to multiple network devices and the Internet, inappropriate settings will have a large effect on the entire network. For detailed information about the settings, consult your network administrator.
Determine the IP addresses, subnet mask, and default gateway to connect the computer and this machine to a network.
-
Determine the IP addresses.
- Computer: 192.168.0.XXX
- Device: 192.168.0.YYY
"XXX" and "YYY" represent numbers from 1 to 254. Ensure that they are different from the numbers of other network equipment.
-
Determine the subnet mask.
- Computer: 255.255.255.0
- Device: 255.255.255.0
Use the same number for the computer and this machine.
-
Determine the default gateway.
- Computer: 192.168.0.AAA
- Device: 192.168.0.AAA
"AAA" represents numbers from 1 to 254. It may not be necessary to set this number, so check with your network administrator.
2. Change the IP address.
-
Click
 .
.
- Click System Information.
- Clear the Obtain IP Address Automatically check box under Network.
-
Enter the machine network addresses determined under 1. Determine the network addresses..
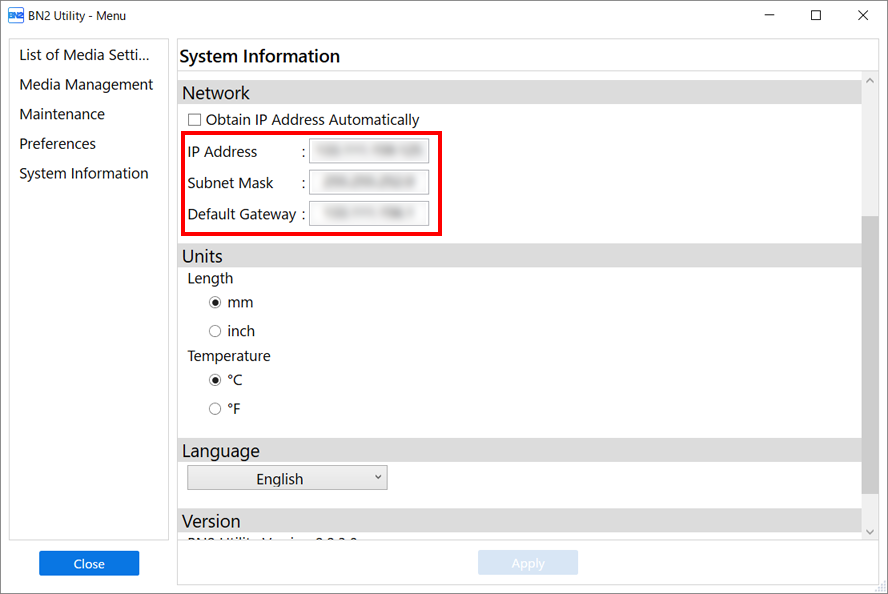
- Click Apply.
- Click Close to return to the original screen.
- Start Roland DG Connect Hub.
- Click +, and then enter the IP address determined under 1. Determine the network addresses. in the address field.
- Click Verify, and then click Apply.
-
Click OK.
IMPORTANTIf it is not possible to connect the computer and the machine during reinstallation (such as when relocating a machine with a fixed IP address), press the reset button to switch to automatic IP address acquisition.
- Switch off the sub power.
- Use a paper clip or something similar to hold down the reset button () for 5 seconds or longer.
You will hear a short beep when you press the reset button. If you hold down this button for at least 5 seconds from this point, you will hear two short beeps and the machine will reset.

3. A: Setting the Computer's Network (Windows)
- Log on to Windows as the Administrator or a member of the Administrators group.
- Display the network connections screen.
- Windows 11 (version: 24H2)
- Click .
- Click .
- Click Network and Sharing Center.
- Click Ethernet or Wi-Fi.
- Windows 11 (version: 24H2)
- Click Properties.
If a User Account Control window appears, click Continue.
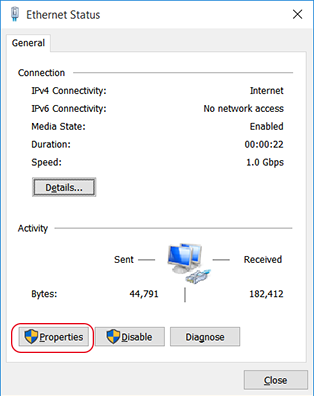
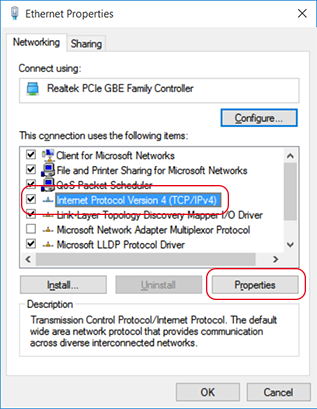
The Ethernet Properties or Wi-Fi Properties window appears.
- Select Internet Protocol Version 4 (TCP/IPv4), and then click Properties.
If the Internet Protocol check box is clear, select it.
- Select Use the following IP address and enter the computer network address that was determined in 1. Determine the network addresses..

- Click OK.
- Close all the windows opened for the network settings.
3. B: Setting the Computer's Network (Mac)
- Log on to the Mac as the "Administrator."
- From the Apple menu, click System Settings....
- Click or the network name (when using Ethernet).
- Click Details....
- Click TCP/IP.
- Select Manually for Configure IPv4.
- Enter the computer network address that was determined in 1. Determine the network addresses..Enter the default gateway in Router.
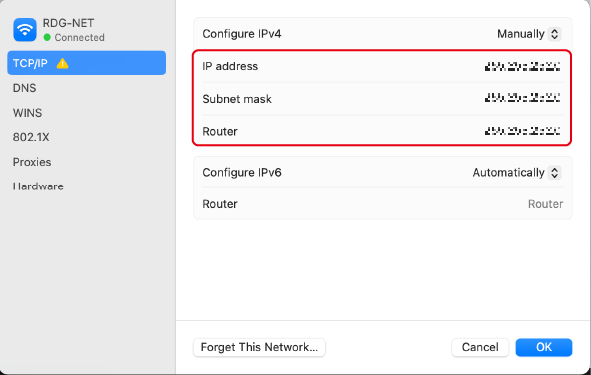
- Click OK.
4. Configuring VersaWorks Settings
- Open Roland DG Connect Hub.
- Select the machine to be connected.
- Click the VersaWorks icon
 , and then click Open.
 - Set the printer to connect.VersaWorks will automatically search for and register the connectable printers. However, if the search finds zero printers, you will have to register printers manually. If the search finds five or more printers, select the printer to register.
- When the detected number of printers is one to four
- Check the list of detected printers and click OK to register all of them.
If there is a printer you do not want to register, click SKIP. Register printers manually, referring to the situation in which no printers are detected.
- Check the list of detected printers and click OK to register all of them.
- When five or more printers are detected
- Select the printer to register, and then click Register.
The printer details window appears.
- Click OK.
- Repeat Steps (1) and (2) to register the printer.
- Select the printer to register, and then click Register.
- When no printers are detectedMEMO If the printer is not displayed, check the LAN cable connection status.
- Click Manual Registration.
- Enter the IP address and click Verify.
Items such as the Model Name and Ink Type are displayed.
- If there are no problems, click Register.

The VersaWorks home screen shows the registered printers.
- When the detected number of printers is one to four