
Cleaning Liquid Pouch Replacement
Never store ink, cleaning liquid, or discharged fluid in any of the following locations.
- Any location where high temperature may occur
- Near bleach or any other such oxidizing agent or explosive material
- Any location within the reach of children
Accidental ingestion by children may pose a health hazard.
- Be sure to use a new cleaning liquid pouch.
- Never, under any circumstances, use anything other than the specified type of cleaning liquid.
-
Cleaning liquid pouches and cleaning cartridges are consumable items. To purchase consumable items, contact your authorized Roland DG Corporation dealer or visit our website (https://www.rolanddg.co.jp/).
-
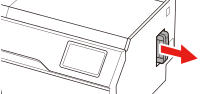
Pull the cleaning cartridge out of the cleaning liquid slot on the side of the printer.
-
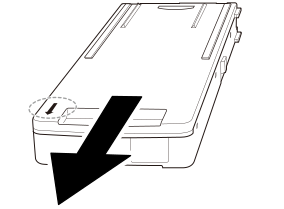
Remove the cover of the cleaning cartridge.
- Keep the side with the arrow mark face up.
- Remove the cover by sliding it in the direction indicated by the arrow.
-
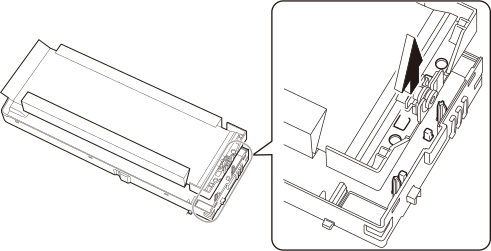
Remove the used cleaning liquid pouch from the cartridge case.
-
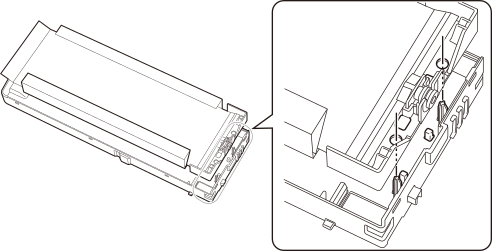
Set the cleaning liquid pouch into the cartridge case.
MEMO
To set the pouch in the correct position, pass the protrusions on the cartridge case through the holes in the pouch.
-
Attach the cover to the cartridge case.
- Insert the protrusions (A) at the back of the cover into the holes in the cartridge case.
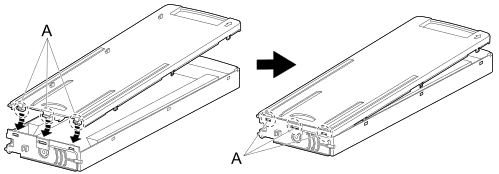
- Push the cover to fit its hooks into the holes in the cartridge case.There are hooks in six locations. Check that all the hooks are seated in the holes and that the cover does not come loose from the cartridge case.
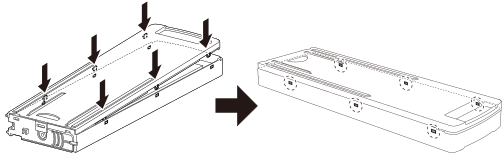
- Insert the protrusions (A) at the back of the cover into the holes in the cartridge case.
-
Set the cleaning cartridge in the cleaning liquid slot.
Insert the ink cartridge as far as it will go. If the inserted cleaning liquid is not recognized and does not show up on the operation panel, remove it and insert it again.
-
Tap Yes when the cleaning liquid pouch replacement confirmation screen appears.
If you tap Yes to reset the amount of cleaning liquid remaining, the cleaning liquid pouch will be identified as a new product.
MEMOIf you tap Yes on the cleaning liquid pouch replacement confirmation screen even though you have not replaced the cleaning liquid pouch, the amount of cleaning liquid remaining is reset. In this situation, no notification will appear even if the amount of cleaning liquid remaining is very small, and the message Replace the cleaning liquid pouch. will appear when the cleaning liquid runs out. To ensure you have enough time to prepare the replacement cleaning liquid, tap No if you have not replaced the cleaning liquid.