
LG-640 再利用コンテンツ - steps
- Load the media.
- Close the front cover.
-
Tap
 .
.
- Tap .
- Select Detailed Correction (Manual) and tap Next.
-
Tap Execute next to Printing Test.
Printing of the test pattern starts.
-
View the printed test pattern, and then enter the No. 1: H1 to H4 and No. 2: H1 to H4 correction values.
Select the value that gives the least misalignment between the two lines. In the case of the following figure, select "+5" for H1 and H3 and "+4" for H2 and H4. When you cannot choose between two sequential numbers, select a value that is between them (you can set correction values in units of "0.5").

-
Tap Save.
The entered correction values are saved.
-
Tap Execute next to Printing Test.
The test pattern is printed again.
-
Check the test pattern to see whether the correction was successful.
For all the correction values, check that the misalignment is minimized for the two vertical lines indicated by "
 " (that is, the current correction value). If the misalignment is smaller for another set of vertical lines, set the correction value again.
 -
When you have successfully performed the correction, tap
 to go back to the original screen.
-
Tap to display the home screen.
-
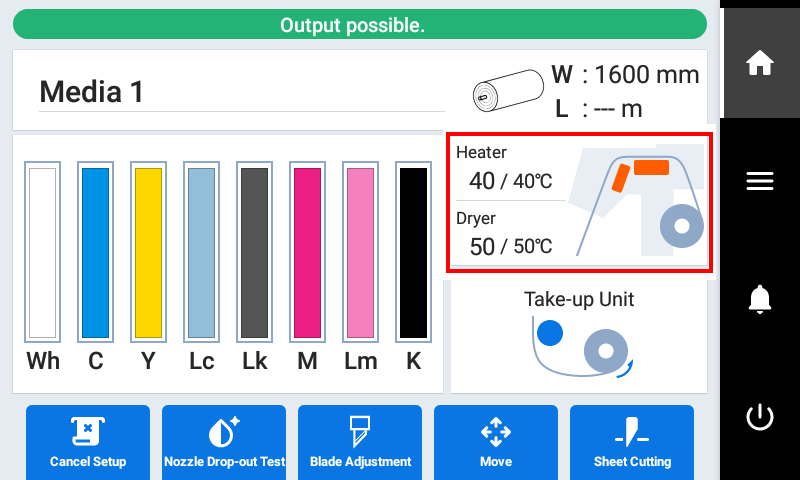
Tap the following part.
-
Check that Front Heater is off.
If Front Heater is on, tap
 to turn it off
  .
.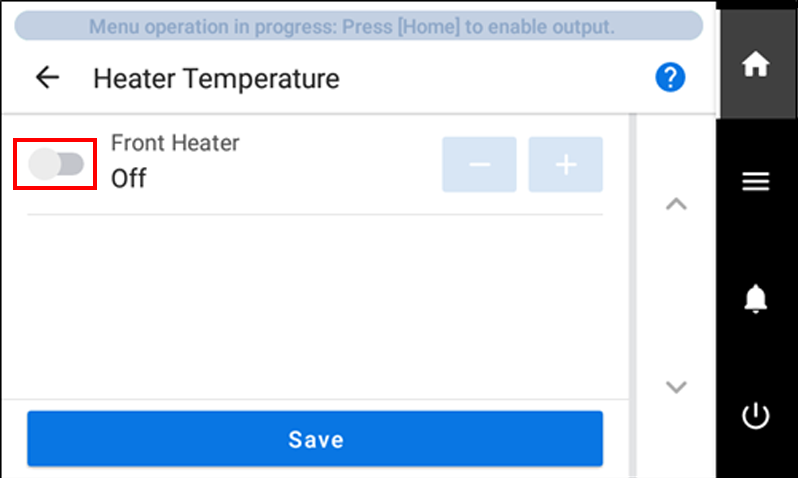
- Tap Save to confirm your entry.
-
Tap to go back to the original screen.
-
Tap .
- Tap .
- Select Enable.
- Tap Save to confirm your entry.
-
Tap to go back to the original screen.
- Load the media.
-
Tap .
- Tap .
- Select Simple Correction (Auto) and tap Next.
-
Tap Execute.
The test pattern is printed and the media gap is adjusted automatically.
- Tap OK when the completion screen appears.
-
Perform the operations shown below according to the Result.
- If Successful is displayed on the operation panel, tap to go back to the original screen.
- If Failed is displayed on the operation panel, manually adjust the media gap.
- If Successful is displayed on the operation panel, tap
- Set up the media.
-
Tap
 .
.
- Tap Change next to Output Start Location.
-
Tap
 ,
,  ,
,  , or
, or  to move the cutting carriage to the location where you want to carry out the cutting test.
You can freely set the location for the cutting test.
to move the cutting carriage to the location where you want to carry out the cutting test.
You can freely set the location for the cutting test. -
Tap Set Base Point Here.
You are returned to the Blade Adjustment screen.
-
Tap Execute next to Cutting Test.
The test pattern is cut.
-
Check the results of the cutting test.

Check item Result Setting item Adjustment Check the shape. The cut shape is distorted. Cutting Speed Reduce Peel off the circle. The square also peels off. Blade Force Increase Some uncut areas remain. Cutting Speed Reduce Peel off the square. The blade leaves faint traces on the backing paper. Blade Force No change The blade trace is indistinct. Increase The blade trace is too deep and cuts into the backing paper. Reduce Check the shape of the square you have peeled off. 
The corners are not rounded and do not have "horns." Blade Offset No change 
The corners are rounded. Increase 
The corners have "horns." Reduce -
Tap
 or
or  to change the settings.
Cutting condition Setting details Default settings Blade Force Set the force (pressure) of the blade. 50 gf Cutting Speed Set the speed of cutting. 30 cm/s Blade Offset Set the blade offset. Enter the listed offset value for the blade.
The offset value for the included blade is 0.250 mm (9.8 mil).
0.250 mm (0.010 in.) Rise Movement Speed Set the blade's up speed during cutting (the speed at which the blade travels when it moves to the next cutting line after cutting one cutting line). If the media comes loose during no-load feed and the blade damages the surface of the media, reduce the speed. 30 cm/s - Press Save to confirm your entry.
-
Repeatedly perform the cutting test and adjust the cutting conditions until the settings are optimized.
Repeat steps 7 to 10 to adjust the cutting conditions.
-
Tap to go back to the original screen.
- Close the front cover.
- Make sure Output possible. is displayed at the top of the operation panel.
-
Send the output data from the computer.
For information on how to create the output data, refer to the documentation for the software RIP.MEMO
When you send the output data, Ink circulation in progress. or Normal cleaning in progress. may be displayed on the screen. These indicate the preparation operations performed before output. Output will begin after the time displayed on the screen elapses.
- If Heater warm up in progress. Please wait. is displayed, wait until the set temperature is reached.
- The data being output can be viewed as an image. Tap
 shown in the following figure to switch to the remaining ink screen. Tap this icon again to return to the screen for checking the data being output. However, this functionality is limited to software RIPs that support the display of the output data image (thumbnail).
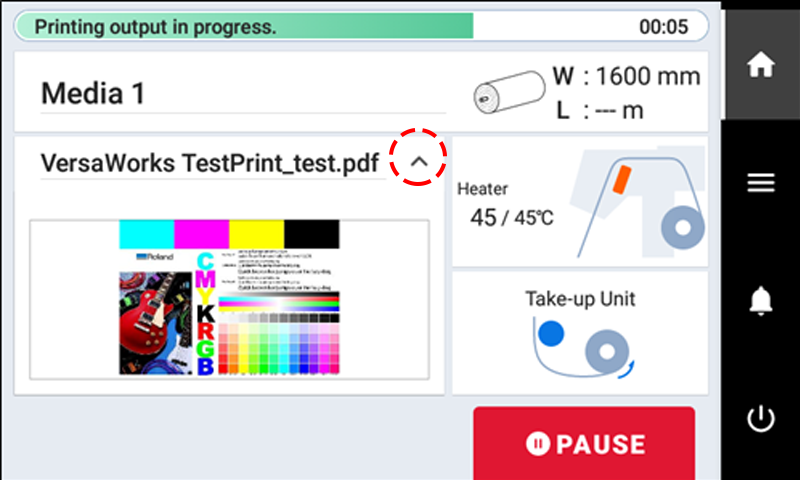
IMPORTANTOutput Is Not Possible in These Situations
The machine does not run when a cover (front, left, right, or the rear UV shield) is open.
Data from the computer is not accepted when Load media. is displayed.
Output does not start while Heater warm up in progress. Please wait. is displayed.
- On menu screens where Menu operation in progress: Press [Home] to enable output. is displayed, output doesn't start even when data is sent from the computer. When you return to a menu item where output is possible or tap to return to the home screen, output starts.
Points that must be observed
Do not open a cover (front, left, right, or the rear UV shield) while output is in progress. Doing so interrupts printing.
When you are performing printing, clamp the edges of the media with the media clamps. Otherwise, the edges of the media may warp and catch on the print heads.
During output, do not touch the media. Doing so may obstruct the media feed or cause the media to rub against the print heads, which may result in a paper jam or damage to the heads.
Keep the loading lever raised when the machine is not in use.
When not using the machine, remove any media and store it in a suitable environment.
- If the machine is left with the media loaded, the media may be damaged, which may adversely affect printing. When not using the machine, remove any media and store it in a suitable environment.
- Close the front cover.
-
Tap to display the home screen.
- Make sure Output possible. is displayed at the top of the operation panel.
-
Send the output data from the computer.
For information on how to create the output data, refer to the documentation for the software RIP.IMPORTANT
Output Is Not Possible in These Situations
The machine does not run when a cover (front, left, right, or the rear UV shield) is open.
Data from the computer is not accepted when Load media. is displayed.
- On menu screens where Menu operation in progress: Press [Home] to enable output. is displayed, output doesn't start even when data is sent from the computer. When you return to a menu item where output is possible or tap to return to the home screen, output starts.
Points that must be observed
Do not open a cover (front, left, right, or the rear UV shield) while output is in progress. Doing so interrupts printing.
-
When you are performing printing, clamp the edges of the media with the media clamps. Otherwise, the edges of the media may warp and catch on the print heads.
During output, do not touch the media. Doing so may obstruct the media feed or cause the media to rub against the print heads, which may result in a paper jam or damage to the heads.
Keep the loading lever raised when the machine is not in use.
When not using the machine, remove any media and store it in a suitable environment.
- If the machine is left with the media loaded, the media may be damaged, which may adversely affect printing. When not using the machine, remove any media and store it in a suitable environment.