1 Prepare for powerful cleaning.
-
Press ▼ several times to display the screen shown below.

-
Press ▶ to display the screen shown below.
-
Check for the group with dot drop-out or dot displacement by viewing the results of the printing test.
Missing blocks indicate dot drop-out. Collapsed or inclined blocks indicate dot displacement.
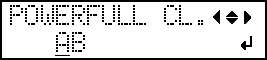
The space from "A" to "B" is group A. The space from "B" to the right side is group B.
The following figure shows the "TEST PRINT 2" test pattern.
MEMO:If the printing-test results are difficult to interpret
Examine the results from different angles in a well-lit location. It is visible using the reflection of the light.
-
Select the group of print heads to clean.
-
Press ◀ or ▶ to select the group of print heads that is not to be cleaned.
-
Press ▲ or ▼ to get rid of the group display.

-
Press ◀ or ▶ to select the group of print heads that is not to be cleaned.
-
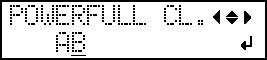
Press ENTER.
The screen shown below appears.
MEMO:You can press ◀ on this screen to cancel powerful cleaning.
Powerful cleaning consumes a lot of ink and overly frequent use will damage the print heads. Perform this cleaning only when it is required. If you display this menu by mistake, cancel the operation.
-
Open the panel cover.

-
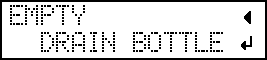
Remove the drain bottle and discard the discharged fluid.

 : Upper limit. Discard the discharged fluid before this line is passed.IMPORTANT:
When you remove the drain bottle, a few drops of discharged fluid may come out of the machine. Exercise caution to prevent this fluid from soiling your hands.
-
Close the panel cover.
